12
EN
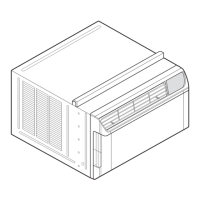
Cabinet Installation
Inside SillInside Sill
Center HoleCenter Hole
Outside SillOutside Sill
1
Open the window. Mark a line on the center of
the inside sill and extending across the center
of the outside sill.
Loosely attach each sill bracket to a support
bracket using a carriage bolt and a lock nut.
Sill BracketSill Bracket
Support BracketSupport Bracket
Lock NutLock Nut
Carriage Carriage
BoltBolt
2
Carefully place the cabinet in the window and
align the center hole on the cabinet bottom
front with the center line marked on the
window sills. Pull the bottom window sash
down behind the upper guide until they meet.
Align the support brackets with the cabinet
track holes and mark the sill along the sides of
each sill bracket.
Remove the cabinet from the window and
attach each sill bracket on the outside sill
between the marks using 2 type B screws.
Cabinet Track HolesCabinet Track Holes
Center HoleCenter Hole
Sill Sill
BracketBracket
Screws (Type B)Screws (Type B)
3
Carefully place the cabinet back in the window
and align the cabinet track holes with the
support brackets. Attach each support bracket
to the cabinet through a cabinet track hole,
using a type D screw and a lock nut. Use the
first track hole past the sill bracket on the outer
edge of the window sill. Tighten the lock nuts
on the support brackets to secure them to the
sill brackets.
Install the cabinet with a slight tilt (about 1/2”)
downward to the outside sill.
Lock Lock
NutNut
Support BracketSupport Bracket
about 1/2”about 1/2”
Screw (Type D)Screw (Type D)
CabinetCabinet
CAUTION
• Do not drill a hole in the bottom pan.
The product is designed to operate with
approximately 1/2” of water in the bottom pan.
There is no need to add water if the pan is dry.
4
Mount the cabinet to the window sill using 3
type B screws in the holes on the front angle.
Sash TrackSash Track
Front AngleFront Angle
Screws (Type B)Screws (Type B)
 Loading...