24
TOOLS AND HARDWARE REQUIRED / OUTILS ET QUINCAILLERIE REQUIS / INSTRUMENTAL Y HERRAJE REQUERIDOS
X SECTION 4 (CONTINUED) / SECTION 4 (SUITE) / SECCIÓN 4 (CONTINUACIÓN)
BBH (x1)
BDJ
EDW
• Align these holes in the next step.
• Aligner ces trous dans l’étape suivante.
• Alinear estos agujeros en el siguiente paso.
• This hole must face upward.
• Ce trou doit faire face en haut.
• Este agujero debe dar hacia arriba.
• Insert an end cap (BBH) into the end of the tube, and fi nish inserting the tube until fl ush with bottom of door and the
two holes in the tube align with those in the door.
• Insérer un capuchon (BBH) dans l’extrémité du tube, et terminer d’insérer le tube jusqu’à ce qu’il soit égal avec le bas
de la porte et que les deux trous dans le tube s’alignent avec ceux de la porte.
• Insertar un Tapon (BBH) en el extremo del tubo, y terminar de insertar el tubo hasta que se alinee con la parte inferior
de la puerta y los dos agujeros en el tubo se alineen con los de la puerta.
BBH
4.2
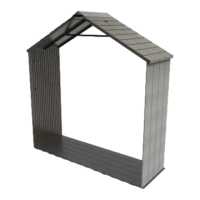
4.1
• Slide a long tube (EDW) into the hole in the left door (BDJ) until a few inches remain out of the door. The end with the hole goes at
the top.
• Faire glisser un long tube (EDW) dans le trou de la porte gauche (BDJ) jusqu’à ce qu’il ne reste que quelques centimètres
hors de la porte. Le bout avec le trou va sur le dessus.
• Deslizar el tubo largo (EDW) en el agujero en la puerta izquierda (BDJ) hasta que unas pulgadas queden fuera de la puerta.
El extremo con el agujero va en la parte superior.
http://go.Lifetime.com/outdoorstorageshed-section4
• In case of troubles with this section, scan the QR code below to view a video on its assembly.
• En cas d’avoir des problèmes avec cette section, scanner le code QR en dessous pour voir un vidéo de l’assemblage.
• En caso de tener problemas con esta sección, escanear el código QR debajo para ver un video del ensamblaje.