28
TOOLS AND HARDWARE REQUIRED / OUTILS ET QUINCAILLERIE REQUIS / INSTRUMENTAL Y HERRAJE REQUERIDOS
X SECTION 4 (CONTINUED) / SECTION 4 (SUITE) / SECCIÓN 4 (CONTINUACIÓN)
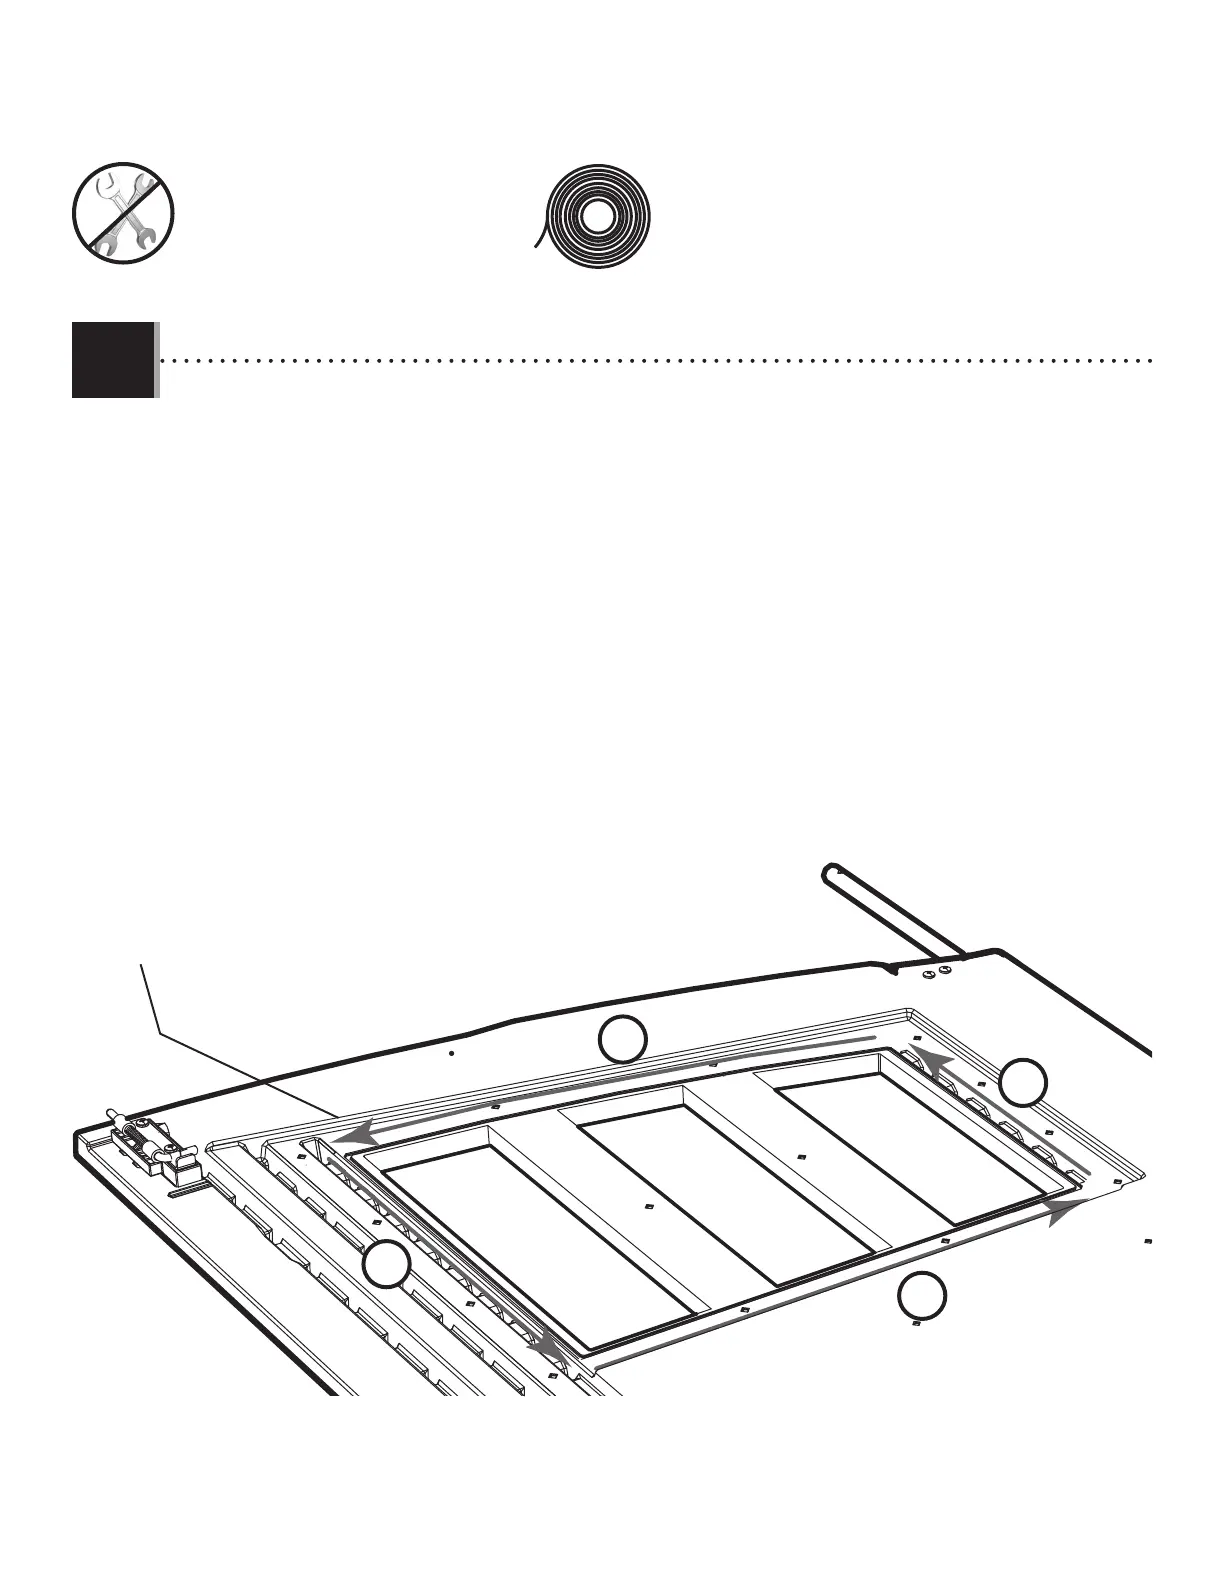
• There is a narrow groove (illustrated in black) running along the outside of the window on the back of each door.
Starting at the top, left corner of the groove in the left door, lay the 1/8" (≈3,2 mm) strip of butyl tape (EPH) into the
groove. Do not worry about getting the tape completely into the groove just yet—simply lay the tape over the groove. Do not press the tape into the groove. Do not
stretch the tape. Work your way downward (1) and, as you get to each corner, peel o the paper backing from the tape
you just laid (peel o backing at each corner). Go along the bottom (2) of the window. Curve your way upward (3) and
then along the top (4) of the window until you’re back where you started. Clip o the excess.
• Une rainure étroite (illustrée en noir) se trouve le long de l’extérieur de la fenêtre à l’arrière de chaque porte. Partant
du coin supérieur gauche de la rainure de la porte gauche, étendez une bande de 1/8 po (≈3,2 mm) de ruban de
caoutchouc butyl (EPH) dans la rainure. Ne vous inquiétez pas si le ruban de caoutchouc n’est pas complètement dans la rainure en ce moment, ne faites que
déposer le ruban de caoutchouc sur la rainure. N’étirez pas le ruban de caoutchouc. Ne poussez pas le ruban dans la rainure. Travaillez vers
le bas (1) et, en approchant chaque courbe, retirez le papier protecteur du ruban que vous avez étendé (retirez le
papier protecteur a chaque courbe). Étendez le ruban le long du bas (2) de la fenêtre. Courbez vers le haut (3), puis le
long du haut (4) de la fenêtre jusqu’à ce que vous reveniez au point de départ. Coupez l’excédent.
• Hay una ranura angosta (ilustrada en negro) bordeando la ventana en la superfi cie posterior de cada puerta.
Comenzando desde arriba, en la esquina izquierda de la ranura en la puerta izquierda, aplique una línea de 1/8
in (≈3,2 mm) de cinta butílica (EPH) en de la ranura. Ne se preocupe por poner la cinta, mas solamente ponta la cinta sobre la ranura. No presione la
cinta dentro de la ranura. No estire la línea. Siga hacia abajo (1) y, al acercar cada ángulo, quite el papel protector de la cinta que
apenas aplicó (quite el papel protector a cada ángulo). Siga a lo largo del borde inferior (2) de la ventana. Curvéela
hacia arriba (3) y, entonces, a lo largo del borde superior (4) de la ventana hasta estar al punto de partida. Corte el exceso.
Groove / Rainure / Ranura
EPH (x1)
1
2
3
4
4.9