Explanation
The response values are single Bytes except in the case of the [OUTPUT] which is always
a double Byte, eg. ‘12’.
List of RS-232 Commands
The underlined values mean the default settings.
Typical Application
RS-232 Commands
Below listed commands can be used to query or control the receiver. The commands can be
sent via the local RS-232 port or via the TPS line. Please check the serial port settings which
are xed in the device:
Baud rate: 9600; data bit: 8 bits; parity: none; stop bit: 1
Connect a cross-link serial cable between the receiver and a computer.
Protocol Description
The commands must be followed by Carriage return and Line feed (<CR><LF>).
The parameters can be queried (read) by the ’R’ letter in each case.
The parameters can be set by the ’S’ letter.
The commands are not case-sensitive.
The ● symbol means the space character in below examples.
Supported Resolutions (HDMI Input Port)
* with reduced blanking
Querying a Parameter
Format Example
Command
Response
R●OUTPUT<CR><LF>
OUTPUT=<current_setting><CR><LF>
→
←
r output
OUTPUT=12
Setting a Parameter
Format Example
Command
Response
S●OUTPUT●<new_setting><CR><LF>
OUTPUT=<new_setting><CR><LF>
→
←
s output 8
OUTPUT=8
Setting the Output Resolution (RGB, YUV)
OUTPUT <set>
0 = native
1 = 640x480@60
2 = 800x600@60
3 = 1024x768@60
5 = 1360x768@60
6 = 1280x720@60
7 = 1280x800@60
8 = 1280x1024@60
9 = 1440x900@60
10 = 1400x1050@60
11 = 1680x1050@60
12 = 1600x1200@60
13 = 1920x1080@60
16 = 1920x1200@60
17 = 720x480p60
18 = 1280x720p60
19 = 1920x1080p60
20 = 1920x1080p60
22 = 720x576p50
23 = 1280x720p50
24 = 1920x1080p50
25 = 1920x1080i50
Setting the Visibility of the Input Port Status Info (OSD, Top Left Corner)
INFO DISPLAY <set>
0 = off 1 = 5 sec 2 = always on
Setting the Output Size Type
SOURCE <set> 1 = HDMI
2 = TPS
Hsync Shifting (for Compatibility Reasons)
HSYNC SHIFT <set>
0 = off 1 = on
Locking the Front Panel Buttons
KEY LOCK <set>
0 = unlocked 1 = locked
When the keys are locked the RS-232 commands can be used only for querying the
parameters. Modication is not possible, only the ‘S KEY LOCK 1’ setting command is
accepted.
Querying the Type of the Current EDID
EDID TYPE <set>
1 = stereo LPCM 2 = multichannel
Querying the Type of the Device (for LW2 Protocol Compatibility)
{i} response: (I:HDMI-TPS-RX120-HDSR)
Setting the Audio Delay
AUDIO DELAY <set>
0 = off
1 = 40 ms
2 = 110 ms
3 = 150 ms
Muting the Audio
AUDIO MUTE <set>
0 = unmuted 1 = muted
Querying the Current Firmware Version
FW note: R/S prex is not necessary
Reloading the Factory Default Values
S RESET 1
Selected input TPS input port
Output size Best fit
Audio unmuted, 40 ms delay
Front panel buttons (key lock) unlocked
Input port status info display (OSD) off
Emulated EDID type at the input port audio supported (stereo LPCM)
RS-232 port setting (device control) 9600 BAUD, 8, N, 1
Factory Default Settings
Specications
General
Compliance ................................................................................................................CE
EMI / EMC .................................................................................. EN 55024 / EN 55032
Cooling .............................................................................................................. passive
Enclosure ...................................................................................................... 1 mm steel
Dimensions ....................................................................190.5 W x 191.7 D x 30 H mm
Weight ....................................................................................................................985 g
Digital Video Signal
Supported signals ........................................................................... DVI 1.0, HDMI 1.3
Signal standard ................. DVI and HDMI standard which supports embedded audio
Supported resolutions ............................ up to 1920x1200@60Hz, 1920x1080@60Hz
Deep color support (output) .....................................................converted to 8 bit / color
HDCP compliant ...................................................................................................... yes
EDID support .............................................. two built-in EDIDs (stereo / AC3 support)
Cable length (HDM input port) ...................................................................... max. 30 m
Video latency .............................................................2-3 frames (=33..50 ms @ 60Hz)
Power
Power supply ....................................................................... external power supply unit
Power adaptor .................. Input 100-240V AC 50-60 Hz, 1.5A, Output 24V DC, 2.7 A
Power consumption ............................................................................................... 12W
Power over TPS..........................................................................................................no
Connectors
Input ports .................................................................RJ45 (TPS interface), HDMI input
Ethernet ................................................................................................................. RJ45
Serial port ..................................................................................................D-Sub 9 male
Power ........................................................................................... locking DC connector
TPS port (HDBaseT
TM
-compatible)
Ethernet pass-through ............................................................................................. yes
RS-232 pass-through ............................................................................................... yes
IR pass-through ................................................................................................................yes
Error Responses
When undened value is sent (e.g. S SOURCE 9) the response will be ERROR. Unknown
and insufcient commands are not processed, response is not sent.
The Handling of the Batteries
Use only standard batteries. Do not use new and used batteries together. This may cause a
battery to break or leak and may cause re, injury, or contamination (damage). When replacing
the batteries, insert them with right polarity. Otherwise, the battery may become damaged or it
may cause re, personal injury or damage due to leakage of the internal liquid. The batteries
(and rechargeable batteries) are not ordinary refuse and must be returned for recycling
purposes. The customer is responsible for returning the used or rechargeable batteries for
recycling. Be careful that children do not place the batteries in their mouths when removed
from the remote control. Place the battery in a location that children or infants cannot reach.
Correct Disposal of Batteries in this Product
This marking on the battery indicates that the batteries in this product should
not be disposed of with other household waste at the end of their working life.
Where marked, the chemical symbols Hg, Cd or Pb indicate that the battery
contains mercury, cadmium or lead above the reference levels in EC Directive
2006/66. If batteries are not properly disposed of, these substances can
cause harm to human health or the environment. To protect natural resources and to promote
material reuse, please separate batteries from other types of waste and recycle them through
your local, free battery return system.
640x480p60/72/75
800x600p56/60/72/75
720x480p60
720x480i60
720x576p50
720x576i50
1024x768p60/70/75
1280x720p50/60
1280x800p60
1280x1024p60/75
1600x1200p60
1680x1050p60 *
1920x1080p50/60
1920x1080i50/60
1920x1200p60
Querying the Status of the Current Settings
Format Example
Command
Response
R●STATUS<CR><LF>
ST<status_parameters>
→
←
r status
ST2x122000002xx
Response Parameter Description
2 [SOURCE] TPS input is selected
x reserved
12 [OUTPUT] output resolution is 1600x1200p60
2 [ASPECT] image aspect is ‘best t’
0 [AUDIO DELAY] no audio delay
0 [AUDIO MUTE] audio is unmuted
0 [KEY LOCK] front panel buttons are unlocked
0 [EDID TYPE] current EDID does not support audio
0 [HSYNC SHIFT] H sync shift is off
2 [INFO DISPLAY] input info is always displayed (OSD)
x reserved
x reserved
Setting the Aspect Ratio of the Output Signal
ASPECT <set>
1 = stretch/full
2 = best t
3 = t width
4 = t height
5 = 14:9
6 = 1 to 1 and center
Maximum Extension Distances
Resolution
Pixel clock
rate
Cable lengths
(Auto / Long reach TPS mode)
CAT5e
AWG24
CAT7
AWG26
CAT7
AWG23
1024x768@60Hz 65 MHz 100 m / 130 m* 90 m / 120 m* 120 m / 170 m*
1280x720p@60Hz 73.8 MHz 100 m / 130 m* 90 m / 120 m* 120 m / 170 m*
1920x1080p@60Hz (24bpp) 148.5 MHz 100 m / 130 m* 90 m / 120 m* 120 m / 170 m*
1920x1200@60Hz 152.9 MHz 100 m / NA 90 m / NA 120 m / NA
1600x1200@60Hz 162 MHz 100 m / NA 90 m / NA 120 m / NA
* Long reach TPS mode supports pixel clock frequencies up to 148.5 MHz.
CAT7 SFTP AWG23 cable is always recommended.
Firmware Upgrade
To have the latest rmware running in your device, please do the followings:
1. Contact Lightware Support to get the latest rmware le.
2. Copy the rmware le to an USB ash drive. Make sure that the le system is FAT/FAT32
and the name of the rmware le is MSTFLASH_FILE_CH_521RX.bin.
3. Disconnect the power supply unit from the receiver.
4. Insert the pen drive into the USB service port of the receiver.
5. Press the Menu button and keep it pressed.
6. Connect the power supply to the receiver. The device is powered on, the upgrade is
started while the front panel Input LED lights in red; release the Menu button.
7. After cca. 30 seconds later the process is nished the front panel Input LED is blinking in
green/red and the Power LED also blinks.
8. Unplug the power supply remove the USB pen drive and reconnect the PSU again.
Software Control – Using Lightware Device Controller
The device can be controlled from a computer using the Lightware Device
Controller (LDC) software. The application is available at www.lightware.com
(Product Families / Software menu). Install the software it on a Windows PC
or a Mac OS X and connect to the device as follows.
Connecting via the RS-232 Port
1. Connect a computer to the RS-232 port of the receiver by a cross-link serial cable.
2. Launch the LDC software and select the Serial Devices tab.
3. Press the Query button of the given COM port, select the device and press the Connect
button.
Connecting via the TPS Line to an MX-FR Matrix Switcher (TPS Output Board)
1. Connect the receiver to an MX-FR matrix with TPS output port.
2. Connect the matrix to a LAN and connect a computer to the same LAN.
3. Start the LDC software and connect to the matrix listed at Ethernet Devices tab.
4. Open the Port properties panel of the given TPS output port and press the Open remote
device settings button at the bottom of the window.
The preferred resolution of the last attached sink will be the default when connected.
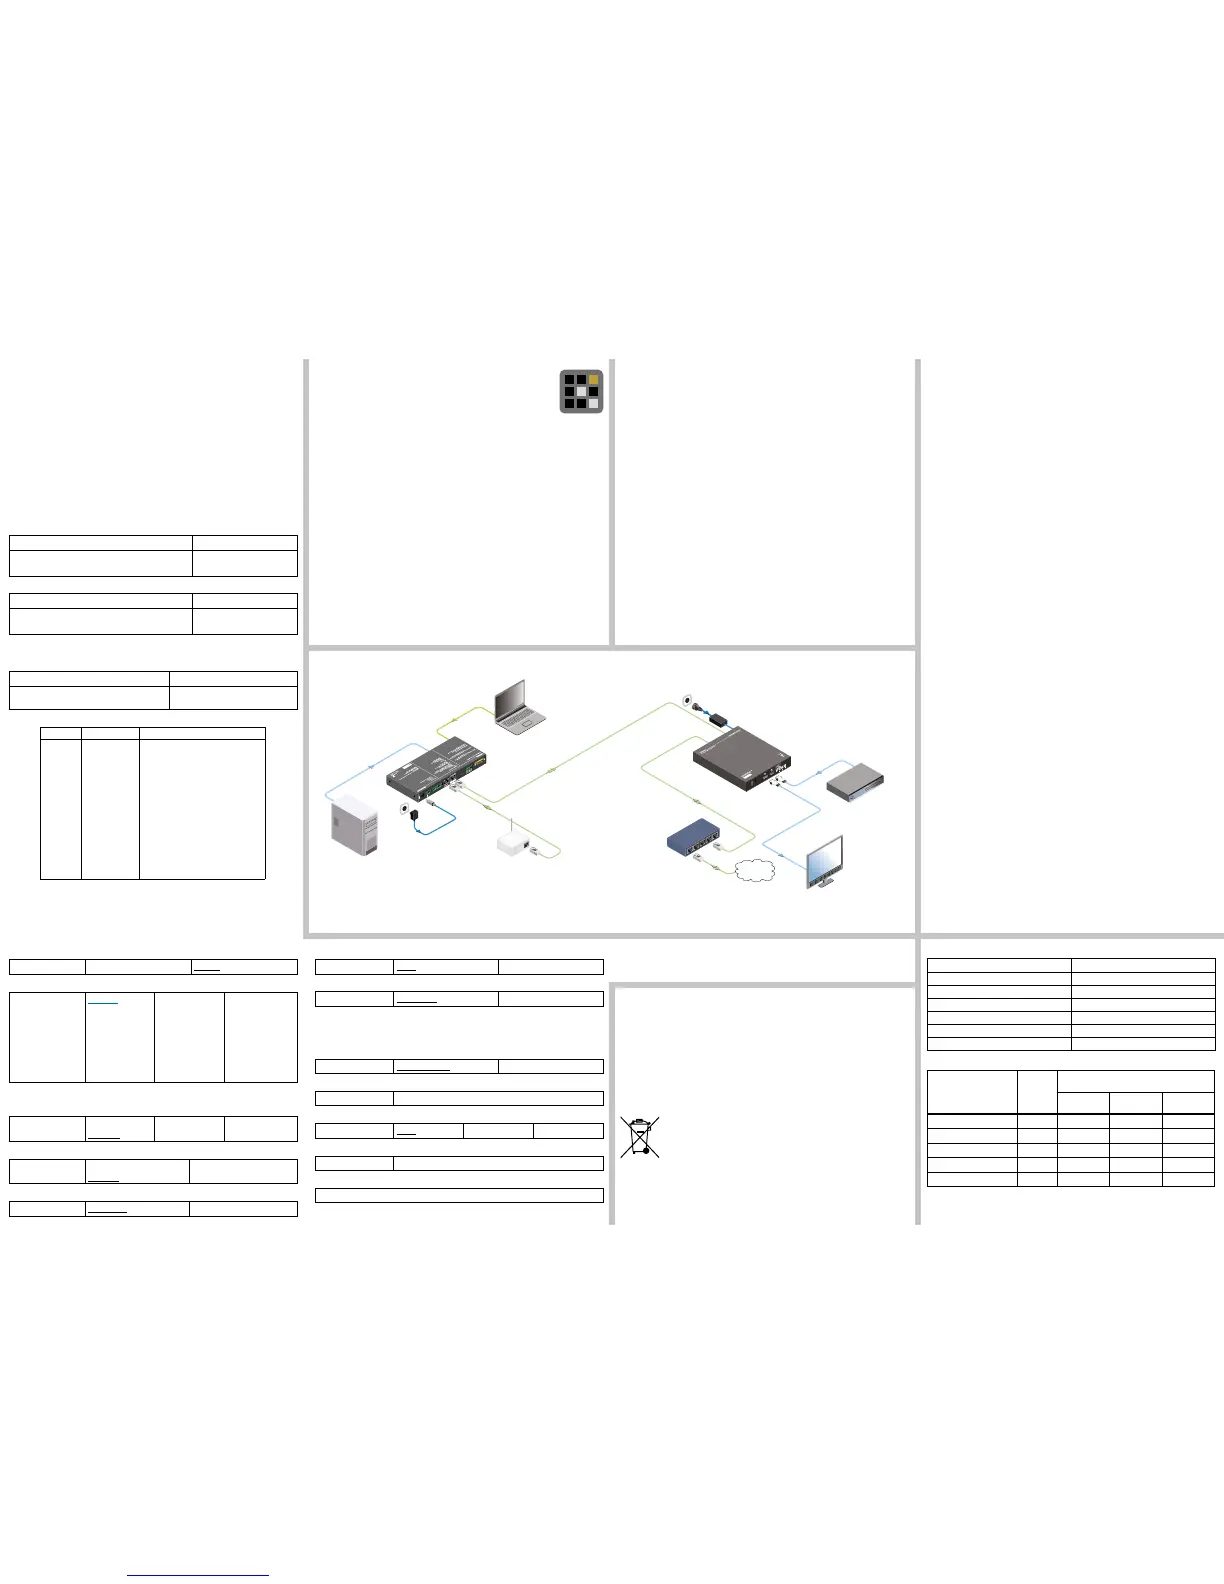
PIN: 2.1mm
GPIO
RS-232
TX RX
AUDIO2 IN
DVI-I IN
IR IN IR OUT
LIVE
RS-232
SRVC
LINK
12V 1A DC
LAN
LAN
Internet
TPS connection
CATx up to 170 m
LAN
VGA
Laptop
Monitor
Blu-ray player
UMX-TPS-TX140
HDMI-TPS-RX120-HDSR
Access
Point
Ethernet
switch
PC
HDMI
HDMI
HDMI
12V DC
power adaptor
1400x1050@60Hz
1920x1080@50Hz
1360x768@60Hz
1600x1200@60Hz
24V DC
power adaptor
HDMI OUT
HDMI IN
SERVICE MENU
ENTER
Set to XGA
Set to 1080p
 Loading...