INSTR,INST,MDT SERIES
Linear P/N: 207779 D
Material: 20 Lb. Mead Bond
Size: 8.500" x 11.000"
Ink: Black
Scale: 1-1
Side 1 of 2
MegaCode Series
MDT, MDT-2, MDT-4
DIGITAL TRANSMITTERS
Installation Instructions
(800) 421-1587 • www.linearcorp.com
DESCRIPTION
The MegaCode series of digital transmitters are wireless radio controls
designed for use with automatic garage door and gate openers. The
MegaCode radio format provides unparalleled security. The system
can be programmed to more than a million different codes.
MegaCode transmitters and receivers do not contain a typical “coding
switch” as in Linear’s standard digital receivers. Each transmitter is
pre-set at the factory to a unique code. The receiver is programmed by
sending a signal to it from the transmitter(s) that are going to be used
with it. This stores the transmitter’s code into the receiver’s memory.
The receiver will retain its memory even without power. The receiver
will activate only from these “memorized” transmitters. Please refer to
the receiver’s instructions for maximum transmitter capability.
The transmitters are powered from two Type 2032 lithium “button cell”
batteries. When the batteries get low, the bright red LED light on the
transmitter will start to dim as the unit is activated. When the red LED
no longer lights when the transmitter is activated, the batteries should
be replaced.
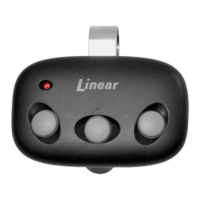
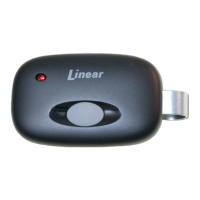
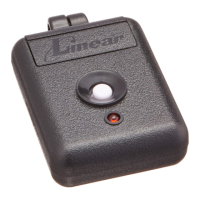
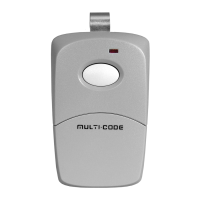
MDT - Single-channel transmitter with a button on the front and the
top (both buttons perform the same function).
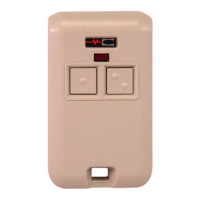
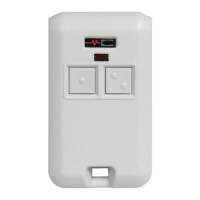
MDT-2 - Three-channel transmitter with two buttons on the front and
one button on the top (each button performs a separate function).
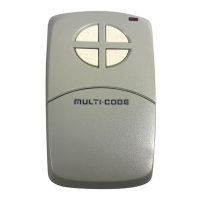
MDT-4 - Five-channel transmitter with four buttons on the front and
one button on the top (each button performs a separate function).
STEP 1
Receiver Installation. Connect the receiver to the
garage door operator as described in the receiver’s Installation
Instructions. Apply power to the operator before programming.
STEP 2A
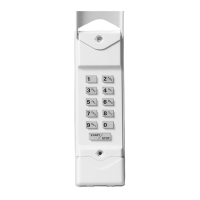
MDR/MDRNR/MDR2 Program button and LED
Location. Locate the program button and LED on the side of the
receiver case.
STEP 2B
MDRM/MDRM2 Program button and LED
Location. Locate the program button and LED on the back of the
receiver case.
STEP 3
Program receiver. Momentarily press the receiver’s
program button (channel one or two). The red programming LED
will light if there’s room in the receiver’s memory for another
transmitter. The LED stays on for about 5 seconds. A transmitter
must be entered
while the LED is on
. Press the desired
transmitter button. The LED will flicker indicating that the receiver
has accepted the transmitter.
➥
NOTE: Be sure to press the receiver program button for less than
2 seconds.
➥
WARNING! Door operator will not activate when the receiver
is being programmed from the transmitter, but the door
operator will activate the next time the transmitter is activated
after programming.
➥
NOTE: The programming LED also monitors radio signals entering
the receiver. It is common to see an occasional blink from the LED.
The LED will also light when any transmitter tuned to the receiver’s
frequency (programmed into the receiver or not) is activated.
STEP 4
Add additional transmitters. Repeat Step 3 for each
transmitter used with the receiver. Be sure to press the receiver’s
program button
each time
a new transmitter or a different
transmitter button on a multi-button transmitter is pressed.
If the LED doesn’t come on when the receiver’s program button is
pressed, the receiver’s memory is full. Use the erase function (Step 7)
to remove transmitters form the receiver’s memory.
MDT
CONNECT RECEIVER TO GARAGE DOOR OPERATOR
CHANNEL TWO
PROGRAMMING
BUTTON
CHANNEL ONE
PROGRAMMING
BUTTON
PROGRAMMING
LED
CHANNEL TW O
PROGRAMMING
BUTTO N
CHANNEL ONE
PROGRAMMING
BUTTO N
PROGRAMMING
LE D
MDT MDT-2 MDT-4
C
H
2
C
H
1
CHANNEL 1
PROGRAMMING
BUTTON
CHANNEL 2
PROGRAMMING
BUTTON
LED WILL LIGHT
WHEN RECEIVER
IS READY
WHEN RECEIVER
IS READY, PRESS THE DESIRED
TRANSMITTER BUTTON
RECEIVER LED
WILL FLICKER
AS TRANSMITTER
IS ENTERED INTO
MEMORY
C
H
2
C
H
1
PRESS CHANNEL 1 OR CHANNEL 2
PROGRAM BUTTON FIRST
THEN PRESS TRANSMITTER BUTTON
WITH MULTI-BUTTON
TRANSMITTERS PRESS
THE DESIRED BUTTON