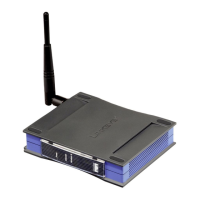
WET54G
Package Contents
• One Wireless-G Ethernet Bridge (1)
• One Setup CD-ROM with User Guide
Included (2)
• One Quick Installation Guide
• One External Antenna (3)
• One RJ-45 Network Cable (4)
• One Power Adapter (5)
• One Pair of Bridge Stands
• One Registration Card
This Quick Installation is meant to help you install the product quickly and easily. For detailed instructions on installation,
configuration, and further setup options, please consult the User Guide.
Instant Wireless
®
Series
Wireless-G Ethernet Bridge
A. Attach the external antenna.
B. Plug the included Ethernet network
cable into the LAN port on the
back panel of the Bridge.
C. The X-II (MDI/MDI-X) slide switch offers a choice between two settings.
Slide the X-II switch to the X position if you are connecting the Bridge to a
PC’s network adapter. Slide the X-II selection switch to the II position if you
are connecting the Bridge to a hub or switch.
D. Plug the other end of the Ethernet network cable into the RJ-45 port of the
hub, switch, or PC you wish to use to configure the Bridge.
E. Plug the supplied power cable into
the Power port on the back panel of
the Bridge. Then plug the other end
into an electrical outlet.
Proceed to Step 2.
Connecting the Wireless-G Ethernet
Bridge for Setup
B
E
A. Insert the Setup CD-ROM
into your PC’s CD-ROM
drive. The Setup Utility
should run automatically, and
the Welcome screen should
appear. If it does not, click
the Start button and choose
Run. In the field that
appears, enter D:\setup.exe
(if “D” is the letter of your
CD-ROM drive).
B. Click Setup to begin the setup process.
C. Make sure the Bridge is
correctly connected to your
wired network. Click Next.
A
C
Setting Up the Wireless-G Ethernet
Bridge
D. The screen displays a list
of Wireless-G Ethernet
Bridges on your network,
along with their status
information. Select the
Bridge you are currently
installing by clicking its
name in the Selection box.
Click Ye s .
E. A Password screen will
appear. In lowercase letters,
enter admin in the Password field. Then click Enter.
F. The Mode Settings screen
shows a choice of two
wireless modes. Click the
Infrastructure radio
button if you want your
wireless computers to
network with computers on
your wired network using a
wireless access point. Click
the Ad-Hoc radio button if
you want multiple wireless
computers to network
directly with each other.
In the WB Name field, enter a unique name for the Bridge. Click Next.
D
Continued on back
F