‑ 15 ‑ EN
• Aer you have fastened the belts, you will hear a disncve „click”.
• Try to move the child safety seat to check its stability.
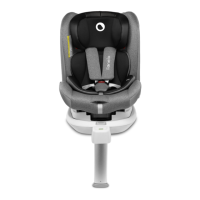
B. ASSEMBLY WITH ISOFIX
4.
Installaon in a rear-facing posion, the child is secured with safety belts of the child
safety seat (group 0+, I, 0 - 18 kg).
• If necessary, put ISOFIX sheaths (Z) on ISOFIX connectors in the car.
• They facilitate scking ISOFIX fasteners of the product when car connectors are hard
to access.
• Rotate the child safety seat to the rear-facing posion. To do so, press the base 360°
rotaon buon (M). (see: g. 13)
• Press ISOFIX buon (X) to extend both ISOFIX arms (V). Next grab the seat with both
hands, slide two ISOFIX arms into the fasteners located in the car seat unl arms (V)
anchor and you can hear a disncve „click”.
• Push the product towards the seat, press it against the car seat as much as you can.
• Green indicator on ISOFIX buon (X) must be visible on both sides; then you can be
sure the seat has been properly secured and xed.
• Press the support leg adjustment buon (Y), next extend the leg and adjust its length
so that it contacts the vehicle oor (the indicator will turn green when the support leg
is suciently extended).
• Put the child in the child safety seat and secure it with safety belts of the child safety
seat. (See: g. 26)
5.
Installaon in a forward-facing posion, the child secured with safety belts of the
child safety seat (group I, 9 - 18 kg).
• If necessary, put ISOFIX sheaths (Z) on ISOFIX connectors in the car.
• They facilitate stocking ISOFIX fasteners of the child safety seat when car connectors
are hard to access.
• Turn the child safety seat to a forward-facing posion. To do so, press the base 360°
rotaon buon (M). (see: g. 13)
• Press ISOFIX buon (X) to extend both ISOFIX arms (V). Next grab the seat with both
hands, slide two ISOFIX arms (V) rmly in fasteners in the car seat unl arms anchor
and you can hear a disncve „click”.
• Push the product towards the car seat, press it against the car seat as much as you can.
• Green indicator on ISOFIX buon (X) must be visible on both sides; then you can be
sure the seat has been properly secured and xed.
• Press the support leg adjustment buon (Y), next extend the leg and adjust its length
so that it contacts the vehicle oor (the indicator will turn green when the support leg
is suciently extended).
 Loading...