EasyManua.ls Logo

Lippert Components 285318 - User Manual

Lippert Components 285318
8 pages
Print Icon
To Next Page IconTo Next Page
Loading...
1
lci1.com 574-537-8900 Rev: 03.06.20
Power Tongue Jack
Installation and Owners Manual
(For Aftermarket Applications)
CCD-0001301
Table of Contents
Introduction ............................................ 2
Additional Information Sources ........................ 2
Safety ................................................... 2
Parts List ................................................ 3
Resources Required ................................... 3
Prior to Installation ..................................... 3
Installation .............................................. 4
Operation ............................................... 5
Unhitching from Tow Vehicle .......................... 5
Hitching to Tow Vehicle ................................ 5
Manual Operation ...................................... 6
Troubleshooting ........................................ 7
Fuse ................................................... 7
Clutch .................................................. 7
Notes .................................................... 7
Power
Tongue Jack
Installation and
Owners Manual
(For Aftermarket Applications)
Power Tongue Jack Aftermarket KitPower Tongue Jack Aftermarket Kit
Part #Part # DescriptionDescription
285318
Power Tongue Jack with Footpad Kit and
Manual Crank Handle

Other manuals for Lippert Components 285318

Question and Answer IconNeed help?

Do you have a question about the Lippert Components 285318 and is the answer not in the manual?

Summary

Introduction

Product Overview

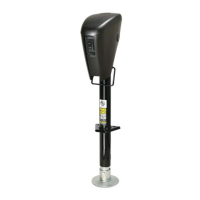
Details the Power Tongue Jack's features, capacity, stroke, and intended use for trailer applications.

Safety Guidelines

General Safety Warnings

Read and understand all instructions and safety labels before installing or operating the product.

Parts and Preparation

Parts List

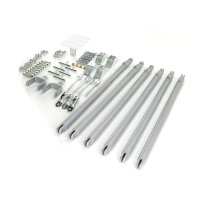
Lists components included in the Power Tongue Jack Aftermarket Kit PN 285318.

Resources Required

Lists tools and materials needed for installation, such as drill, sockets, and loom.

Pre-Installation Steps

Steps to take before installing, including removing the footpad and supporting the trailer.

Installation Guide

Mounting the Jack

Steps for sliding the jack leg through the coupler and aligning mounting holes.

Electrical Connections

Connecting the power wire to a 12V supply and using a 30 amp fused circuit.

Operation Procedures

Unhitching from Tow Vehicle

Steps to safely disconnect the trailer from the tow vehicle using the tongue jack.

Hitching to Tow Vehicle

Steps to safely connect the trailer to the tow vehicle using the tongue jack.

Manual Operation

Manual Unhitching

Procedure for manually operating the tongue jack to unhitch the trailer.

Manual Reconnecting

Procedure for manually operating the tongue jack to reconnect the trailer.

Troubleshooting Common Issues

Fuse Replacement

Information on the 30A fuse and causes of premature blowing, like low battery voltage.

Clutch Slippage

Conditions causing the clutch to slip: reaching limits or exceeding weight capacity.

Important Notes

Overview

The Power Tongue Jack is a device designed for use with travel trailer A-frame applications, facilitating the vertical movement of the trailer. It is an aftermarket kit that includes the Power Tongue Jack with a footpad and a manual crank handle.

Function Description:

The primary function of the Power Tongue Jack is to assist in hitching and unhitching a travel trailer from a tow vehicle by raising and lowering the trailer's coupler. It operates electrically, providing convenient and effortless vertical adjustment. In the event of power loss, the jack can be operated manually using the provided crank handle.

Important Technical Specifications:

  • Capacity: 3,500 lbs.
  • Stroke: 18 inches.
  • Power Rating: 30 Amp.
  • Fuse: Equipped with a 30A ATO-type in-line fuse for circuit protection.
  • Lighting: Features four LED lights for illumination, which can be controlled by an ON/OFF switch.
  • Gears: Utilizes helical cut gears to reduce noise and improve operating efficiency.
  • Switch: Enhanced rocker switch for improved durability.
  • Casing: Textured casing designed to protect against chips and cracks.

Usage Features:

  • Installation: The jack is installed by sliding its leg through the hole in the trailer's coupler and securing it with three 3/8" - 16 x 1" hex bolts. It requires connection to a grounded 12V power supply on the trailer and must be wired through a 30 amp fused circuit. The footpad is reattached to the jack leg using a clevis pin and hairpin cotter pin after installation.
  • Electrical Operation (Unhitching):
    1. Chock the trailer tires.
    2. Ensure the footpad is securely pinned.
    3. Confirm the ground surface under the jack is firm and level.
    4. Push the "EXT" (Extend) button to extend the jack until the footpad touches the ground and the coupler clears the hitch ball.
    5. Disconnect all electrical and mechanical connections between the trailer and tow vehicle.
    6. Move the tow vehicle away.
    7. Push the "RET" (Retract) button as needed to level the front of the trailer.
  • Electrical Operation (Hitching):
    1. Chock the trailer tires.
    2. Press "EXT" if needed to allow the coupler to clear the hitch ball.
    3. Push "RET" to retract the jack until the coupler properly mounts the hitch ball and the leg is fully retracted. It is crucial that the jack leg is fully retracted before moving the tow vehicle.
  • Light Control: An ON/OFF switch controls the jack's LED lights. Leaving the lights on for an extended period can drain the trailer's battery.
  • Manual Operation (Unhitching):
    1. Chock the trailer tires.
    2. Ensure the footpad is securely pinned.
    3. Confirm the ground surface under the jack is firm and level.
    4. Open the rubber plug on top of the gearbox to expose the manual drive shaft.
    5. Insert the manual crank handle into the drive shaft.
    6. Turn the crank handle clockwise until the trailer is supported and the coupler clears the hitch ball.
    7. Move the tow vehicle away.
    8. Lower the trailer to level by turning the crank handle counterclockwise.
    9. Remove the crank handle and replace the rubber plug.
  • Manual Operation (Hitching):
    1. Chock the trailer tires.
    2. Ensure the footpad is securely pinned.
    3. Open the rubber plug on top of the gearbox.
    4. Insert the manual crank handle.
    5. Turn the crank handle counterclockwise until the coupler properly mounts the hitch ball and the jack leg is fully retracted.
    6. Remove the crank handle and replace the rubber plug. Ensure the jack leg is fully retracted before moving the tow vehicle.

Maintenance Features:

  • Fuse Replacement: The Power Tongue Jack is protected by a 30A ATO-type in-line fuse. If the fuse blows, it needs to be replaced. A fully charged battery is essential for proper operation, as low voltage can cause premature fuse blowing.
  • Clutch System: The jack incorporates a clutch as an overload protection mechanism for the motor. The clutch will slip under two conditions:
    1. When the jack reaches its extend or retract limit.
    2. If the trailer's tongue weight exceeds the jack's capacity limits.
    • Troubleshooting Clutch Slippage: If the clutch slips due to excessive tongue weight, it is recommended to reorganize items stored in the trailer to reduce the load on the jack.
    • Operation with Clutch: It is important to release the operating switch immediately when clutch noise occurs. The clutch should not slip during normal operation, as continuous slippage can lead to excessive wear on both the clutch and the motor.
  • Wiring Protection: All electrical wiring harnesses should be properly loomed and secured to prevent damage and installed according to RVIA electrical standards.

Lippert Components 285318 Specifications

General IconGeneral
BrandLippert Components
Model285318
CategoryJacks
LanguageEnglish

Related product manuals