Rev: 07.25.18 Page 6
CCD-0001504
Rear Sensor
The rear sensor (Fig. 7A) MUST be installed on a crossmember in line with or behind the rear jacks, centered
curbside to roadside on the trailer with the arrows on the top of the sensor pointing the correct direction
(Fig. 7 Detail).
Installation
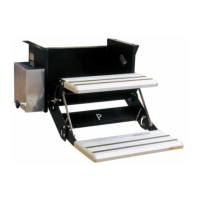
Rear Jacks
1. Determine position and ground clearance
requirements for the rear jacks (Fig. 6D).
The rear jack brackets (Fig. 6B) should be
mounted approximately 1' behind the rear
axle hanger and be aligned with each other.
NOTE: When fully retracted, the rear jacks should
be mounted to achieve a ground
clearance equal to the departure angle
or a minimum of 7" to enable maximum
level correction (Fig. 5). Any additional
ground clearance added to the jack
location will decrease the amount of
level correction available to the system.
2. Mark jack mounting bracket (Fig. 6B)
locations on the main frame rail.
3. Clamp the bracket to the main frame rail
(Fig. 6A) in the marked position.
4. Weld the bracket to the main frame rail (Fig.
6A).
NOTE: Jack brackets may already be pre-installed
by LCI.
5. Bolt the rear jacks (Fig. 6D) to the mounting
brackets (Fig. 6B) using 6 bolts (Fig. 6E) and
nuts (Fig. 6C) per jack. Tighten the bolts to
90 ft-lb. of torque.
6. Connect the wire harnesses to the rear jack
motor wires and run the harnesses to the
compartment where the controller will be
mounted.
NOTE: LCI recommends zip-tying the harnesses
tight against the rear jack motors to
prevent damage to the harnesses.
7" Ground Clearance
Standard
Jack
Optional
Short
Jack
Fig. 5
Fig. 7
Fig. 7 Detail
A
Fig. 6
A
B
C D
E

 Loading...