Rev: 05.22.23 Page 2 CCD-0001436
Introduction
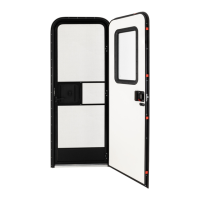
This RV entry door comes completely assembled with door lock, standard push down screen knob, standard
raised kick panel and standard soft screen door corners. Snap trim and drip cap are sold separately. Required
mounting fasteners are not included.
Safety
Read all instructions and safety labels before starting installation of this product.
Moving parts can pinch, crush or cut. Keep clear and use caution.
TABLE OF CONTENTS
Introduction 2
Safety 2
Resources Required 2
Installation 3
Exterior Frame Installation - Towable and Motorized 3
Interior Frame and Hinge Installation - Motorized Only 5
Snap Trim and Drip Cap Installation 6
Friction Hinge Installation 7
Strut Door Installation 7
This Warning symbol indicates that the following procedure may create a condition where severe
product and/or unit damage, serious personal injury or death may occur if stated precautions are
not followed.
This Caution symbol indicates that the following procedure may create a condition where product
and or unit may be damaged and personal injury may occur if stated precautions are not followed.
Resources Required
• 1-2 People, depending on task
• Cordless or electric drill or screw gun
• Appropriate drive bits
• Appropriate drill bits
• Caulk gun
• Gunnable sealant
• Putty tape or closed cell PVC foam tape
• #8 Screws (quantity depends on size of the door) - length must be long enough to penetrate sidewall framing.
• #12 Screws - length must be long enough to penetrate sidewall framing. (For motorized unit entry door only.)
NOTE: For wood frame construction, do not use self-tapping screws.
 Loading...