EasyManua.ls Logo

Lithonia Lighting TDD LED 2 - User Manual

Lithonia Lighting TDD LED 2
9 pages
Print Icon
To Next Page IconTo Next Page
Loading...
page 1
If this xture fails to operate properly, use the guide below to
diagnose and correct the problem.
Trouble Shooting Guide
Verify that power is turned on at switch and breaker
Verify that xture is wired properly
Verify that line voltage is correct.
Test if Photocontrol works properly
The photocontrol in this fi xture is designed to turn on fi xture
light at low light levels.
If light does not come on or stays on:
Test if Photocontrol works properly:
Cover Photocontrol - Light should come on.
Shine a fl ashlight into Photocontrol - Light should go off.
If fi xture cylcles on and off:
Light refl ecting back off any surrounding surfaces enters the
photocontol. To correct problem, reposition the fi xture or eliminate
refl ective surface.
If further technical assistance is required, contact: Technical
Support at: (800) 279-8041
This LED light provides low maintenance service with no bulbs
to change. Clean surfaces with mild soap and water. Do not use
abrasive materials such as scouring pads or powders, steel wool
or abrasive paper.
WARNING: There are no user serviceable parts inside fi xture.
INSTALLATION INSTRUCTIONS
UTDDLED2_Rev 7/14
Protect yourself. Before installing, read the entire instructions
carefully and save them for future reference.
Date installed:________________________________________
FIXTURE PACKING LIST
Description Quantity
1) Housing Assembly ............................................................... 1
2) Photocontrol ........................................................................ 1
3) 1” Bolts* ............................................................................... 2
4) 2” Wood Screws* ................................................................. 3
5) Cover Plate* ........................................................................ 1
6) Wire Nuts* ........................................................................... 3
7) Diffuser* ............................................................................... 1
*Contained in parts packs
Mounting Hardware Included
Waterproof Supply Fittings & Conduit
will be required - Purchase Separately
Silicone Sealant Required
REQUIRED TOOLS:
Dusk to Dawn LED Area Light
Model Number(s):
TDD LED 2
DISCONTINUED
Question and Answer IconNeed help?

Do you have a question about the Lithonia Lighting TDD LED 2 and is the answer not in the manual?

Overview

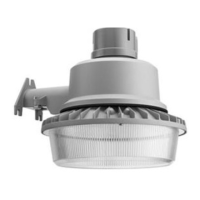
This document describes the Lithonia Lighting Dusk to Dawn LED Area Light, model TDD LED 2, an outdoor lighting fixture designed for low-maintenance, energy-efficient illumination.

Function Description:

The TDD LED 2 is a dusk-to-dawn LED area light, meaning it is equipped with a photocontrol sensor that automatically turns the light on at low light levels (dusk) and off when sufficient ambient light is detected (dawn). This automated operation makes it suitable for continuous outdoor illumination without manual intervention. The fixture is intended for general outdoor area lighting applications, providing consistent light output.

Important Technical Specifications:

The manual provides a fixture packing list that details the components included with the device:

  • 1 Housing Assembly
  • 1 Photocontrol
  • 2 1" Bolts (contained in parts packs)
  • 3 2" Wood Screws (contained in parts packs)
  • 1 Cover Plate (contained in parts packs)
  • 3 Wire Nuts (contained in parts packs)
  • 1 Diffuser (contained in parts packs)

Mounting hardware is included for wood surfaces. However, waterproof supply fittings, conduit, and silicone sealant are required but must be purchased separately. The fixture is designed for use with UL-listed conduit connectors, conduit, and junction boxes suitable for wet locations and properly installed and grounded. The LED light provides low-maintenance service, eliminating the need for bulb changes. The device operates on standard line voltage, which should be verified against the luminaire label information. It is not suitable for use with dimmers, motion sensors, or other remote devices.

Usage Features:

The installation process involves several steps to ensure proper functionality and safety:

  1. Component Check: Users must first remove and check all fixture components and parts packs, ensuring all parts are present. Small parts should be accounted for, and packing material should be destroyed to prevent hazards, especially to children.
  2. Power Disconnection: Before any installation or servicing, power must be turned OFF at the circuit breaker box. Relying solely on a wall switch is insufficient.
  3. Photocontrol Installation: The photocontrol is installed by aligning an arrow on its top with an arrow on the receptacle, then pushing down and twisting clockwise until it clicks. For optimal performance, the photocontrol's arrow should face north after installation. If adjustment is needed, the screw in the center of the white photocontrol receptacle can be loosened, the receptacle rotated to face north, and the screw re-tightened. A stop mechanism prevents the receptacle from turning completely around. If difficulty is encountered, turning in the opposite direction is suggested. It is crucial to keep the photocontrol or a shorting cap installed to prevent water ingress into the receptacle.
  4. Fixture Mounting: The fixture is designed for mounting to structurally sound wood surfaces. Optional mounting arms are available separately. Installation involves marking pilot holes (3/16" diameter) using a template from the box. Two 2" screws are partially installed in the bottom holes, leaving about 3/8" space. A third 2" screw is threaded into the top pre-drilled hole and then backed out to facilitate installation. The fixture housing is then placed on the two bottom screws, the third screw is installed, and all bottom screws are tightened to secure the fixture.
  5. Wiring: Power must be turned off before wiring. A knockout on the bottom of the cover plate is removed to feed house supply wires through. The fixture is intended for use with UL-listed conduit connectors, conduit, and junction boxes suitable for wet locations and properly installed and grounded.
  6. Grounding: The copper house supply ground wire is connected to the green fixture ground wire using a wire nut. If the house wiring lacks a ground wire, local electrical codes should be consulted for approved grounding methods. Wire nuts should be twisted clockwise until tight for proper connection.
  7. Supply Wire Connection: Black fixture wire is connected to black power supply wire, and white fixture wire (neutral) is connected to white supply wire using wire nuts.
  8. Cover Plate Securement: The cover plate is secured to the housing with two 1" bolts.
  9. Diffuser Installation (Optional): If desired, the decorative diffuser is installed by aligning its keyholes with the three screw heads around the fixture's bottom, pushing up, and rotating counter-clockwise to secure it.
  10. Power Activation and Testing: Electricity is turned on at the fuse or circuit breaker box to verify successful installation. Testing should be done at night or by blocking the photocontrol.
  11. Moisture Seal: Silicone caulking (not included) is applied for a moisture seal.

Maintenance Features:

The TDD LED 2 is designed for low-maintenance service, as it uses LEDs and does not require bulb changes.

  • Cleaning: Surfaces should be cleaned with mild soap and water. Abrasive materials such as scouring pads, powders, steel wool, or abrasive paper should not be used.
  • Troubleshooting Guide: A comprehensive troubleshooting guide is provided for diagnosing and correcting issues if the fixture fails to operate properly.
    • Basic Checks: Verify that power is on at the switch and breaker, the fixture is wired properly, and the line voltage is correct.
    • Photocontrol Test: To test the photocontrol, cover it (light should turn on) or shine a flashlight into it (light should turn off).
    • Cycling On/Off: If the fixture cycles on and off, it indicates light reflecting from surrounding surfaces is entering the photocontrol. Repositioning the fixture or eliminating reflective surfaces can correct this.
  • Technical Support: For further technical assistance, users can contact Technical Support at (800) 279-8041.
  • No User Serviceable Parts: The manual explicitly states that there are no user-serviceable parts inside the fixture, implying that any internal issues requiring repair should be handled by qualified personnel or through warranty service.
  • Warranty: The product comes with a 5-year limited warranty. Users are encouraged to register their warranty on www.lightahome.com/warranty. Failure to follow instructions may void product warranties. Acuity Brands Lighting, Inc. disclaims responsibility for claims arising from improper or careless installation or handling.
  • Recycling: Information on recycling LED electronic products can be found at www.epa.gov.

Safety Instructions:

The manual includes important safety instructions to prevent death, personal injury, or property damage from fire, electric shock, falling parts, cuts/abrasions, and other hazards.

  • General Precautions: Read all warnings and instructions on the fixture box and labels. Follow general precautions before installation, servicing, or routine maintenance.
  • Qualified Electrician: Commercial installation, service, and maintenance should be performed by a qualified licensed electrician. For residential installations, if unsure, consult a qualified electrician and local electrical codes.
  • Regular Maintenance: Maintenance should be performed by persons familiar with the luminaire's construction and operation. Regular fixture maintenance programs are recommended.
  • Grounding: The fixture must be connected to a properly installed and grounded UL-listed junction box.
  • Refractor/Lens Cleaning: The outside of the refractor/lens should be cleaned with warm water and mild, non-abrasive household detergent, then rinsed and wiped dry. If the optical assembly becomes dirty inside, clean as described and replace damaged gaskets as necessary.
  • Damaged Product: Do not install damaged products. Inspect for transit damage; any damaged or broken parts should be replaced.
  • Risk of Electric Shock: Disconnect power before installation or servicing. Verify supply voltage. All electrical and grounded connections must comply with the National Electrical Code (NEC) and local codes, using UL-approved wire connectors.
  • Risk of Injury: Wear gloves and safety glasses when handling the luminaire. Avoid direct eye exposure to the light source when it is on.
  • Risk of Burn: Allow the lamp/fixture to cool before handling. Do not touch the enclosure, lens, or light source. Do not exceed maximum wattage. Follow manufacturer's warnings and restrictions. Use only ANSI-compliant lamps.
  • Risk of Fire: Keep combustible materials away from the lamp/lens. Do not operate near persons, combustible materials, or substances affected by heat.
  • Risk of Product Damage: Never connect components under load. Do not mount or support fixtures in a way that cuts or damages wire insulation. Do not connect LED products directly to dimmer packs, occupancy sensors, timing devices, or other control devices; LED fixtures must be powered directly off a switched circuit. Do not restrict fixture ventilation; allow airspace around the fixture. Avoid covering LED fixtures with insulation, foam, or other materials that prevent convection or cooling. Do not exceed maximum ambient temperature. Use the fixture only in its intended location.
  • Polarity Sensitivity: LED products are polarity sensitive; ensure proper polarity before installation.
  • Electrostatic Discharge (ESD): ESD can damage LED fixtures. Wear personal grounding equipment during installation or servicing. Do not touch individual electrical components.
  • Non-Serviceable Components: Some internal components may not be serviceable. If service is required, stop using the unit and contact an ABL representative.
  • Modifications: Changes or modifications not expressly approved by Acuity Brands Lighting could void the authority to operate the equipment.
  • FCC Compliance: The equipment complies with Class B digital device limits per FCC Rules Part 15. It generates, uses, and can radiate radio frequency energy. If it causes harmful interference to radio or television reception, corrective measures include reorienting the antenna, increasing separation, connecting to a different circuit, or consulting a radio/TV technician.

Lithonia Lighting TDD LED 2 Specifications

General IconGeneral
BrandLithonia Lighting
ModelTDD LED 2
CategoryOutdoor Light
LanguageEnglish

Related product manuals