SAVE THESE INSTRUCTIONS
2003 © Acuity Lighting Group, Inc., Rev B 08/09/07
RJ5210140 INST SHT TWR2
SAVE THESE INSTRUCTIONS AND DELIVER TO OWNER AFTER INSTALLATION
Page 2
Reference product warnings and instructions on Page 1 prior to beginning installation.
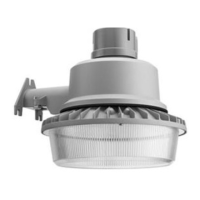
SURFACE CONDUIT MOUNTING
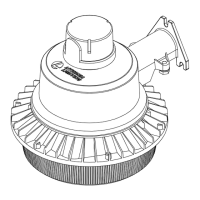
1. Remove the lamp, reflector, and component cover and keep them in a safe place.
2. Look at the back of the rear housing to locate the pre-cast locators which allow for lag-bolt surface mounting. Using a hammer and punch, prepare
the housing by knocking out only the appropriate mounting holes.
3. Remove the appropriate threaded plug (top of sides) from housing to allow conduit entry
4. Attach conduit to fixture and secure fixture to wall
NOTE: All unused conduit entries must be plugged.
5. Use code compliant connectors to connect fixture leads to supply leads, being careful to follow the wiring directions below.
6. Replace the component cover and reflector and install lamp, being careful to follow the re-lamping directions below.
7. Replace lens. Make sure that the lens gasket is properly seated around the perimeter of the lens to insure a weathertight seal.
8. Make sure all wiring access holes are sealed with weatherproof silicone sealant.
NOTE: Fixture must be installed per all applicable national and local codes.
WIRING
Caution: Check that voltage is compatible with fixture ballast. Use approved connectors for all electrical connections. Use a minimum of 150°C wires if
splices are made inside luminaire.
1. Connect the black fixture lead to the black supply lead.
2. Connect the white fixture lead to the white supply lead.
3. Connect the green, or bare copper fixture lead to the green supply lead.
NOTE: Refer to wiring diagram on ballast. Multi-tap ballasts may not use standard wire colors.
LAMP INSTALLATION AND RE-LAMPING
1. When re-lamping, turn power off and allow the fixture to cool adequately.
2. Install the correct lamp (provided). Prior to installing the lamp in the fixture, check to be sure the lamp is of proper type and wattage. Screw the lamp
securely into the socket, back the lamp out one to two turns, then screw the lamp back in, making sure it is secure. This properly seats the lamp in the
socket.
3. Secure front cover to housing. Be sure that the gasket is firmly seated in the proper channel prior to closing fixture to maintain weather-tight seal.
4. Re-connect the power.