4
7、Installation steps
Ⅰ、Linedrawing
1. draw a horizontal center line
1m from the ground on both
sides of the door.
2.Fold the opening template in
half, align the center line of the
handle of the opening template
with the horizontal line on the
door, and draw the opening
lines on the front and side of the
door according to the require-
ments of the opening template.
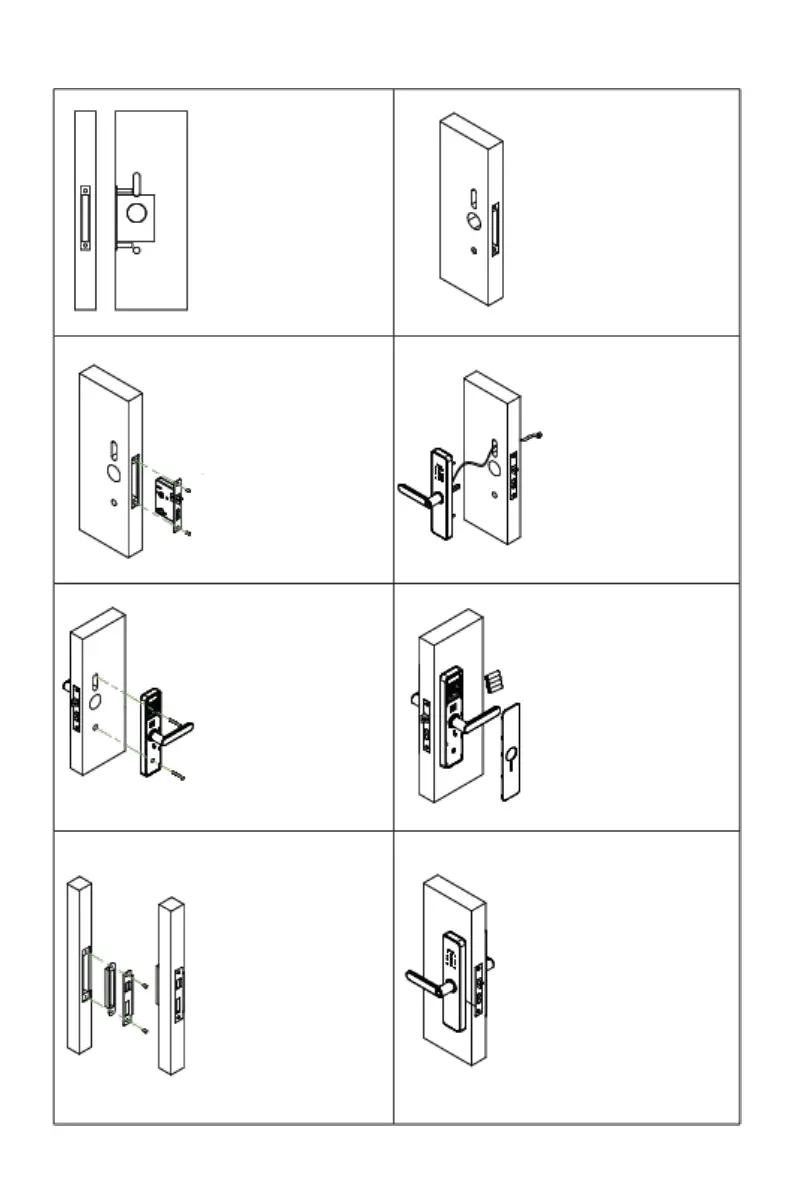
Ⅳ、Front Panel Installation
1.Install the hollow stud and
square sha ft on the fron t
panel .
2.Align the shaft on the front
panel with the square shaft
hole on the lock mortise.
3、ins tall the fron t panel
horizontally to the outside of
the door.
Ⅵ、Battery and rear cover
plate installation
Install the new battery into the
battery box according to the
positive and negative align-
ment, and install the rear cover
plate into the rear panel after
the power on is normal.
Ⅶ、Install the door gusset
plate
2.Open the lock mechanical key
hole cover, insert the mechanical
key, twist the key in place clock-
wise, then push the handle to
open the door, and check whether
the ke y c an open the door
normally.
3.Test the door opening function
after setting the door lock accord-
ing to the door lock operation
guide .
1.Put the door close to the door
frame, draw the position of the
lock tongue on the door frame
with a pencil, and then draw the
opening shape of th e door
frame .
2.After opening the hole, put the
Latch box and the door gusset
plate into the hole as shown on
the left, and fix the gusset plate
with 2 M5*20 screws.
3 . Closin g the do or, check
whether the lock tongue can be
fully extended.
Ⅴ、Back Panel Installation
1.Align and insert the front and
rear wiring.
2.Attach the back plate to the
door, and lock the front and
back panels with two panel
screws, lock and fix.
Ⅱ、Opening
Open the panel and lock
core mo unti ng hol es
according to the require-
me nt s of the o pen i ng
template.
Ⅲ、Install the lock
Install the lock mortise into
the mort ise hole in door
frame, and secured to the
door with two M5*20 screws.
Ⅷ、Installation and debugging
1 .tur n the han dle , chec k the
flexibility of the front and back
handle.
 Loading...