Do you have a question about the Logosol BIG MILL and is the answer not in the manual?
Lists parts for the saw carriage, including the carriage itself and its holders.
Lists tube locks, tubes, oil, and water bottles for the assembly.
Details the guide bar and associated components for saw operation.
Lists bagged items, plugs, and bolts included in the kit.
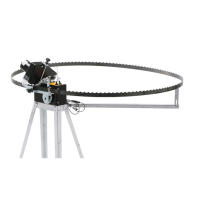
Provides a diagram labeling key parts of the assembled saw.
Visual representation of how the saw frame components fit together.
Explains the meaning of warning and information symbols used in the manual.
Guidelines on necessary protective gear like gloves, goggles, and footwear.
Warnings about cutting tools, hot parts, and the importance of reading the manual.
Rules covering protective gear, correct usage, and site conditions.
Addresses risks like chain throw-out, kickback, and working alone.
Safety advice for using a petrol-driven chainsaw, including refueling.
How to properly hold and operate the saw during the cutting process.
Steps to take after completing a cut, including safety measures.
Instructions and checks required before starting the chainsaw.
Guidance on setting up a safe and level work area for sawing.
Steps for marking logs and performing pre-saw safety checks.
Importance of regular maintenance for equipment functionality.
Critical safety advice related to performing maintenance tasks.
Tips on sharpening the chain, avoiding breaks, and maintaining the guide bar.
Recommendations for chain oil and reference to a cutting tools handbook.
Attaching tube holders to the saw and bar nose carriages.
Fitting tubes into the saw carriage and bar nose carriage holders.
Installing tube locks and placing oil/water bottles.
Connecting the water and oil bottles to the lubrication system.
Instructions for replacing bumper spikes, including a safety note.
Fitting the guide bar and reinstalling the guide bar cover.
Removing the oil pump plate and mounting the chainsaw onto the saw carriage.
Fitting guide bar, chain, and refitting the oil pump plate.
Detaching tubes, removing bottles, and loosening tube locks.
Supporting the saw and removing tube holders from both carriages.
Removing tubes, releasing chain tension, and unscrewing the saw carriage.
Loosening nuts, removing the cover, and loosening oil pump plate nuts.
Removing the oil pump plate, lifting the old chain, and installing the new chain.
Marking the first cut and securing the guide rail holder on the log.
Placing the supports for the guide rails onto the log.
Attaching and fastening the guide rails to their respective supports.
Fine-tuning the guide rails to ensure they are parallel.
Fitting plates with eyebolts and threading the feed line through them.
Performing the first cut and creating saw templates for subsequent cuts.
Adjusting for the next cut, performing it, and repeating for desired board dimensions.
Guidelines for drying sawn wood outdoors to prevent damage.
Methods for drying wood for fine joinery or achieving optimal results.
Information on wood shrinkage and considerations for using undried wood.
Information regarding product compliance with directives and standards.
| Brand | Logosol |
|---|---|
| Model | BIG MILL |
| Category | Power Tool |
| Language | English |