Do you have a question about the Lorex B862AJ Series and is the answer not in the manual?
Includes video doorbell, standard mounting bracket, and optional angled brackets.
Lists USB cable, wire harness, chime kit, screws, anchors, and wire caps.
Lists pin, extra wires, drill bit, and pre-inserted microSD card.
Lists necessary tools like a drill and screwdriver for installation.
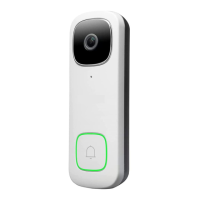
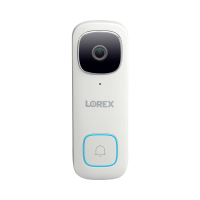
Describes the camera, microphone, status indicator, and call button on the front.
Details the micro-USB port, reset hole, and power ports on the back.
Shows the warning/night light and speaker at the bottom.
Explains solid blue, red, and green LED states for power, reset, and operation.
Explains slow and rapid flashing blue states for connection and motion detection.
Explains flashing red (network error), flashing green (talk), and multi-color (firmware update).
Explains spinning red (no internet) and spinning green (call in use) states.
Download the app and create or log into your Lorex Home account.
Use the '+' icon and scan the device QR code to add it to the app.
Option to manually enter the Device ID if QR scan fails.
Follow in-app instructions or the quick start guide for setup.
Turn off power at the breaker to the existing doorbell and chime.
Disconnect wiring and secure cables from the old doorbell.
Confirms the need for a 16-24 VAC power supply for the doorbell.
Determine if your home chime is electronic or mechanical.
Steps for mechanical chimes, including connecting the chime kit.
Connect the chime kit wiring to the FRONT and TRANS terminals.
Secure the chime kit inside or on the cover plate of the chime box.
Mark holes, ensure UP arrow points up.
Attach horizontal or vertical brackets for desired viewing angle.
Lock brackets together and secure the bracket to wall surfaces using screws or anchors.
Ensure UP arrow, angled bracket, and cable fit are correct before finishing.
Loosen the screws on the doorbell's power ports.
Loop the power wires underneath the port screws and tighten.
Use extra wires and wire caps to extend short existing doorbell wires.
Push wires back, insert tabs, and press doorbell down to lock onto bracket.
Use a pin to release the buckle and slide the doorbell upwards.
Customize person detection zones, sensitivity, and LED alerts.
Configure night light mode and record custom voice responses.
Manage shared users and adjust video quality settings.
Details controls for live view and calling screens, including snapshot and talk.
Addresses issues with the doorbell not turning on or chime not working.
Instructions for factory reset and managing the microSD card.
Covers managing notifications and scheduling the night light.
Answers questions about USB power, custom responses, and wireless range.
| Series | B862AJ |
|---|---|
| Night Vision | Yes |
| IR Cut Filter | Yes |
| Audio | Yes, built-in microphone |
| Two-Way Audio | No |
| Active Deterrence | Yes |
| Motion Detection | Yes |
| Operating Temperature | -22°F ~ 140°F / -30°C ~ 60°C |
| Weather Resistance | IP67 |
| Housing Material | Metal |
| Power Supply | Power over Ethernet (PoE) |
| Dimensions | 79mm x 79mm x 163mm |
| Weight | 0.59kg |
| Connectivity | Ethernet |
| Camera Type | IP Camera |