EasyManua.ls Logo

Lowrance 10 User Manual

Lowrance 10
6 pages
To Next Page IconTo Next Page
Page #1 background imageLoading...
Page #1 background image
1

!!!


          

 
     
!"
 #$!
!"%"&''
()!"
!*
"+!
!,!"
''!"
   !    -.-   !  
!!"

/      !     
!"

 
Gimbal knob
Plastic washer
Gimbal bracket
Sonar unit
Rubber washer
Question and Answer IconNeed help?

Do you have a question about the Lowrance 10 and is the answer not in the manual?

Lowrance 10 Specifications

General IconGeneral
BrandLowrance
Model10
CategoryPower Pack
LanguageEnglish

Summary

Portable Power Pack Installation

Attaching Sonar Unit to Bracket

Connect the sonar unit to the gimbal bracket using the provided washers and knobs.

Installing the Batteries

Battery Installation and Connection

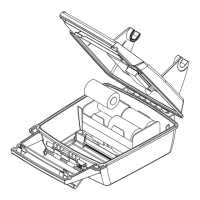
Install batteries, close the case, and connect the power cable to the sonar unit.

Battery Troubleshooting and Maintenance

Check contacts, wiring, voltage, and remove batteries before storage to prevent corrosion.

Portable Transducer Assembly and Mounting

Transducer and Bracket Assembly

Assemble the transducer to the bracket using washers, bolt, and nut.

Suction Cup and Cord Attachment

Screw suction cup onto bracket and tie nylon cord to bracket and boat for security.

Hull Mounting and Cable Routing

Moisten cup, press onto hull, tie cord to boat, and route cable to sonar unit.

Full One-Year Warranty

Warranty Coverage and Remedies

Covers defects for one year; remedies include repair, replacement, or refund.

Warranty Exclusions and Conditions

Excludes coverage for unauthorized service, improper handling, accidents, or negligence.

Warranty Rights and Reminders

Outlines legal rights, company product changes, and need to retain sales receipts.

Contact Information

LEI Extras, Inc. Contact Details

Provides website, toll-free phone number, and mailing address for LEI Extras, Inc.

Related product manuals