FCC / IC Information
This device complies with part 15 of the FCC Rules and Industry Canada license-exempt RSS standard(s). Operation is subject to
the following two conditions: (1) This device may not cause interference, and (2) this device must accept any interference, including
interference that may cause undesired operation. Modifications not expressly approved by Lutron Electronics Co., Inc. could void the
user’s authority to operate this equipment.
NOTE: This equipment has been tested and found to comply with the limits for a Class B digital device, pursuant to part 15 of the FCC
Rules. These limits are designed to provide reasonable protection against harmful interference in a residential installation. This equipment
generates, uses and can radiate radio frequency energy and, if not installed and used in accordance with the instructions, may cause
harmful interference to radio communications. However, there is no guarantee that interference will not occur in a particular installation.
If this equipment does cause harmful interference to radio or television reception, which can be determined by turning the equipment off
and on, the user is encouraged to try to correct the interference by one or more of the following measures:
• Re-orient or relocate the receiving antenna.
• Increase the separation between the equipment and receiver.
• Connect the equipment into an outlet on a circuit different from that to which the receiver is connected.
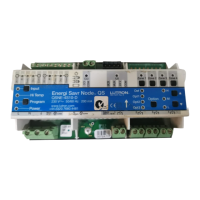
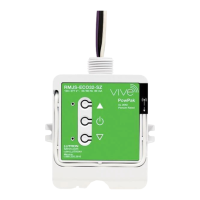
PowPak Fixture Controls
Programming without a Vive Hub
Limited Warranty:
www.lutron.com/TechnicalDocumentLibrary/369-119_Wallbox_Warranty.pdf
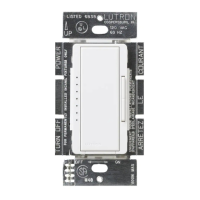
Low-End Trim
A
Enter low-end trim adjustment mode:
Press and hold the Lower button “
Ǻ
” on the fixture control for 12 seconds.
The lights will flash and the load status LED will begin flashing.
B
Adjust the low-end trim:
Use the Raise button “
ŷ
” and Lower button “
Ǻ
” on the fixture control to adjust and set the lights to
the desired low-end (1 to 45%).
C
Save the low-end trim:
Press and hold the Toggle button “ u” for 6seconds to save setting.
The load status LED will begin flashing and then turn solid to indicate new level has been saved.
High-End Trim
A
Enter high-end trim adjustment mode:
Press and hold the Raise button “
ŷ
” on the fixture control for 12seconds.
The lights will flash and the load status LED will flash.
B
Adjust the high-end trim:
Use the Raise button “
ŷ
” and Lower button “
Ǻ
” on the fixture control to adjust and set the lights to
the desired high-end (55 to 100%).
C
Save the high-end trim:
Press and hold the Toggle button “ u” for 6seconds to save setting.
The load status LED will begin flashing and then turn solid to indicate new level has been saved.
Set Low-End Trim and High-End Trim (Optional)
For best results, minimize the amount of sunlight entering the room before performing the
following procedures.
Depending on the fixture manufacturer or load, low-end trim and high-end trim may need
to be adjusted.
• Trim low-end to ensure a stable light level because some loads will flicker or drop out if trimmed too low.
• Be sure that you can turn on the lights to the low-end trim level without any abnormal operation.
• The factory default high-end trim is suitable for most applications but can be adjusted as desired.
NOTE: High-end and low-end trim can also
be performed for a single unit or group of units
simultaneously with a Pico remote control.
For more information see P/N 048556
on www.lutron.com.
Lutron, EcoSystem, Pico, PowPak, and Vive are trademarks of Lutron Electronics Co., Inc., registered in the U.S. and other countries. Radio Powr Savr is a trademark of Lutron Electronics Co., Inc. Safari is a trademark of Apple Inc., registered in the U.S. and other countries. iOS is a registered trademark of Cisco in the U.S. and other countries and is used
under license. Google is a registered trademark and Android and Chrome are trademarks of Google Inc. NEC is a registered trademark of the National Fire Protection Association, Quincy, Massachusetts. ©2014 – 2018 Lutron Electronics Co., Inc.
B
Hold the indicated button on each transmitter for 6seconds. The
fixture will flash to show that wireless transmitters have been
associated. Alternatively, for Radio Powr Savr occupancy / vacancy
and daylight sensors, the green laser pointer can be used. See Lutron
Application Note #407 (P/N 048407) on www.lutron.com for more
information. To associate another transmitter, repeat steps 1A and 1B.
Test
Link
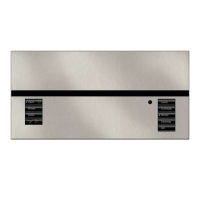
Associate Transmitters to Fixture Control
Before beginning this step, make sure that there are no other fixture
controls being set up in the building which are currently in association
mode. It is possible that wireless transmitters from other systems can be
incorrectly associated to this module.
OR
Laser Detection
Green laser specifications:
• Wave output: constant
• Wavelength: 532 nm
• Output power: 5 mW maximum
Note: The fixture control will automatically exit
association mode 10 minutes after the last activity.
A
Initiate association mode on the fixture control in one of two ways:
1 Press and hold the Toggle button “ u ” for 6 seconds on the fixture
control until the load attached to the fixture control starts flashing
(every 2 seconds).
2 Alternatively, shine a green laser pointer (available at hardware or
office supply stores) at the laser detection hole on the sensor until the
load attached to the fixture control starts flashing (every 2 seconds).
Note: Multiple fixture controls can be placed into association mode
by repeating one of the two above methods for the next fixture control
prior to moving to Step 1B.
!
WARNING
!
DANGER
Eye injury and/or blindness hazard; avoid direct eye exposure to laser beam.
• Use of laser pointer is NOT recommended for use with Lutron products located near
reflective surfaces.
• DO NOT aim or shine laser pointers at any person, pet, vehicle, or aircraft directly, or
through reflection by mirrors or other shiny surfaces. DO NOT view the laser beam through
binoculars magnifying glass, or other optical devices.
• DO NOT allow children to use laser pointers.
• Read and follow the laser pointer manufacturer’s instructions on safe use. In the
event of injury, get medical attention immediately.
Tes t
Link
Cal.
Calibrate the Radio Powr Savr Daylight Sensor
Daylight Sensor will control all wired fixtures equally.
Start Here
Troubleshooting www.lutron.com/support
Symptom Solution
Ballasts / drivers cannot be controlled
locally from the fi xture control.
• Ensure that the breaker(s) to the fixture control are energized.
• Ensure that the fixture control switched hot lead is wired to the ballast / driver (FCJS-010 / FCJS-010-EM).
• Ensure that the fixture control control lines (FCJS-010 / FCJS-010-EM: violet/gray, FCJS-ECO /
FCJS-ECO-EM: violet/violet) are wired to the ballast / driver.
• If using FCJS-010 / FCJS-010-EM, verify the driver/ballast is 0 –10 V-.
If using FCJS-ECO / FCJS-ECO-EM, use the Lutron EcoSystem driver/ballast.
Reset to factory defaults.
Lights do not dim or turn ON as
expected.
• Ensure that control lines are wired properly (FCJS-010 / FCJS-010-EM: violet/gray-polarity-
sensitive, FCJS-ECO / FCJS-ECO-EM: violet/violet)
• Ensure that the wires are connected between the fixture sensor and the fi xture control.
• FCJS-010 / FCJS-010-EM only: Make sure that 0 –10 V- fixture is at low-end (at 0 V), not OFF
(at 0 V). If OFF (at 0 V), adjust low-end trim.
• FCJS-010 / FCJS-010-EM only: Ensure that fixture does not require an inverted signal
(10 – 0 V- control).
• FCJS-010 / FCJS-010-EM only: Verify that the voltage across the gray and violet wires is between
0 and 10 V-.
• FCJS-ECO / FCJS-ECO-EM only: Disconnect the violet / violet wires from the fixture control.
Verify that the lights go to 100%.
• FCJS-010 / FCJS-010-EM only: Disconnect the violet / gray wires from the fixture control. Verify
that the lights go to 100%. Short the violet / gray wires on the ballast / driver, verify that the lights
go to low-end.
Lights do not respond to wireless
transmitter(s).
• Ensure that the breaker(s) to the fixture control and ballasts / drivers are energized.
• Ensure that wireless transmitters are associated to the fixture control.
Reset to factory defaults.
Wireless transmitter(s) cannot be
associated to the fixture control.
• The maximum number of wireless transmitters have been associated to the fixture control. To
remove a previously set up wireless transmitter, tap any button on the wireless transmitter three
times; on the third tap, hold for three seconds and then tap three more times.
RF range between wireless controls
is diminished below 30 ft (9 m).
• Keep the ballast/driver wiring as short as possible and well organized to avoid excess wire being
bunched up.
• Keep the first 7 in –12 in (20 cm –30 cm) of the wires coming out of the fixture control knockout
separated as much as possible from any nearby ballast/driver/lamp wires.
• Contact Lutron Customer Assistance for further details.
Lights are unstable at low-end. • Adjust low-end trim.
Fixture sensor does not turn the lights
ON.
• Check that fixture sensor wires are connected to fixture control.
• FC-VSENSOR is vacancy only (it will not turn the lights on).
Fixture control is in emergency mode
(FCJS-010-EM, FCJS-ECO-EM only).
• In systems with a Vive hub: Contact Lutron Customer Assistance for further details.
• In systems without a Vive hub: Wait 90 minutes for the PowPak to return to normal operation.
Fixture control will not go into
emergency mode
(FCJS-010-EM, FCJS-ECO-EM only).
• Contact Lutron Customer Assistance for further details.
For information on activating egress mode, application suggestions, and many other notes on the PowPak fixture controls, see Lutron
document 048556 or 369918 on www.lutron.com.
A
Press and release the “Cal.” button on the Daylight Sensor.
B
Set lights in room to desired light level.
C
Press and hold the “Cal.” button for 6seconds.
D
Exit room for 5 minutes to complete calibration.
Note: When calibration has completed, all lights will flash and begin to respond to daylight.
Customer Assistance | 1.844.LUTRON1 U.S.A., Canada, and the Caribbean | +44.(0)20.7680.4481 Europe | +1.610.282.3800 Others | www.lutron.com/support
Part of the Vive Family
Customer Assistance www.lutron.com/support
1
2
Raise
Lower
Favorite
Set a Favorite Light Level (Optional)
For Pico remote controls with a Favorite Button.
A
Adjust lights to desired level:
Use the Raise button “
” or Lower button “ ” on the Pico remote control.
B
Save favorite level:
Press and hold the Favorite button for 6seconds. The load will flash 3 times
to confirm that the Favorite level is saved.
3
4
Wireless Controls: All lights
Default Functionality
Fixture Controls
Auto On level: FC-SENSOR only
(not applicable for FC-VSENSOR)
Varies with ambient light level when occupancy is triggered
(e.g., 100% for a dark room, 10% for a bright room).
Timeout period: 15 minutes
On: 100% ; Favorite: 50%; Off: 0%
 Loading...