EasyManua.ls Logo

Luxul Epic 3 - User Manual

Luxul Epic 3
8 pages
Print Icon
To Next Page IconTo Next Page
Loading...
Fo ld Fo ld Fo ld
READ ME FIRST
QUICK INSTALL GUIDE
Epic 3
Dual-Band AC3100 Gigabit Router
XWR-3150
Includes:
Dual-Band Wireless AC3100 Gigabit Router
Dual Band Antennas (4)
Ethernet Cable
Power Adapter
ROUTER SETUP AND CONFIGURATION
1
Physical Installation
The Epic 3 Wireless Router is designed for simple and ecient installation. For
horizontal installation, install the rubber feet and position the Epic 3 on a desk
or other horizontal surface with adequate room around the device for ventila-
tion. For wall or ceiling mounting, simply follow the directions on the included
mounting pattern and use the mounting keyholes on the Epic 3.
2
Connecting Antennas, Ethernet and Power
Antennas: Ensure all dual-band antennas are installed on the router.
INTERNET Connection: Connect the Ethernet cable from the modem/
router equipment provided by your Internet Service Provider (ISP) to the
black INTERNET port of the Epic 3.
AC Power: Connect the included AC Adapter to the XWR-3150 first and then
to the AC outlet.
3
Preparing for Access
IP Addressing
The Epic 3 default LAN IP address is 192.168.0.1. The DHCP server on the Epic 3 is
configured by default to create a 192.168.0.x network.
Both the default LAN IP address and subnet scheme can be changed. However
for hassle-free plug-and-play installation of other Luxul hardware, we recom-
mend you use the default IP address if possible.
If your client device is set to obtain an address automatically, no further config-
uration is required and you can skip to the next step, Access and Setup.
If your computer or device isnt set to obtain an IP address automatically,
you’ll need to set a temporary static IP address on that device. Set the IP
address of your computer to an address in the 192.168.0.X range, then
set the Gateway/Router address to 192.168.0.1 (the default IP address of
the Epic 3).
n NOTE: Visit http://luxul.com/ip-addressing to learn more about
changing your computer’s IP address and getting connected.
4
Access and Setup
Getting Connected
Connecting Via an Ethernet Device: Use an Ethernet cable to connect
your computer to one of the green Epic 3 LAN ports. Ethernet is the
preferred method of connection.
Connecting Via a Wireless Device: Connect a wireless client device to
one of the Epic 3 default wireless networks (Luxul3150 or Luxul31505G).
Both Wireless networks will run in Open security mode, so a passphrase
will not be required until wireless security is configured.
Open a web browser, enter 192.168.0.1, then log in to the router using the
default user name and password and proceed with configuration:
Default IP: 192.168.0.1
Username: admin
Password: admin
n NOTE: If another device on your network shares the 192.168.0.1
address, you’ll need to reassign that device a dierent IP
address to configure the Epic 3.
n NOTE: Only devices that support the 5GHz frequency will see the
default Luxul31505G wireless network.
Sales
P: 801-822-5450
E: sales@luxul.com
Technical Support
P: 801-822-5450 Option 3
E: support@luxul.com
LUX-QIG-XWR-3150-v3 02211801
Copyright and Trademark Notices
No part of this document may be modified or adapted in any way, for any purposes without permission
in writing from Luxul. The material in this document is subject to change without notice. Luxul reserves
the right to make changes to any product to improve reliability, function, or design. No license is granted,
either expressly or by implication or otherwise under any Luxul intellectual property rights. An implied
license only exists for equipment, circuits and subsystems contained in this or any Luxul product.
© Copyright 2016 Luxul. All rights reserved. The name Luxul, the Luxul logo, the Luxul logo mark and Simply
Connected are all trademarks and or registered trademarks of Luxul Wireless, Inc. All other trademarks and
registered trademarks are property of their respective holders.
Question and Answer IconNeed help?

Do you have a question about the Luxul Epic 3 and is the answer not in the manual?

Summary

Router Setup and Configuration

Physical Installation

Instructions for physically placing the router, including horizontal placement and wall or ceiling mounting options.

Connecting Antennas, Ethernet and Power

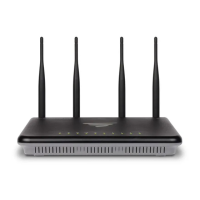
Steps to connect the router's antennas, link to the modem via Ethernet, and connect the power adapter.

Preparing for Access

Details on default IP addressing, DHCP configuration, and network setup for device access.

Access and Setup

Guidance on connecting devices via Ethernet or Wi-Fi, accessing the router interface, and initial login.

Advanced Configuration

Configuring the Epic 3 as a Wireless Controller

Enabling the router to manage up to two additional access points for seamless client roaming and configuration.

Activating Domotz in a Luxul Router

Information and link to learn how to activate the Domotz feature within a Luxul router.

Other Advanced Configuration

References for configuring advanced features like DDNS, VPN, and other network settings.

Hardware Operation and Details

Front Panel LED Indicators

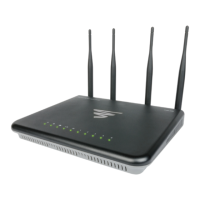
Explanation of the status and function of each LED indicator on the front panel of the Epic 3 router.

Antenna Ports

Details on the four RPSMA female antenna ports for connecting the included antennas.

WAN and LAN Ports

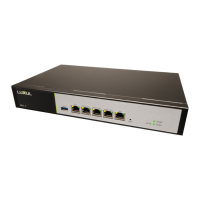
Description of the WAN port for internet connection and the four LAN ports for local network connectivity.

Reset Button Functionality

Explanation of the reset button's use for restoring factory default settings and the caution involved.

Overview

The Luxul Epic 3 XWR-3150 is a Dual-Band AC3100 Gigabit Router designed for simple and efficient installation, offering robust wireless connectivity and advanced network management capabilities.

Function Description:

The Epic 3 XWR-3150 serves as a central hub for a network, providing both wired and wireless connectivity. It operates on dual bands (2.4GHz and 5GHz) to deliver high-speed AC3100 wireless performance. Beyond basic routing, it can function as a wireless controller, managing up to two additional compatible access points to enable seamless wireless client roaming and simplified configuration. This feature is particularly useful for larger installations requiring extended wireless coverage without manual configuration of individual access points. The router also supports advanced features such as DDNS (Dynamic Domain Name System) and VPN (Virtual Private Network), catering to more complex network requirements.

Important Technical Specifications:

  • Model: XWR-3150
  • Wireless Standard: Dual-Band AC3100
  • Ethernet Ports:
    • 1x Black RJ-45 Ethernet Port for Internet (WAN) connection.
    • 4x Green RJ-45 Ethernet Ports for local network (LAN 1-4) connections.
  • Antenna Ports: 4x RPSMA female antenna ports for connecting the included dual-band antennas. All four antennas must be installed for optimal performance.
  • IP Addressing: Default LAN IP address is 192.168.0.1, with a DHCP server configured to create a 192.168.0.x network by default.
  • Default Login Credentials:
    • Username: admin
    • Password: admin
  • Power: Requires an included power adapter.
  • LED Indicators (Front Panel):
    • 5GHz LED: ON indicates a 5GHz wireless network is broadcasting.
    • 2.4GHz LED: ON indicates a 2.4GHz wireless network is broadcasting.
    • 1-4 LED: ON indicates a device is connected to the corresponding Ethernet port. FLASHING indicates data packets are being transmitted to the connected device.
    • Internet LED: ON indicates the router is connected to the ISP. FLASHING indicates data packets are being transmitted.
    • USB LED: ON indicates a USB-enabled device is connected and configured.
    • System LED: FLASHING indicates the router is booting. HEART BEAT indicates the router is operating normally. OFF indicates the router is not booting.
    • Power LED: ON indicates power is applied to the router. OFF indicates power is not applied to the router.

Usage Features:

  • Physical Installation: The router can be installed horizontally on a desk or other surface, or wall/ceiling mounted using the provided mounting pattern and keyholes. Adequate room around the device for ventilation is recommended.
  • Antenna Connection: Four dual-band antennas are included and must be installed into the RPSMA female antenna ports prior to powering up the device for optimal wireless performance.
  • Internet Connection: Connect the Ethernet cable from the modem/router provided by the Internet Service Provider (ISP) to the black INTERNET port on the Epic 3.
  • Local Network Connection: Connect client devices to the local network using Ethernet cables plugged into the green LAN 1-4 ports.
  • Wireless Connection: The router broadcasts two default wireless networks: "Luxul3150" (2.4GHz) and "Luxul31505G" (5GHz). These networks operate in Open security mode initially, meaning no passphrase is required until wireless security is configured. Note that only devices supporting the 5GHz frequency will detect the "Luxul31505G" network.
  • Web-Based Configuration: Access the router's configuration interface by opening a web browser and entering the default IP address (192.168.0.1). Log in using the default username and password (admin/admin).
  • IP Address Configuration: For client devices not set to obtain an IP address automatically, a temporary static IP address in the 192.168.0.X range should be set, with the Gateway/Router address set to 192.168.0.1. Luxul recommends using the default IP address for hassle-free integration with other Luxul hardware.
  • Wireless Controller Functionality: The Epic 3 can manage up to two additional compatible access points. To enable this, ensure the access points are on the same network as the Epic 3, then select "Wireless Controller" from the web configuration interface and follow the online help to add them to the profile. This allows for seamless client roaming and centralized management.
  • Domotz Activation: The manual provides a link to a YouTube video tutorial on how to activate Domotz in a Luxul router, indicating support for network monitoring and management services.
  • Advanced Configuration: For features like DDNS and VPN, users are directed to Luxul's support resources at luxul.com.

Maintenance Features:

  • Rebooting the Router: To reboot, disconnect the power adapter, wait 10 seconds, and then reconnect it.
  • Factory Reset: To restore the router to its factory default settings, press and hold the Reset button. Continue holding until the System LED stops flashing (approximately 20 seconds). A factory reset takes one minute or more to complete. A successful factory reset is indicated when all Port LEDs flash once, and the unit is ready when the System LED starts flashing again.
    • Caution: Holding the Reset button longer than 10 seconds will initiate a factory reset. Resetting to factory defaults will remove all custom settings.
  • Troubleshooting: The LED indicators on the front panel provide visual cues for the router's operational status, network activity, and connection status, aiding in basic troubleshooting.
  • Support Resources: Luxul provides technical support via phone (801-822-5450 Option 3) and email (support@luxul.com), as well as sales support (801-822-5450, sales@luxul.com). Online support resources are also available at luxul.com for advanced configuration and troubleshooting.

Luxul Epic 3 Specifications

General IconGeneral
BrandLuxul
ModelEpic 3
CategoryNetwork Router
LanguageEnglish

Related product manuals