EN
29
In
more
detail...
MLM1737
by MacAllister
Care and maintenance
Underbody and cutting blade
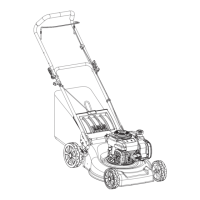
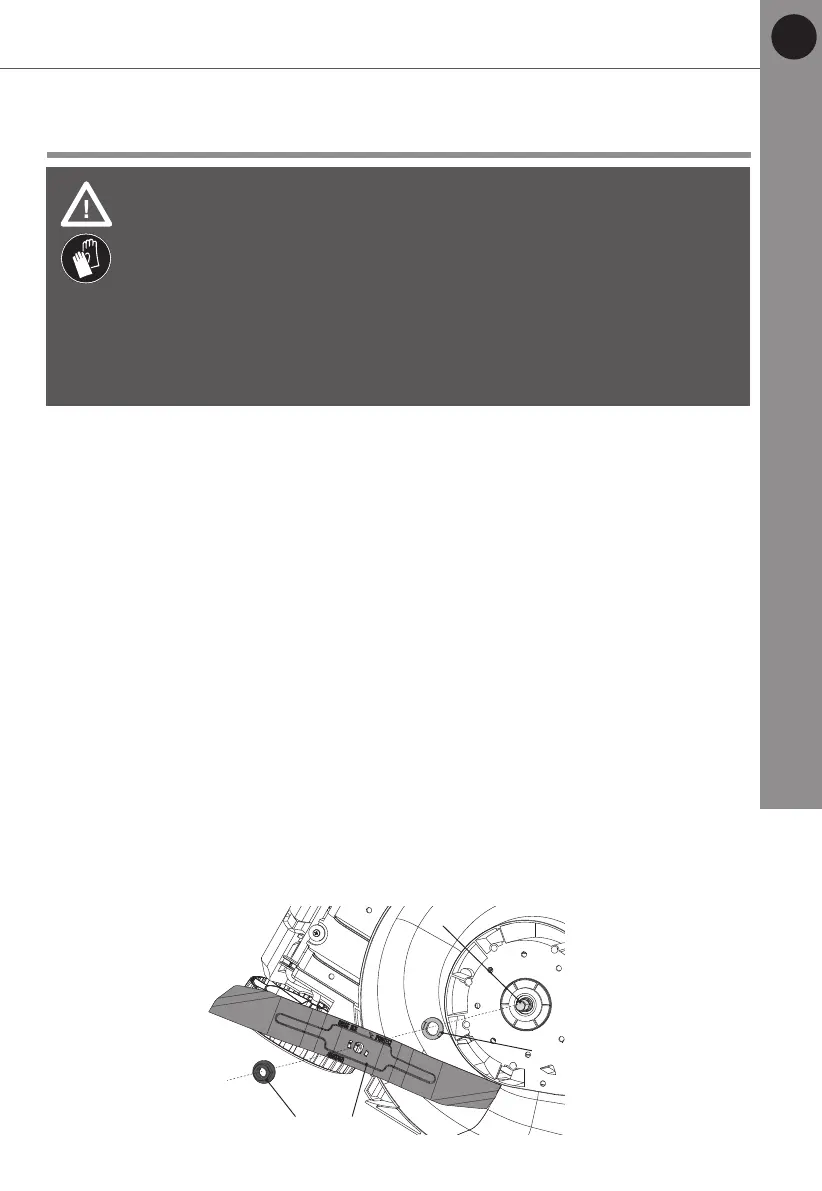
1. Keep the underbody and cutting blade (12c) clean and free of debris. Remove
clippings from the rear discharge chute (18).
2. Check all fasteners, such as nuts and bolts, periodically for tightness before
operation. After prolonged use, especially in sandy soil conditions, the cutting
blade will become worn and lose some of the original shape. The cutting
efciency will be reduced and the cutting blade should be replaced.
3. Keep the cutting blade (12c) sharp to ensure a good cutting performance.
Replace a worn or damaged cutting blade with a new one of the same type or
have it sharpened by a qualied specialist.
4. Loosen the hex nut (12d) anti-clockwise using a suitable wrench
(Size 17 mm) and remove it together with the cutting blade (12c) (Fig. 19).
5. Replace the cutting blade (12c) with a new one of the same type. Check the
status of the ange (12b) onto the spindle (12a) rstly, then attach the cutting
blade (12c) and hex nut (12d) properly. Tighten the hex nut (12d) clockwise
with 20 Nm min, 25 Nm max. to ensure safe operation of your product.
6. Replace this cutting blade after 50 hours mowing or 2 years whichever is
sooner regardless of condition. If the cutting blade is cracked or damaged,
you must immediately replace it with a new one.
7. Lubricate the cutting blade (12c) after each use to prolong the life span of
cutting blade and product. Apply light machine oil along the edge of the
cutting blade.
WARNING!
Wear safety gloves when working on the blade and close
to it! Use proper tools to remove debris, e. g. a wooden stick! Never
use your bare hands!
Always use original spare parts for replacement. The cutting blade
must be replaced by an identication no. ref. A056018100. Do not
attach any other type of cutting blade!
The replacement of the cutting blade should be done by a qualied
specialist! Rework or sharpening blades is not recommended unless
it is done by a repair service or a similarly qualied specialist!
12d 12c
12b
12a
Fig. 19
 Loading...