EasyManua.ls Logo

Mad Catz DUAL FORCE 2 - User Manual

Mad Catz DUAL FORCE 2
4 pages
Print Icon
To Next Page IconTo Next Page
Loading...
ENGLISH
DUAL FORCE 2
CONTROLLER
FOR PLAYSTATION®2, PSONE
AND PLAYSTATION®
Thank you for purchasing the Mad Catz Dual Force 2 controller for use with
PlayStation 2, PS one and PlayStation. We consider the Dual Force 2 controller to
be the finest product on the market. We hope that you will be pleased with your
purchase and that you will turn to Mad Catz for all your gaming accessory needs.
Be sure to visit www.madcatz.com to register your product and see new and
exciting video game controllers for your every gaming need!
CONTENTS
SET-UP 1
CONTROL MODES 1
PROGRAMMING MACROS 2
LAYOUT 4
TROUBLESHOOTING 5
TECHNICAL SUPPORT 6
WARRANTY 6
SET-UP
1. Turn the power to your game console OFF.
2. Insert the controller into the controller port on the game console.
3. Insert the game disk.
4. Turn the power to your game console ON and begin play.
CONTROL MODES
There are three different modes from which you can choose, depending on your style
of play. You change modes by pressing the Mode Button. The color of the lighted
Mode Button tells you which mode you are in:
Analog Controller Mode - RED
This is the standard “Dual Shock” Mode. Some games will only vibrate if the
controller is in Analog Controller Mode.
Steering Wheel Mode - GREEN
This mode is best for driving games that use Steering Wheel (or NegCon) protocols.
Some games will allow you to calibrate from within the software. This will allow the
user to adjust the sensitivity from within the game. This sensitivity and adjustment
feature is only available in Steering Wheel Mode.
Digital Mode - CLEAR
Digital Mode is the original PlayStation controller mode.
MACROS
The Dual Force 2 Controller features a powerful macro function. When playing
certain games, especially fighting games, a combination of directional pad and
action button presses execute special moves for more intricate attacks. The Macro
function allows that series of button presses to be easily programmed and executed
from a single button press. Being able to program these commands to a single
button will allow you to perform the special moves on demand and without failure.
Recording Macros
Macro’s can be recorded to four different buttons for playback: L2, L3, R2, and R3
(see controller layout section). One macro will allow up to fifteen button presses
per macro. Pressing multiple buttons simultaneously counts as a single command.
In other words, pressing X, O, and Triangle at the same time is one command, not
three. Your commands must be able to be executed within 1.5 seconds to take
advantage of the macro function.
Delay: In some combo’s, it can be necessary to have a delay between commands.
To record a delay, press the SELECT button. If a longer delay is necessary, press
the SELECT button as many times as needed. You may need to experiment with your
particular game.
Hold: In some cases, it can be necessary to hold down a button or direction for
an extended period of time. To do this, simply hit the button or direction twice.
If a longer hold is necessary, press the button (or direction) multiple times. You may
need to experiment with your particular game.
Double Tap: A “double tap” is hitting a certain action button or direction twice.
To record a double tap, press the button (or direction), then SELECT, then the same
button (or direction).
While recording a macro all action buttons retain their original game function.
Programming Macros
1. Press the Macro Button (Macro Button illuminates red).
2. Adjust the macro speed as necessary. (see below)
3. Press the button to which the macro is to be assigned (Macro Button blinks).
4. Press the commands desired, in order and with delays in the appropriate places.
5. To finish recording the macro, press the Macro Button again (if you use all fifteen
commands - the Macro Button will also stop flashing).
1 2
Question and Answer IconNeed help?

Do you have a question about the Mad Catz DUAL FORCE 2 and is the answer not in the manual?

Summary

Controller Setup and Modes

Controller Setup

Steps to connect and begin using the controller with your game console.

Analog Controller Mode

Standard "Dual Shock™™" mode, enabling vibration for compatible games.

Steering Wheel Mode

Optimized for driving games using Steering Wheel protocols, allowing sensitivity adjustments.

Digital Mode

The original PlayStation controller mode.

Macro Functionality

Recording Macros

Record up to fifteen button presses per macro for special moves.

Macro Delay Function

Use the SELECT button to insert delays between commands in a macro.

Macro Hold Function

Double-tap a button to record extended presses.

Macro Double Tap Function

Record double taps by pressing button, SELECT, then button again.

Programming Macros

Detailed steps to record and assign macros to specific buttons.

Macro Speed Adjustment

Adjust macro playback speed (fast/slow) using Macro and D-Pad buttons.

Sample Macro Programming

Examples of programming macros for specific moves in popular games.

Controller Layout and Components

Controller Layout Diagram

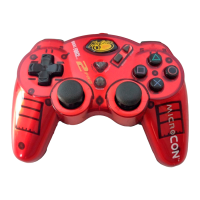
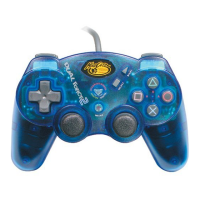
Visual guide to the controller's buttons, D-pad, and analog sticks.

Directional Pad

Controls character movement, primary in Digital Mode.

Analog Sticks

Control movement on two axes and support vibration feedback.

Action Buttons

Buttons like Square, Circle, Triangle, and X for various game actions.

Shoulder and Trigger Buttons

Buttons L1, L2, R1, R2 whose functions depend on the software.

Start and Select Buttons

Buttons for menu selections, pausing, and other software-dependent functions.

Mode and Macro Buttons

Buttons to change controller modes and record/activate macros.

Troubleshooting and Safety

Controller Not Responding

Check connection and ensure the controller mode is supported by the game.

Controller Vibration Issues

Verify game compatibility, use Analog mode, and check in-game options.

General Cautions

Important warnings regarding electrical shock, moisture, and proper usage.

Health and Usage Precautions

Advice on avoiding fatigue, pain, and potential injury from prolonged use.

Technical Support and Warranty

Technical Support Options

Information on obtaining support via website, email, telephone, and fax.

Product Warranty

Details of the five-year replacement warranty and coverage limitations.

Warranty Activation and Service

Steps to activate the warranty and obtain service, including return procedures.

Return Address

Mailing address for product returns and warranty claims.

Overview

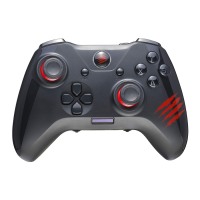
The Mad Catz Dual Force 2 Controller is a gaming peripheral designed for use with PlayStation 2, PS one, and PlayStation consoles. It features a powerful macro function, multiple control modes, and vibration feedback.

Function Description:

The Dual Force 2 Controller allows users to interact with their game console, providing directional control, action buttons, and shoulder buttons for gameplay. Its primary function is to enhance the gaming experience through customizable macros and different control modes tailored to various game types.

Usage Features:

Setup:

  1. Turn off the game console.
  2. Insert the controller into the controller port.
  3. Insert the game disk.
  4. Turn on the game console to begin play.

Control Modes:

The controller offers three distinct modes, selectable via the Mode Button, with the button's color indicating the active mode:

  • Analog Controller Mode (Red Light): This is the standard "Dual Shock™" mode, enabling vibration feedback in compatible games.
  • Steering Wheel Mode (Green Light): Optimized for driving games utilizing Steering Wheel (or NegCon™) protocols. This mode allows for in-software calibration to adjust sensitivity.
  • Digital Mode (Light Off/Clear): The original PlayStation controller mode, primarily using the D-pad for directional control.

Macros:

The macro function allows users to program a series of button presses (up to fifteen commands) into a single button (L2, L3, R2, R3) for easy execution of special moves or intricate attacks. Simultaneous button presses count as a single command. Commands must be executable within 1.5 seconds to leverage the macro function effectively.

Recording Macros:

  1. Press the Macro Button (illuminates red).
  2. Adjust macro speed (see "Macro Speed" below).
  3. Press the target button for macro assignment (Macro Button blinks).
  4. Input desired commands in order, including delays where necessary.
  5. Press the Macro Button again to finish recording (or it stops flashing after fifteen commands).

Macro Delays:

To record a delay between commands, press the SELECT button. Multiple presses increase the delay duration. Experimentation may be needed to find optimal delays for specific games.

Macro Holds:

To simulate holding a button or direction, press it twice. For longer holds, press the button/direction multiple times.

Macro Double Tap:

To record a double tap, press the button/direction, then SELECT, then the same button/direction again.

Macro Speed:

The controller supports two macro playback speeds:

  • Fast (default): Activated by pressing the Macro Button, then UP on the D-Pad (Macro Button flashes quickly). Most games work with this speed.
  • Slow: Activated by pressing the Macro Button, then DOWN on the D-Pad (Macro Button flashes slowly). If slow speed is needed, adjust it before programming the macro.

Sample Macro Programming Examples:

  • Tekken Tag (Character: Jin, Special Move: Rolling Uppercut):

    1. Press Macro Button (Green).
    2. Select L2 (Macro Button blinks).
    3. Press D-Pad Left.
    4. Press Square and Circle simultaneously.
    5. Press Macro Button (Light goes out).
    6. Execute with L2.
  • Tony Hawk Pro Skater (Character: Jamie Thomas, Special Move: Front Flip):

    1. Press Macro Button (Green).
    2. Select L2 (Macro Button blinks).
    3. Press D-Pad Down.
    4. Press Select.
    5. Press D-Pad UP.
    6. Press Circle.
    7. Press Macro Button (Light goes out).
    8. Execute with L2.
  • Mortal Kombat 4 (Character: Scorpion, Special Move: Spear Throw):

    1. Press Macro Button (Green).
    2. Select L2 (Macro Button blinks).
    3. Press D-Pad Left.
    4. Press Select.
    5. Press D-Pad Left.
    6. Press X.
    7. Press Macro Button (Light goes out).
    8. Execute with L2.

Layout Components:

  • Mode Button: Toggles between control modes.
  • Shoulder Action Buttons (L1, L2, R1, R2): Functions depend on software.
  • Directional Pad (D-Pad): Primary directional control in Digital Mode.
  • Select Button: Standard button for various in-game functions.
  • Macro Button: Used for recording commands.
  • Analog Sticks: Two sticks controlling X and Y axes. Sensitivity can be modified in-game. In Analog Mode, compatible software will trigger vibration feedback.
  • Start Button: Generally used for menu selections and pausing.
  • Action Buttons (O, □, Δ, X): Used for various in-game actions.

Important Technical Specifications:

  • Macro Capacity: Up to fifteen button presses per macro.
  • Macro Playback Buttons: L2, L3, R2, R3.
  • Compatibility: PlayStation 2, PS one, PlayStation.
  • Vibration Function: Available in Analog Mode for compatible games. Look for the "VIBRATION FUNCTION COMPATIBLE" icon on game packaging or manual.

Maintenance Features:

Troubleshooting:

  • Controller not responding:
    • Ensure it's fully plugged into the console.
    • Verify the controller's mode is supported by the game.
  • Controller not vibrating:
    • Check if the game is "Vibration Function Compatible."
    • Change to Analog Mode (not all games vibrate outside Analog Mode).
    • Check in-game options to ensure vibration is turned on.

Cautions:

  • Use only as intended.
  • Avoid exposure to rain/moisture; do not use near water.
  • Do not disassemble; refer servicing to qualified personnel.
  • Operate only from the indicated power source.
  • Polarized AC plug: Ensure correct insertion; do not force.
  • Do not overload wall outlets/extension cords.
  • Do not insert unauthorized objects into the product.
  • Stop use if experiencing discomfort/pain in hands/arms; consult a doctor if it persists.
  • Do not operate with anything other than hands; avoid contact with head, face, or bones.
  • If you have bone/joint ailments in hands/arms, switch off or do not use vibration.
  • Avoid prolonged use; take breaks every 30 minutes.
  • Route cords to prevent tripping/pinching/damage. Do not wrap cords around body parts.
  • Do not allow children to play with cords.

Technical Support:

  • Online: www.madcatz.com for solutions, tips, and information.
  • E-mail: techsupport@madcatz.com (reply within one business day).
  • Telephone: 1.800.659.2287 (U.S. only) or 1.619.258.6920 (outside U.S.); Monday-Friday, 8 A.M. to 4 P.M. PST.
  • Fax: 1.619.258.6929.

Warranty:

  • Duration: Five (5) year replacement warranty.
  • Coverage: Free from defects in material or workmanship. Mad Catz will repair or replace at its option.
  • Exclusions: Normal wear and tear, abusive use, industrial/professional/commercial use, damage from abuse, misuse, modification, tampering, or other non-material/workmanship causes.
  • Replacement: If product is unavailable, a comparable product may be substituted.
  • Geographic Scope: North American customers only (Canada, Mexico, U.S.).

Warranty Activation & Service:

  1. Activate: Register product at www.madcatz.com.
  2. Service:
    • Call Mad Catz Technical Support (1.800.659.2287 USA / 1.619.683.9830 outside USA).
    • Obtain a Return Authorization Number.
    • Return product with postage prepaid and insured to Mad Catz, Inc., ATTN: WARRANTY, 7480 Mission Valley Rd, Suite 101, San Diego, CA 92108-4406. Mad Catz pays return shipping.
    • Include copy of original sales receipt with purchase date.
    • Include full return address and daytime/evening phone numbers.
    • Package product securely, preferably in original box inside another box with packaging material. Mad Catz is not responsible for shipping damage/loss.
  • Processing: Allow 4 to 6 weeks. Mad Catz will contact you if there's a problem.

Mad Catz DUAL FORCE 2 Specifications

General IconGeneral
BrandMad Catz
ModelDUAL FORCE 2
CategoryVideo Game Controller
LanguageEnglish

Related product manuals