MADAS
© 2004 MADAS s.r.l.
pag. 7
M16/RM N.C. - M16/RMO N.C.
Capitolo 5 /
Chapter 5
MADAS - Manuale Tecnico 2004 - Edizione 1
MADAS - 2004 Technical Manual - Ediction 1
®
ELETTROVALVOLE A RIARMO MANUALE NORMALMENTE
CHIUSE TIPO M16/RM N.C. - M16/RMO N.C.
NORMALLY-CLOSED MANUAL RESET SOLENOID VALVES
TYPE M16/RM N.C. - M16/RMO N.C.
MANUTENZIONE
In caso di necessità prima di effettuare verifi che interne accertarsi che :
- l'elettrovalvola non sia alimentata elettricamente
- all'interno della stessa non vi sia gas in pressione
- con attacchi DN 15 ÷ DN 50 e DN 125 - DN 150: (vedi fi g. 1) con un
cacciavite svitare le viti di fi ssaggio (9) e con molta attenzione sfi lare il coperchio
(2) dal corpo valvola (5), quindi controllare l'otturatore e se necessario sostituire
l'organo di tenuta in gomma (3). Successivamente pulire o soffi are il fi ltro (12) o
se necessario sostituirlo (per il posizionamento vedi fi g. 5 e 6); quindi procedere
al montaggio facendo a ritroso l'operazione di smontaggio.
- con attacchi DN 65 ÷ DN 100: (vedi fi g. 2) svitare con un cacciavite le viti di
fi ssaggio (4) del coperchio (14) e con molta attenzione sfi larlo dal corpo valvola
(8), succesivamente per controllare gli otturatori procedere nel seguente modo:
svitare le viti di fi ssaggio (5) per la sede superiore (6) e sfi larla dal corpo valvola
(8). Se necessario pulirla accuratamente assieme all'O-Ring ad essa accoppiato.
Rimuovere il pacchetto otturatori-perno e pulire o sostituire se necessario gli organi
di tenuta in gomma. Controllare successivamente l'organo fi ltrante (12), soffi arlo,
pulirlo con acqua e sapone o se necessario sostituirlo. In ogni caso assicurarsi
di rimontarlo all'interno delle apposite guide (18) (vedi fi g. 5). Poi procedere al
montaggio facendo a ritroso l'operazione di smontaggio.
- con attacchi DN 200: non è previsto alcun tipo di manutenzione.
SERVICING
If it is necessary, before doing the internal inspection, make sure that:
- the solenoid valve is not electrically supplied
- there is not gas inside the solenoid valve
- with connections DN 15 ÷ DN 50 and DN 125 - DN 150: (see fi g. 1)
unscrew by a screwdriver the fi xing screws (9) and, with care, take the cover
(2) off the body (5) of the valve, then control the obturator and if it is neces-
sary change the rubber made seal component (3). Then clean or blow the fi lter
(12) or change it if necessary (for the correct position see fi g. 5 and 6); then
assemble doing backward the same operation.
- with connections DN 65 ÷ DN 100: (see fi g. 2) unscrew by a screwdriver
the fi xing screws (4) of the cover (14) and, with care, take it out of the body
of the valve (8), then control the obturators by proceding in this way: unscrew
the upper seat (6) fi xing screws (5) and take it off the body (8) of the valve. If
it is necessary clean it with its O-Ring.
Remove the system obturators-pin and clean or, if it is necessary, change the
rubber made seal components.
Then control the fi ltering component (12), blow it, clean it with water and soap
or, if it is necessary, change it.
In any case pay attention to assemble inside the special guide (18) (see fi g. 5).
Then assemble doing backward the same operation.
- with connections DN 200: it is not necessary any type of servicing.
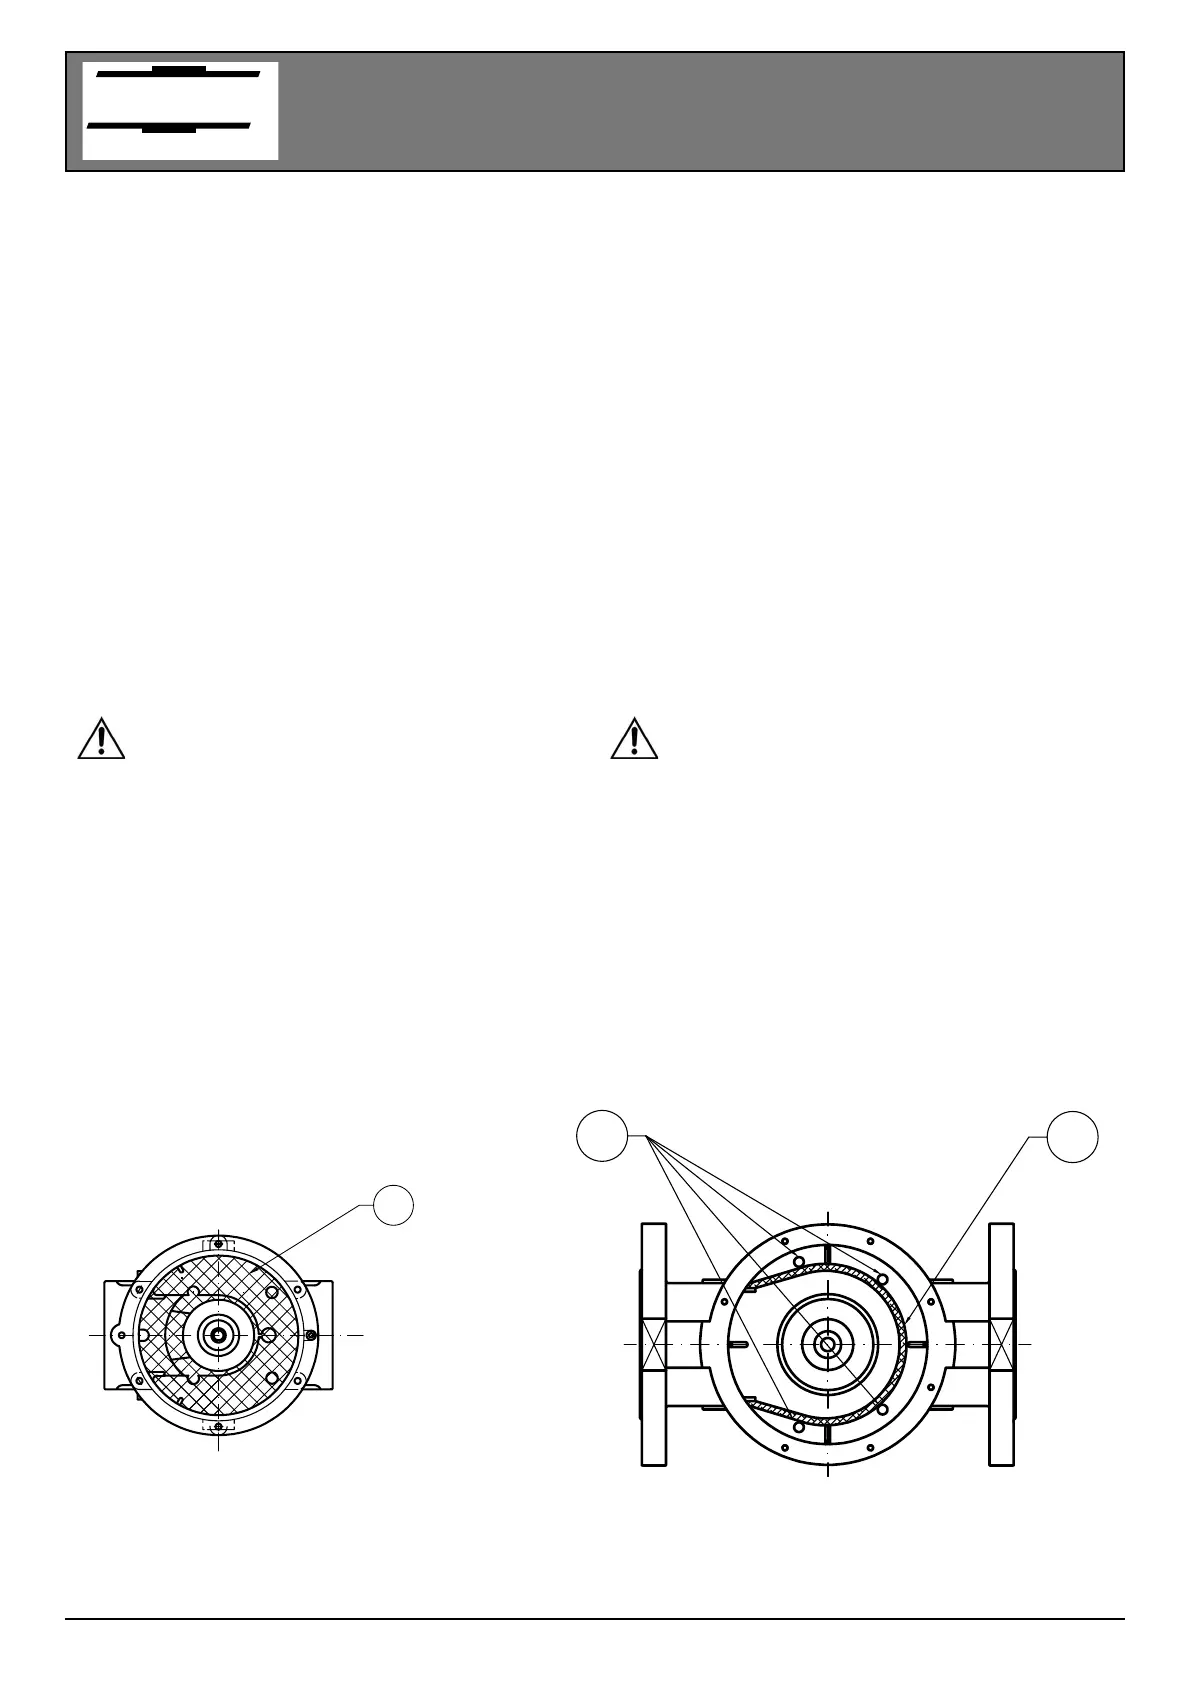
18
12
12
VISTA: CORPO VALVOLA SENZA COPERCHIO
PER INSERIRE LA RETE:
Posizionarla come in fi gura facendo attenzione a rispettare le guide sulla circon-
ferenza interna del corpo valvola e bloccarla con le tre viti apposite (M3x10)
PER INSERIRE L'ORGANO FILTRANTE:
Posizionarlo come in fi gura facendo attenzione ad inserirlo all'interno delle
guide (18)
fi g. 5
VIEW: BODY OF THE VALVE WITHOUT COVER
TO INSERT THE NET:
Position it as in the fi gure taking care to respect the guides in the internal circu-
mference of the body valve and fi x it by the three special screws (M3x10)
TO INSERT THE FILTERING ORGAN:
Position it as in the fi gure taking care to put it inside the guides (18)
Le suddette operazioni devono essere eseguite
esclusivamente da tecnici qualifi cati.
The above-said operations must be carried out only
by qualifi ed technicians.
 Loading...