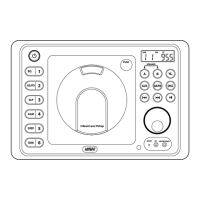
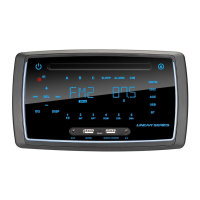
The RV5070 AM/FM Stereo Multi-Media Receiver is a versatile audio and video unit designed for various applications, offering a range of features for entertainment and convenience.
Function Description:
The RV5070 serves as a central hub for audio and video entertainment. It includes an AM/FM stereo tuner, a multi-media player capable of handling USB and disc inputs (CD, MP3, Movie Disc), and auxiliary audio inputs. The unit features a display for showing radio frequencies, track numbers, time, and other operational information. It also incorporates alarm and sleep timer functions, as well as sound controls for bass, treble, and loudness. Speaker selection allows for directing audio to different speaker zones. The receiver is designed for easy operation with both front panel buttons and a remote control.
Important Technical Specifications:
- Radio Bands: AM/FM stereo tuner with multiple frequency bands (e.g., 1 MHz (FM), 2 MHz (FM), 3 MHz (FM), 1 KHz (AM), 2 KHz (AM)).
- Audio Inputs: USB/DISC input, Auxiliary Rear/Front Audio Input (3.5mm jack).
- Power Output: Not explicitly stated in the provided manual excerpts, but implied by speaker connections.
- Display: LCD display for various operational information.
- Power Requirements: Red Wire (+) to 12 Volt DC Power, Black Wire Ground.
- Fuse: 15A Fuse.
- Dimensions: Chassis Opening: 9" (width) x 6 1/4" (height). Overall unit dimensions: 9 3/4" (width) x 4 5/8" (height).
- Speaker Outputs: Three pairs of speaker outputs (Speaker A, Speaker B, Speaker C) with dedicated wiring for Left and Right channels (Brown/Black, Gray/Black for A; Green/Black, Blue/Black for B; White/Black, Purple/Black for C).
- Video Outputs: Video Out (RCA), TV Composite In (RCA), TV Component In (RCA).
- Audio Outputs: AUX Out (RCA), TV Headphone Out (3.5mm jack), Digital to Analog Converter (Optical/Coaxial Out).
Usage Features:
General Operations:
- Power On/Off: Press the power button to turn the unit on or off.
- Play Source Selection: Select between AUX, AM/FM (Radio), USB, or Disc by pressing the corresponding mode buttons.
- Dimming the Display: Press the DIM button to adjust the display brightness.
- Display Selection: Press the DISP button to show the clock or other information.
- Volume Control: Rotate the Volume knob to increase or decrease the volume.
- Sound Controls:
- Bass/Treble: Press the VOLUME knob to cycle through Bass and Treble modes. Rotate the knob to adjust levels.
- Balance: Select Balance mode and rotate the VOLUME knob to adjust the left/right balance (R=L, R=R, L=L).
- Equalizer (EQ): Press the EQ button to select preset equalizer settings (Normal, Classic, Rock, Pop, Jazz).
- Loudness (LOUD): Press and hold the EQ button to toggle the Loudness feature on/off, boosting high and low tones.
- Mute: Press the MUTE button to silence the audio. Press again to restore.
- Speaker Selection: Press SPEAKER A, B, or C buttons to toggle speaker sets on or off. LEDs indicate active speakers.
Setting the Clock:
- Press the DISP button until the clock appears.
- Press and hold DISP until the hour digits flash.
- Rotate the Volume knob to set the correct hour (AM/PM).
- Rotate the Volume knob to set the correct minutes.
- Wait 5 seconds for the clock to set.
Sleep Timer Operation:
- Press the SLP button to activate the sleep timer.
- Keep pressing SLP to cycle through sleep durations (0, 10, 20, 30, 40, 50, 60, 70, 80 minutes).
- Wait 5 seconds for the display to return to normal.
- To cancel, press SLP until "0" is displayed.
Alarm Operation:
- Press the ALRM button to display the alarm clock.
- Rotate the Volume knob to set the hour (AM/PM).
- Rotate the Volume knob to set the minutes.
- Wait 5 seconds for the alarm to set.
- To turn off the alarm, press the POWER button.
- To cancel, follow the setting procedure and set the alarm time to "A AM 12:00".
Radio Operations:
- Selecting AM/FM: Press the AM/FM button to switch between AM and FM bands.
- Manual Tuning: Press the << or >> buttons to tune down or up the frequency.
- Tuning Using Seek: Press the SEEK button to scan for the next strong station.
- Tuning Using Scan: Press the SCAN button to scan for 5 seconds at each strong station.
- Memorizing Stations:
- Manual Store: Tune to the desired station, then press and hold one of the six station recall buttons (1-6) until the preset number appears.
- Automatic Store (AS/PS): Press and hold the AS/PS button to automatically store the strongest stations in the current band.
- Scanning Stored Stations: Press the AS/PS button to scan through stored stations.
Disc Operations (Music, MP3, Movie):
- Inserting a Disc: Gently insert the disc into the slot with the label side up. The unit will automatically load and begin playing.
- Disc Selection (Music/MP3):
- Track/File Selection: Press the << or >> buttons to select a lower or higher track/file.
- Direct Track/File Entry (Remote Control): Use number buttons (1-10+) to directly select tracks/files.
- Pausing the Disc: Press the ►II button to pause playback. Press again to resume.
- Stopping the Disc: Press the ■ button to stop playback.
- Ejecting the Disc: Press the EJECT button.
- Repeating a Track/Disc: Press the REPEAT button to repeat the current track/file or the entire disc.
- Preview Music Tracks (INTRO): Press the INTRO button to play the first 15 seconds of each track.
- Random Music Play (RANDM): Press the RANDM button to play tracks/files in random order.
- Elapse Times (AS/PS): Press the AS/PS button during music disc play to display the elapsed time, single remaining, total elapsed, and total remaining time.
- Movie Disc Operations:
- Menu Function: Press the MENU button to access the disc menu. Use navigation buttons and ENTER to select.
- Fast Forward/Backward: Press the >> or << buttons to fast forward or backward (2X, 4X, 8X, 20X).
- Slow Motion: Press the SLOW button to play in slow motion (1/2, 1/3, 1/4, 1/5, 1/6, 1/7).
- Zooming the Image: Press the ZOOM button to enlarge the on-screen image (2X, 3X, 4X, 1/2, 1/3, 1/4).
- Subtitle Language Menu: Press the SUB.TT button to change subtitle languages.
- Audio Language Menu: Press the AUDIO button to change audio languages.
- Accessing Movie Disc Setup Menu: Press the SETUP button on the remote control to display the Setup Menu, which includes System Setup, Language Setup, Audio Setup, Video Setup, and Speaker Setup pages.
- Selecting USB Audio Play Source: Press the USB/DISC button. The unit will automatically start playing files from the USB device.
- File Selection: Press the << or >> buttons to select files. Use number buttons on the remote for direct entry.
- Pausing/Stopping USB Playback: Similar to disc operations, use ►II to pause/resume and ■ to stop.
- Selecting AUX Source: Press the AUX button.
- Rear Audio Input: Connect an audio device to the rear RCA AUX IN jacks.
- Front Audio Input: Insert a 3.5mm jack into the front AUX IN socket.
Additional Feature (Area Radio Frequency Adjustment):
- Allows adjustment of radio frequency settings for different regions (e.g., US or Ocean).
- Press AM/FM, then press and hold VOL/TONE until "SETUP" appears.
- Use the << or >> buttons to select "US" or "OCEAN".
- Press the ►II button to save.
Maintenance Features:
- Reset Button: The LCD display may malfunction due to battery conditions or microprocessor issues. Press the RESET button (located behind the front AUX input) with a ballpoint pen to reset the unit to factory settings. This clears all station settings.
- Disc Handling and Cleaning:
- Avoid dirt, scratches, and warping.
- Do not place stickers on discs.
- Always hold discs by the edges.
- Clean discs with a soft, dry cloth from the center outward. Do not use solvents like benzene, thinner, or conventional cleaners.
- Installation: Includes diagrams for chassis opening dimensions and trim ring installation.
- Speaker Connections: Detailed wiring diagrams for Speaker A, B, and C, including color-coded wires (Brown/Black, Gray/Black, Green/Black, Blue/Black, White/Black, Purple/Black).
- Wiring and Auxiliary Connections: Diagrams for power (Red +12V DC, Black Ground), antenna, 15A fuse, and various audio/video inputs/outputs (AUX IN/OUT, Video Out, TV Composite/Component In, TV Headphone Out, Digital to Analog Converter).
- Safety Instructions: Important guidelines regarding installation, power supply, wiring, maintenance, and environmental factors (moisture, temperature).
- Outdoor Antenna Grounding: Instructions for proper grounding of the antenna system to protect against voltage surges and static buildup, referencing National Electrical Code (ANSI/NFPS No. 70-1983). Includes diagrams for antenna lead-in wire, ground clamp, ground wire, and grounding electrode.
- Warranty: One (1) year limited warranty covering defects in materials and workmanship. Specifies conditions for voiding the warranty (damage, unreasonable use, improper maintenance, unauthorized service, broken seals). Excludes cabinet appearance, accessories, and damages from improper installation or misuse. Emphasizes that the manufacturer is not responsible for radio or TV interference caused by unauthorized modifications. Provides return instructions for defective merchandise.