22
A. Identify hardware size and grade.
B. Torque hardware to specification noted on torque
chart, page 82, unless otherwise specified below.
IMPORTANT NOTE: To keep mounting kit hardware
from loosening during loader operation, hardware
must be torqued to specifications.
1st LH & RH center brackets spacer assembly
hardware.
2nd LH & RH center casting hardware.
3rd LH & RH side rail hardware. Refer to torque
chart, page 82.
4th LH & RH cross member hardware. Refer to
torque chart, page 82.
5
th
LH & RH rear rail hardware. Refer to torque
chart, page 82.
6
th
LH & RH rear rail hardware. Refer to torqwue
chart, page 82.
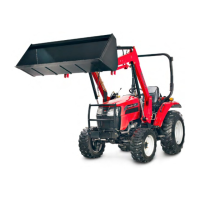
3.2.8. If equipped, install tractor tie down hook to each
loader centerbracket using hex head cap screw ¾”-10 x
2.0” Grade 8 and stover hex locknut ¾”-10, 2 places as
shown.
Hex Head Cap Screw ¾”-10 x 2.0” Grade 8, Stover
Hex Locknut ¾”-10, 2 places
Tractor Tie Down Hook
1
st
- Engine hardware
14-2 x 35mm bolts, 9/16” disc-lock
washers, 14-1.5 x 65mm bolts,
9/16” disc-lock washers Torque to
107 ft. lbs.
6
laces each side
2
n
- Center casting hardware
¾”-10 x 1.75” Gr. 8 bolts, ¾” disc-lock
washers. Torque to 172 ft. lbs. (4 places each
side)
6th
36” Centers after installation
5th
3
r
– Front Rail hardware
5/8”-12 x 2.0” Gr. 8 bolts, 5/8” disc-lock
washers. Refer to torque chart, page 82.
(4 places each side)
4th
Use these loader mount
plate holes to install Tractor
Tie Down Hooks.
35 Series 4WD, Model - 3535 & 4035 Loader June’08
 Loading...