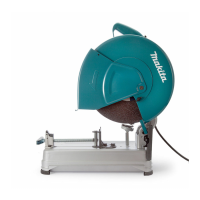
This document describes the Makita Portable Cut-Off Model 2414NB, an electrical power tool designed for cutting operations. The manual emphasizes safety precautions, operational procedures, and maintenance guidelines to ensure safe and efficient use.
Function Description
The Makita Portable Cut-Off Model 2414NB is a power tool used for cutting various workpieces. It features a cut-off wheel that rotates at high speed to perform cuts. The tool is designed with a spark guard to manage sparks generated during operation and a stopper plate to prevent the wheel from contacting the workbench or floor. It includes a vise system for securing workpieces at different angles and intervals, making it versatile for various cutting tasks, including miter cuts. The tool is equipped with a switch trigger and a lock-off button for controlled operation and to prevent accidental starting.
Important Technical Specifications
- Model: 2414NB
- Wheel diameter: 355 mm (14")
- Hole diameter: 25.4 mm (1")
- No load speed (RPM): 3,800 /min.
- Dimensions (L x W x H): 500 mm x 280 mm x 600 mm (19-3/4" x 11" x 23-5/8")
- Net weight: 16.4 kg (36.2 lbs)
- Applicable wheel diameter: 355 mm (14")
- Cutting capacity (90°):
- Round workpiece: 115mm (4-1/2")
- Square workpiece: 119mm (4-11/16")
- Rectangular workpiece: 115mm x 130 mm (4-1/2" × 5-1/8"), 102 mm x 194 mm (4" x 7-5/8"), 70 mm × 233 mm (2-3/4" x 9-1/8")
- Angle iron workpiece: 137 mm (5-3/8")
- Cutting capacity (45°):
- Round workpiece: 115mm (4-1/2")
- Square workpiece: 106 mm (4-3/16")
- Rectangular workpiece: 115 mm × 103 mm (4-1/2" × 4-1/16")
- Angle iron workpiece: 100 mm (3-15/16")
- Vise and guide plate interval settings:
- Original: 0 - 170 mm (0 - 6-11/16”)
- Wider settings: 35 - 205 mm (1-3/8” - 8-1/16"), 70 - 240 mm (2-3/4" - 9-7/16")
- Cutting angle settings: 0° - 45°
Usage Features
- Securing the Cut-Off Tool: The tool should be bolted to a level and stable surface using the provided bolt holes in its base to prevent tipping and potential personal injury.
- Switch Action: The tool features a lock-off button to prevent accidental pulling of the switch trigger. To start, depress the lock-off button and pull the switch trigger. Releasing the switch trigger stops the tool. For safety, the lock-off button should be removed and stored securely when the tool is not in use to prevent unauthorized operation.
- Spark Guard Adjustment: The factory-installed spark guard can be adjusted by loosening a screw to minimize the spread of sparks during operation.
- Stopper Plate: The stopper plate prevents the cut-off wheel from contacting the workbench or floor. It can be set to position (A) for new wheels and position (B) for worn wheels to maximize cutting capacity.
- Interval between Vise and Guide Plate: The guide plate's position can be adjusted to accommodate different workpiece widths. The two hex bolts securing the guide plate can be removed and repositioned to achieve intervals of 35 - 205 mm (1-3/8” - 8-1/16") or 70 - 240 mm (2-3/4" - 9-7/16"). However, caution is advised as narrow workpieces may not be secured safely with wider settings.
- Setting Cutting Angle: The guide plate can be moved to set desired cutting angles from 0° to 45° by loosening and then securely tightening two hex bolts. Miter cuts should not be performed when the guide plate is set at the wider interval positions (35 - 205 mm or 70 - 240 mm).
- Removing/Installing Cut-Off Wheel: To remove the wheel, raise the safety guard, press the shaft lock, and use the socket wrench to loosen the hex bolt counterclockwise. Then remove the hex bolt, outer flange, and wheel. Installation follows the reverse procedure, ensuring the hex bolt is securely tightened with the provided socket wrench. Only proper inner and outer flanges provided with the tool should be used, and the safety guard must be lowered after wheel replacement.
- Securing Workpiece: The vise handle can be turned counterclockwise and the vise nut flipped left to release the vise for rapid adjustment. To secure a workpiece, push the vise handle until it contacts the workpiece, flip the vise nut to the right, and turn the vise handle clockwise to securely retain the workpiece. It is crucial to always set the vise nut fully to the right to prevent insufficient securing, which could lead to the workpiece being ejected or wheel breakage.
- Utilizing Worn Wheels: A spacer block made of sturdy, non-flammable material can be placed behind the workpiece to allow efficient use of a worn cut-off wheel by cutting with its mid-point.
- Cutting Wide Workpieces at an Angle: For workpieces over 65 mm (2-9/16") wide cut at an angle, a straight piece of wood (spacer) measuring over 190 mm (7-1/2") long x 45 mm (1-3/4") wide can be attached to the guide plate with screws.
- Economical Wheel Use: Using a spacer block slightly narrower than the workpiece can help utilize the wheel more economically.
- Supporting Long Workpieces: Long workpieces must be supported by non-flammable blocks on either side to ensure they are level with the base top.
- Operation Procedure: Hold the handle firmly, switch on the tool, and wait for the wheel to reach full speed before gently lowering it into the cut. Gradually bear down on the handle to perform the cut. After cutting, switch off the tool and wait for the wheel to stop completely before returning the handle to the elevated position.
- Optimal Cutting Pressure: Proper handle pressure is indicated by the maximum amount of sparks produced. Excessive pressure should be avoided as it reduces cutting efficiency, causes premature wheel wear, and can damage the tool or workpiece.
- Carrying the Tool: The tool head can be folded down and secured with a chain to a hook on the handle for easy carrying.
Maintenance Features
- Carbon Brush Replacement: Carbon brushes should be regularly removed and checked. They must be replaced when worn down to the limit mark. Both carbon brushes should be replaced simultaneously with identical carbon brushes. To replace, use a screwdriver to remove the brush holder caps, insert new brushes, and secure the caps.
- General Maintenance: For product safety and reliability, all repairs, maintenance, or adjustments should be performed by Makita Authorized or Factory Service Centers using genuine Makita replacement parts.
- Inspection: Always ensure the tool is switched off and unplugged before performing any inspection or maintenance.
- Accessory Use: Only accessories or attachments recommended for the Makita tool specified in this manual should be used. Using improper accessories can pose a risk of injury. Recommended accessories include abrasive cut-off wheels and a socket wrench 17. For assistance with accessories, contact a local Makita service center.
- Know Your Power Tool: Read the owner's manual thoroughly to understand the tool's applications, limitations, and potential hazards.
- Guards: Keep all guards in place and in working order.
- Adjusting Keys and Wrenches: Always remove adjusting keys and wrenches from the tool before turning it on.
- Work Area: Keep the work area clean, well-lighted, and free of clutter. Avoid using the tool in damp, wet, or flammable environments.
- Children and Visitors: Keep children and visitors at a safe distance from the work area.
- Workshop Safety: Make the workshop child-proof with padlocks, master switches, or by removing starter keys.
- Tool Force: Do not force the tool; it will perform better and safer at its designed rate. Use the right tool for the job.
- Apparel: Wear proper apparel, avoiding loose clothing, gloves, neckties, rings, bracelets, or other jewelry that could get caught in moving parts. Nonslip footwear and protective hair covering for long hair are recommended.
- Safety Glasses/Mask: Always wear safety glasses. Use a face or dust mask if the cutting operation is dusty. Everyday eyeglasses are not safety glasses.
- Secure Work: Use clamps or a vise to hold workpieces when practical, as it is safer than using hands and frees both hands to operate the tool.
- Overreach: Maintain proper footing and balance at all times.
- Tool Care: Maintain tools with care, keeping them sharp and clean. Follow instructions for lubrication and accessory changes.
- Disconnect Tools: Disconnect tools before servicing or changing accessories.
- Unintentional Starting: Ensure the switch is in the "off" position before plugging in the tool.
- Recommended Accessories: Consult the owner's manual for recommended accessories.
- Never Stand on Tool: Avoid standing on the tool to prevent serious injury from tipping or unintentional contact with the cutting tool.
- Damaged Parts: Before further use, carefully check any damaged guards or parts to ensure proper operation. Repair or replace damaged parts.
- Direction of Feed: Feed work into the blade or cutter against the direction of rotation.
- Unattended Operation: Never leave the tool running unattended. Turn off the power and wait for the tool to come to a complete stop.
- Replacement Parts: Use only identical replacement parts for servicing.
- Polarized Plugs: This equipment has a polarized plug (one blade wider than the other). It will fit in a polarized outlet only one way. If it doesn't fit, reverse the plug. If it still doesn't fit, contact a qualified electrician. Do not modify the plug.
- Voltage Warning: Ensure the power source voltage matches the tool's nameplate specification. Incorrect voltage can cause serious injury or tool damage.
- Extension Cord: Use a proper extension cord that is heavy enough to carry the tool's current to prevent power loss and overheating. Refer to the provided table for minimum gage requirements based on cord length and ampere rating.
- Pre-Operation Run: Before using on a workpiece, let the tool run for about a minute to check for vibration or wobbling, which could indicate poor installation or a poorly balanced wheel.
- Flying Sparks: Be aware of flying sparks during operation, which can cause injury or ignite combustible materials. Remove debris from the area and ensure others are not in the path of sparks. Keep a charged extinguisher nearby.
- Cutting Edge: Use only the cutting edge of the wheel, never the side surface.
- Trigger ON Position: Do not attempt to keep the trigger in the ON position.
- Abnormal Operation: If the wheel stops, makes an odd noise, or vibrates, switch off the tool immediately.
- Workpiece Movement: Turn off the tool and wait for the wheel to stop before moving the workpiece or changing settings.
- Hot Workpiece: Do not touch the workpiece immediately after operation as it will be extremely hot and can cause burns.
- Wheel Storage: Store wheels in a dry location only.
WARNING: Misuse or failure to follow the safety rules stated in this instruction manual may cause serious personal injury. The document also includes a California Proposition 65 warning regarding chemicals in dust created by power sanding, sawing, grinding, drilling, and other construction activities, advising users to work in well-ventilated areas and use approved safety equipment like dust masks.
Warranty Information: Makita provides a one-year limited warranty against defects in workmanship and materials from the date of original purchase. Repairs or replacements are free if the trouble is due to defective workmanship or material. The warranty does not cover repairs made by others, normal wear and tear, abuse, misuse, improper maintenance, or alterations to the tool. Makita disclaims liability for indirect, incidental, or consequential damages and implied warranties after the one-year term.