6 ENGLISH
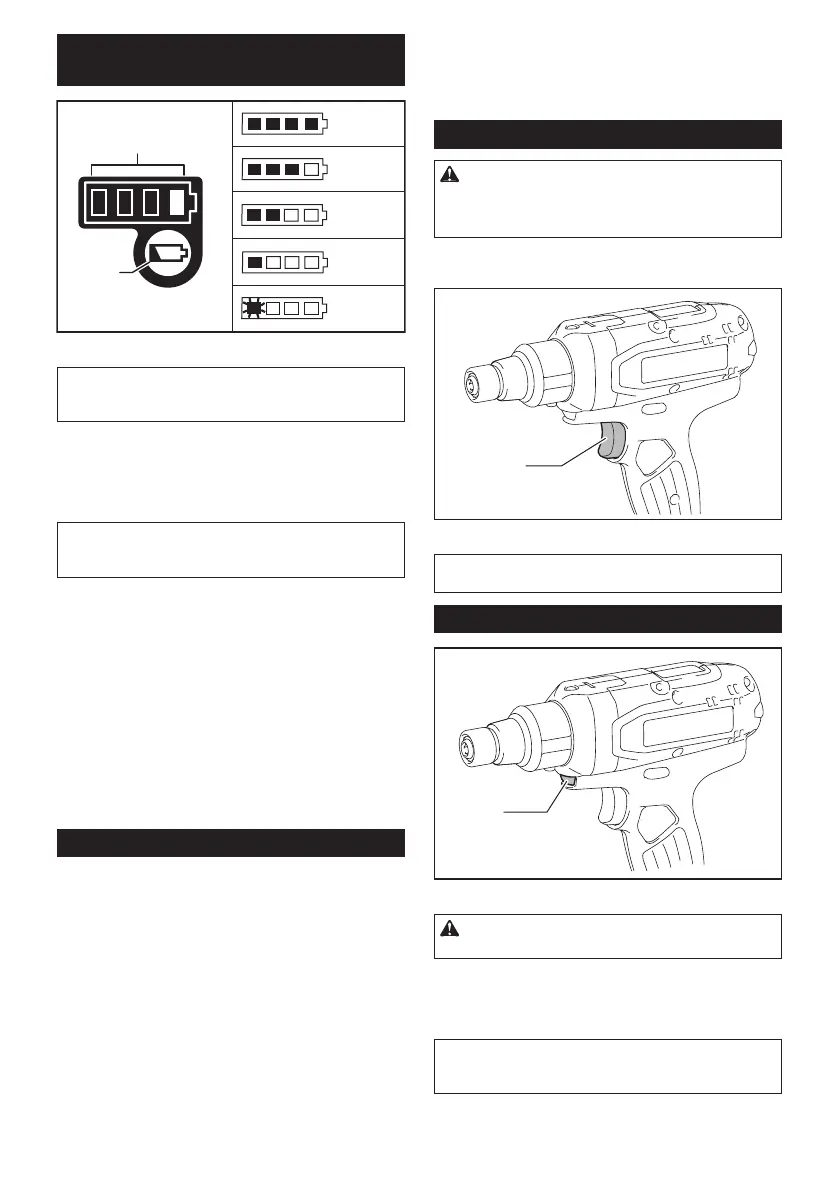
Checking the remaining battery
capacity (BL1460A)
1
2
50%-70%
70%-100%
35%-50%
20%-35%
0%-20%
►1. Indicator lamps 2. Check button
NOTE: Depending on the conditions of use and the
ambienttemperature,theindicationmaydierslightly
from the actual capacity.
When charging
Whenthechargingbegins,therst(farleft)indicatinglamp
beginstoicker.Then,aschargingproceeds,theotherlamps
light, one after the other, to indicate the battery capacity.
NOTE:Iftheindicatorlampdoesnotturnonoricker
when charging, the battery may be faulty. In this case,
ask your local service center.
When using
When the tool is switched on, the lamps will light to
indicate the remaining battery capacity. When the tool is
switchedo,thelightgoesoutafterapprox.5seconds.
Whenpushingthecheckbuttonwiththetoolswitchedo,theindi-
cator lamps turn on for approx. 5 seconds to show battery capacity.
Iftheorangelampickers,thetoolstopsbecauseoflittle
remaining battery capacity (Auto-stop mechanism). Charge the
battery cartridge or use a charged battery cartridge at this time.
When the tool is used with the battery that has not been
used for a long time and is switched on, no lamps may
light up. The tool stops because of little remaining bat-
tery capacity at this time. Charge the battery properly.
Tool / battery protection system
The tool is equipped with a tool/battery protection system. This
systemautomaticallycutsopowertothemotortoextendtool
and battery life. The tool will automatically stop during operation if
the tool or battery is placed under one of the following conditions:
Overload protection
When the tool/battery is operated in a manner that causes it to
draw an abnormally high current, the tool stops automatically. In
thissituation,turnthetooloandstoptheapplicationthatcaused
the tool to become overloaded. Then turn the tool on to restart.
Overheat protection
When the tool/battery is overheated, the tool stops
automatically. In this situation, let the tool/battery cool
before turning the tool on again.
Overdischarge protection
When the battery capacity is not enough, the tool stops
automatically. In this case, remove the battery from the
tool and charge the battery.
Switch action
WARNING: Before installing the battery car-
tridge into the tool, always check to see that the
switch trigger actuates properly and returns to
the "OFF" position when released.
To start the tool, simply pull the switch trigger. Release
the switch trigger to stop.
1
►1. Switch trigger
NOTE: For approximately one second after fastening,
the tool does not work even with the switch pulled.
Lighting up the front lamp
1
►1. Lamp
CAUTION: Do not look in the light or see the
source of light directly.
Pull the switch trigger to light up the lamp. The lamp
keeps on lighting while the switch trigger is being pulled.
The lamp goes out approximately 10 seconds after
releasing the switch trigger.
NOTE:Useadryclothtowipethedirtothelensof
the lamp. Be careful not to scratch the lens of lamp, or
it may lower the illumination.

 Loading...