Do you have a question about the Makita HM1202 and is the answer not in the manual?
Important safety measures related to electrical power and tool usage.
Rules for operator alertness, proper attire, and avoiding accidental starts.
Proper techniques for using and maintaining the tool safely.
Safety when using the tool near electrical wiring or its own cord.
Importance of wearing ear protectors during extended use.
Requirements for safety glasses, hard hats, and other PPE.
Tips on footing, grip, hand placement, and not leaving the tool running.
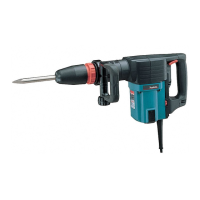
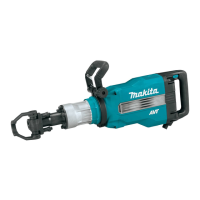
This document provides an instruction manual for the Makita Demolition Hammer models HM1202 and HM1202C. It covers general safety rules, specific safety rules, functional descriptions, assembly instructions, operation procedures, and maintenance guidelines.
The manual emphasizes reading and understanding all instructions to prevent electric shock, fire, and serious personal injury. It advises users to save these instructions for future reference.
Users should keep their work area clean and well lit to avoid accidents. Power tools should not be operated in explosive atmospheres, such as in the presence of flammable liquids, gases, or dust, as sparks can ignite these substances. Bystanders, children, and visitors should be kept away from the operating area to prevent loss of control.
Double insulated tools, like the Makita Demolition Hammer, are equipped with a polarized plug (one blade wider than the other). This plug fits into a polarized outlet only one way. If it doesn't fit, the user should reverse the plug. If it still doesn't fit, a qualified electrician should be contacted to install a polarized outlet, and the plug should not be changed. Double insulation eliminates the need for a three-wire grounded power cord and grounded power supply system. Users should avoid body contact with grounded surfaces such as pipes, radiators, ranges, and refrigerators to reduce the risk of electric shock. Power tools should not be exposed to rain or wet conditions, as water increases the risk of electric shock. The power cord should not be abused; it should not be used to carry the tool or pull the plug from an outlet. The cord should be kept away from heat, oil, sharp edges, or moving parts, and damaged cords should be replaced immediately. When operating a power tool outdoors, an outdoor extension cord marked "W-A" or "W" should be used, as these cords are rated for outdoor use and reduce the risk of electric shock.
Users must stay alert, watch what they are doing, and use common sense when operating a power tool. The tool should not be used while tired or under the influence of drugs, alcohol, or medication, as inattention can result in serious personal injury. Proper dress is important: loose clothing or jewelry should not be worn, and long hair should be contained. Hair, clothing, and gloves should be kept away from moving parts. Accidental starting should be avoided by ensuring the switch is off before plugging in the tool. Adjusting keys or wrenches should be removed before turning the tool on to prevent personal injury. Users should not overreach and should maintain proper footing and balance at all times for better control. Safety equipment is mandatory; eye protection, a dust mask, non-skid safety shoes, a hard hat, or hearing protection should be used as appropriate. Ordinary eye or sun glasses are not considered safety glasses.
The workpiece should be secured and supported using clamps or other practical methods to ensure stability and prevent loss of control. The tool should not be forced; the correct tool for the application should be used to ensure better and safer performance. If the switch does not turn the tool on or off, the tool is dangerous and must be repaired. The plug should be disconnected from the power source before making adjustments, changing accessories, or storing the tool to reduce the risk of accidental starting. Idle tools should be stored out of reach of children and untrained persons. Tools should be maintained with care, keeping cutting tools sharp and clean for easier control and to prevent binding. Users should check for misalignment or binding of moving parts, breakage, and any other condition that may affect operation. Damaged tools should be serviced before use. Only accessories recommended by the manufacturer for the specific model should be used, as unsuitable accessories can be hazardous.
Tool service must be performed only by qualified repair personnel to prevent injury. When servicing, only identical replacement parts should be used, following the instructions in the Maintenance section of the manual. Using unauthorized parts or failing to follow maintenance instructions can create a risk of electric shock or injury.
The manual advises using a proper extension cord that is in good condition and heavy enough to carry the current the product will draw. An undersized cord can cause a drop in line voltage, leading to power loss and overheating. A table is provided to help determine the correct cord size based on cord length and ampere rating, recommending the next heavier gauge if in doubt (smaller gauge number indicates a heavier cord).
These rules are specific to the demolition hammer to prevent serious personal injury.
Users should hold the tool by insulated gripping surfaces when performing operations where the cutting tool may contact hidden wiring or its own cord. Contact with a "live" wire will make exposed metal parts of the tool "live" and shock the operator. Ear protectors should be worn for extended periods of use to prevent hearing loss from high intensity noise. A hard hat (safety helmet), safety glasses, and/or face shield are highly recommended, as ordinary eye or sun glasses are not sufficient. A dust mask and thickly padded gloves are also recommended.
The bit must be secured in place before operation. The tool is designed to produce vibration, which can cause screws to loosen, leading to breakdown or accident. Users should check the tightness of screws carefully before operation. In cold weather or after a long period of disuse, the tool should be operated under no load for a while to warm it up and loosen the lubrication, as hammering operation is difficult without proper warm-up.
Users must always ensure they have a firm footing and that no one is below when using the tool in high locations. The tool should be held firmly with both hands, and hands should be kept away from moving parts. The tool should not be left running; it should only be operated when hand-held. The tool should not be pointed at anyone in the area when operating, as the bit could fly out and cause serious injury. The bit or parts close to it should not be touched immediately after operation, as they may be extremely hot and cause burns. Some materials contain toxic chemicals, so caution should be taken to prevent dust inhalation and skin contact, following material supplier safety data.
The manual cautions users to ensure the tool is switched off and unplugged before adjusting or checking its function. Before plugging in the tool, it should be checked to ensure it is switched off. The switch can be locked in the "ON" position for extended use, but caution is advised, and a firm grasp on the tool should be maintained. To start the tool, the switch lever on the left side is pushed; to stop it, the switch lever on the right side is pushed.
The blows per minute can be adjusted by turning the adjusting dial, even while the tool is running. The dial is marked 1 (lowest speed) to 6 (full speed). A table in the manual shows the relationship between the dial settings and blows per minute. The dial can only be turned between 1 and 6; forcing it past these limits may damage the speed adjusting function.
The green power-ON indicator lamp lights up when the tool is switched ON. If the lamp is lit but the tool does not start, the carbon brushes may be worn out, or the electric circuit or motor may be defective. If the lamp does not light up and the tool does not start, the ON/OFF switch or mains cord may be defective. The red service indicator lamp lights up when the carbon brushes are nearly worn out, indicating that servicing is needed. After approximately 8 hours of use, the motor will automatically shut off.
Users are cautioned to ensure the tool is switched off and unplugged before performing any assembly work.
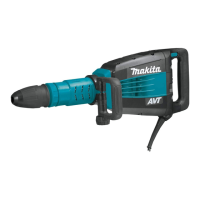
The side handle can be swung 360° vertically and secured at any desired position. It also secures at eight different positions horizontally. To adjust, the clamp nut should be loosened, the side handle swung to the desired position, and then the clamp nut tightened securely. The side handle can also be mounted in the rear groove by loosening the clamp nut, widening the side handle base, sliding it back to the rear groove, and securing it with the clamp nut.
Before installing the bit, the shank should be cleaned, and bit grease applied. The bit is inserted into the tool, turned, and pushed in until it engages. If it doesn't push in, the bit should be removed, the tool holder cover pulled down a couple of times, and then the bit reinserted, turned, and pushed in until it engages. After installation, the bit should be checked to ensure it is securely held by trying to pull it out. To remove the bit, the tool holder cover is pulled down all the way, and the bit is pulled out.
The bit can be secured at 12 different angles. To change the bit angle, the change ring is slid forward, then turned to the desired angle. The change ring is then slid back to the original position to secure the bit. The change ring cannot turn if the bit is not installed on the tool.
The tool should be held firmly with both hands. It should be turned on, and slight pressure applied so that it does not bounce around uncontrollably. Pressing very hard will not increase efficiency.
Users are cautioned to ensure the tool is switched off and unplugged before attempting any inspection or maintenance.
The motor will automatically shut off when the resin insulating tip inside the carbon brush contacts the commutator. When this occurs, both carbon brushes should be replaced simultaneously with identical carbon brushes. The carbon brushes should be kept clean and free to slip in their holders. To replace them, the screws securing the rear cover should be removed, and the rear cover pried off with a screwdriver. After replacing the brushes, the brush holder caps are removed with a screwdriver, the worn brushes taken out, new ones inserted, and the caps secured.
This tool has a grease-packed lubrication system and does not require hourly or daily lubrication. It should be relubricated every 6 months of operation by sending the complete tool to a Makita Authorized or Factory Service Center. If self-lubrication is necessary, the tool should be run for several minutes to warm it up, then switched off and unplugged. The six screws are loosened, and the handle removed. The crank cap is removed using a socket wrench. The tool is rested on a table with the bit end pointing upwards to allow old grease to collect in the crank housing. The old grease is wiped out and replaced with 30g (1 oz) of fresh Makita genuine hammer grease (optional accessory). Overfilling can cause faulty hammering action or tool failure. The crank cap is then reinstalled and tightened with the socket wrench. Users are cautioned not to overtighten the crank cap, as it is made of resin and subject to breakage. Care should be taken not to damage the terminals or lead wires when wiping out old grease or installing the handle.
To maintain product safety and reliability, repairs, maintenance, or adjustments should be performed by Makita Authorized or Factory Service Centers using Makita replacement parts.
Users are cautioned that only accessories or attachments recommended for use with this specific Makita tool should be used, as others may present a risk of injury. Accessories should only be used for their stated purpose. For assistance or details on accessories, users should contact their local Makita service center.
Recommended accessories include:
| Impact Energy | 19.1 J |
|---|---|
| Blows per Minute (BPM) | 950 - 1, 900 bpm |
| Vibration Level | 12.5 m/s² |
| Type | Demolition Hammer |
| Power Source | Corded Electric |