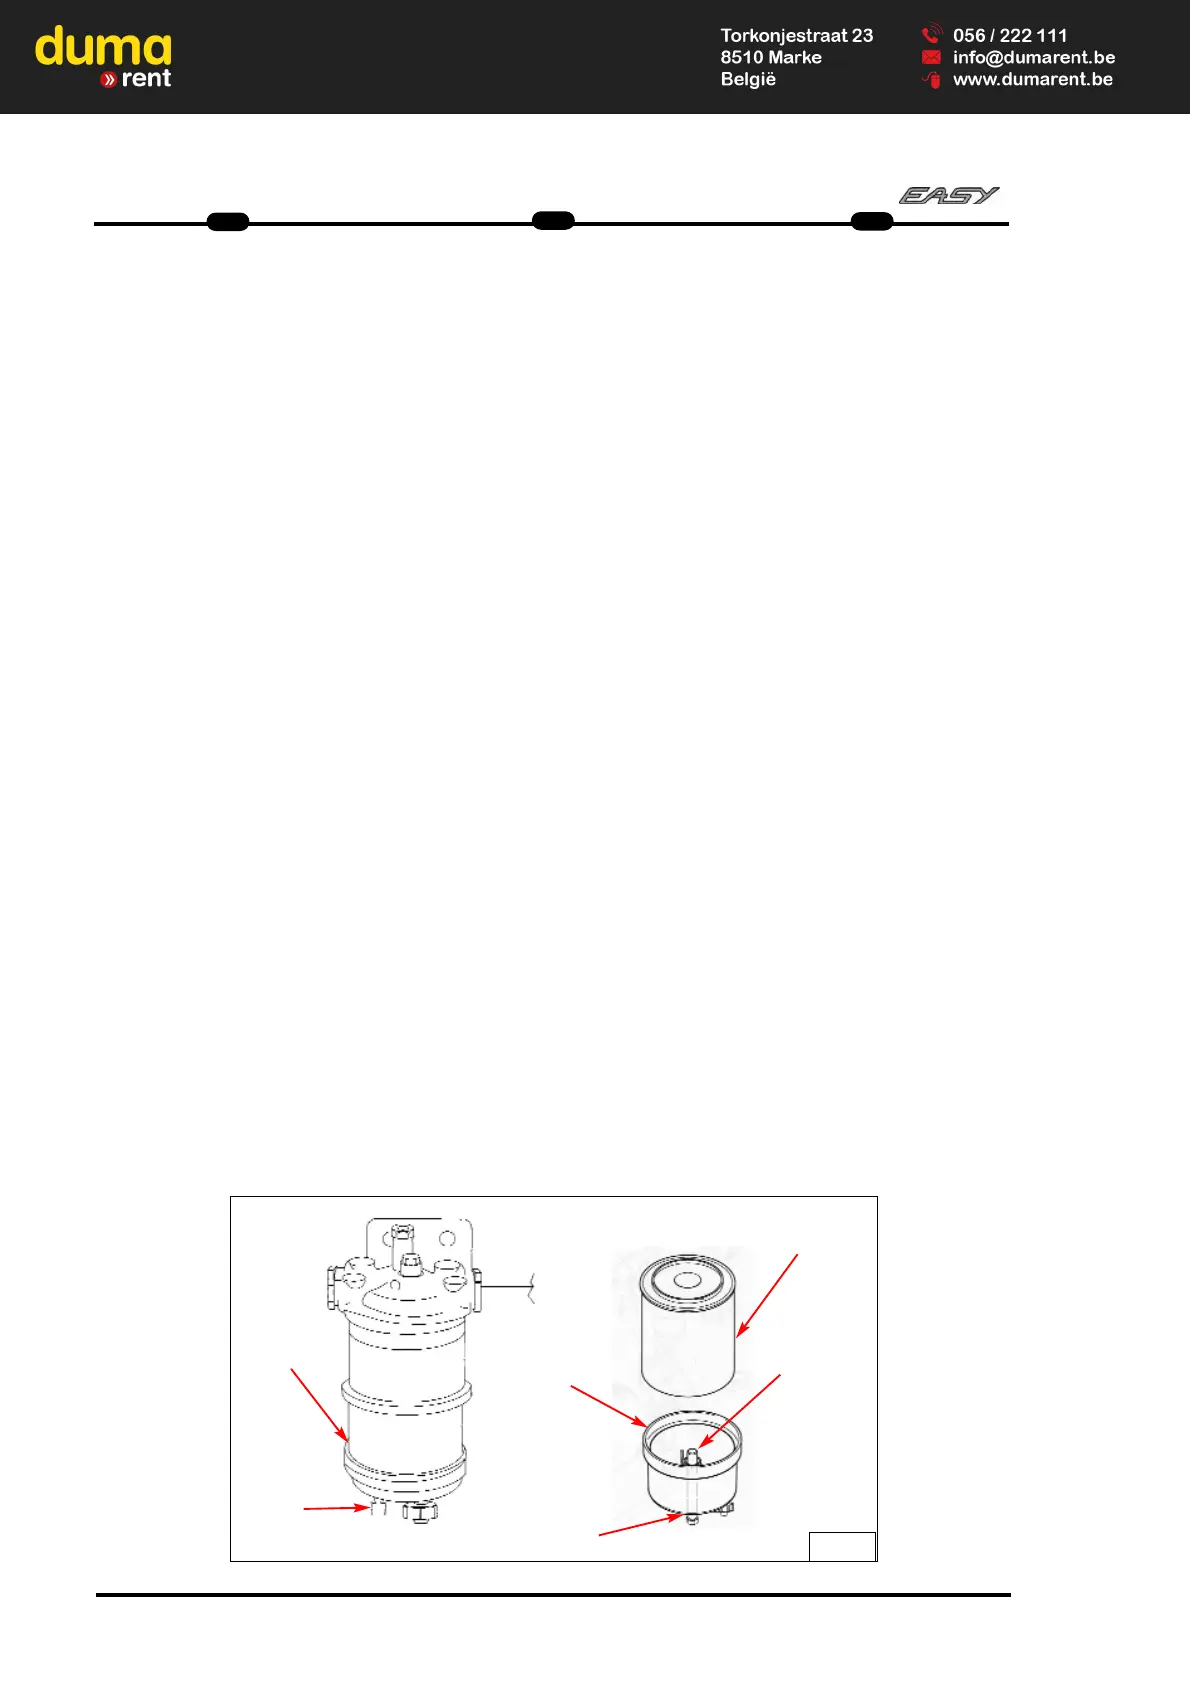
- Install a suitable tube on outlet
“ 1 ” (D7/1).
Open drainage outlet “1” (D7/1). Let
the liquid flow out into the container.
Remove the tube.
- Close drainage outlet “1” (D7/1) tighte-
ning it only manually.
- If supplied, remove the cable from the
sensor at the bottom of the glass cup.
- Hold the glass cup “3” firmly (D7/1)
and remove screw “2” (D7/1).
Remove the glass cup “3” (D7/1) from
filter “4” (D7/1).
- Use a suitable tool to remove the filter
“4” (D7/1).
Dispose off the used gaskets “5 - 6”
(D7/1) and the filter in a safe place.
- Clean the glass cup “3” (D7/1).
- Do not lubricate the sealing ring on the
new fuel filter.
Insert the new filter.
Do not use a tool to insert the filter.
Tighten the filter manually.
- Insert the new sealing ring “5” (Fig.
D7/1) on fixing screw “2” (Fig. D7/1).
Insert the new sealing ring “6” (D7/1)
in the glass cup.
- Align the glass cup with the filter.
Insert fixing screw “2” (D7/1).
Tighten the clogging indicator using a
5Nm torque.
- Remove the container and dispose off
the liquid correctly.
- Einen passenden Schlauch auf dem
Ablauf “1” (D7/1) anbringen.
Den Ablauf “1” (D7/1) öffnen. Die
Flüssigkeit in den Behälter auslaufen
lassen. Den Schlauch ausbauen.
- Die Ablauf “1” (D7/1) schließen, indem
man ihn von Hand zudreht.
- Falls vorhanden, das Kabel des
Sensors auf dem Boden des
Glasbechers entfernen.
- Den Glasbecher “3” (D7/1) fest halten
und die Schraube “2” (D7/1) entfernen.
Den Glasbecher “3” (D7/1) vom Filter
“4” (D7/1) abziehen.
- EIN PASSENDES WERKZEUG
BENUTZEN, UM DEN FILTER 4
(D7/1) ZU ENTFERNEN.
Die alten Dichtungen “5 - 6” (D7/1)
und den Filter an einer sicheren Stelle
entsorgen.
- Den Glasbecher “3” (D7/1) reinigen.
- Den Dichtring auf dem neuen Filter
nicht schmieren.
Den neuen Filter einbauen.
Kein Werkzeug benutzen, um den
Filter zu installieren. Den Filter von
Hand befestigen.
- Den neuen Dichtring “5” (D7/1) auf die
Befestigungsschraube “2” (D7/1)
stecken.
Den neuen Dichtring “6” (D7/1) in den
Glasbecher einstecken.
- Den Glasbecher auf den Filter ausri-
chten. Die Befestigungsschraube “2”
(D7/1) einstecken.
Den Verstopfungsanzeiger mit einem
Drehmoment von 5 Nm anziehen.
- Den Behälter entfernen und die
Flüssigkeit korrekt entsorgen.
- Installare un tubo adatto sullo scari-
co ”1”(D7/1).
Aprire lo scarico ”1”(D7/1). Lasciare
che il liquido defluisca nel
contenitore. Smontare il tubo.
- Chiudere lo scarico ”1”(D7/1) serrando
solo manualmente.
- Se in dotazione, rimuovere il cavo dal
sensore sul fondo della coppa
di vetro.
- Tenere ferma la coppa di vetro “3”
(D7/1) e togliere la vite “2” (D7/1).
Estrarre la coppa di vetro “3” (D7/1)
dal filtro “4” (D7/1).
- Usare un attrezzo adatto per asporta-
re il filtro “4” (D7/1).
Smaltire le guarnizioni vecchie “5 - 6”
(D7/1) e il filtro in un luogo
sicuro.
- Pulire la coppa di vetro “3” (D7/1).
- Non lubrificare l’anello di tenuta sul
nuovo filtro.
Inserire il filtro nuovo.
Non usare un attrezzo per installare il
filtro. Serrare a mano il filtro.
- Inserire l’anello di tenuta nuovo “5”
(D7/1) sulla vite di fissaggio
“2” (D7/1).
Inserire il nuovo anello di tenuta “6”
(D7/1) nella coppa di vetro.
- Allineare la coppa di vetro al filtro.
Inserire la vite di fissaggio
“2” (D7/1).
Serrare l’indicatore di intasamento
auna coppia di 5 Nm.
- Asportare il contenitore e smaltire il
liquido correttamente.
D7/1
2
5
4
1
3
6
3
34
MRT 1440-1640-1840
IT
EN
DE
 Loading...