11
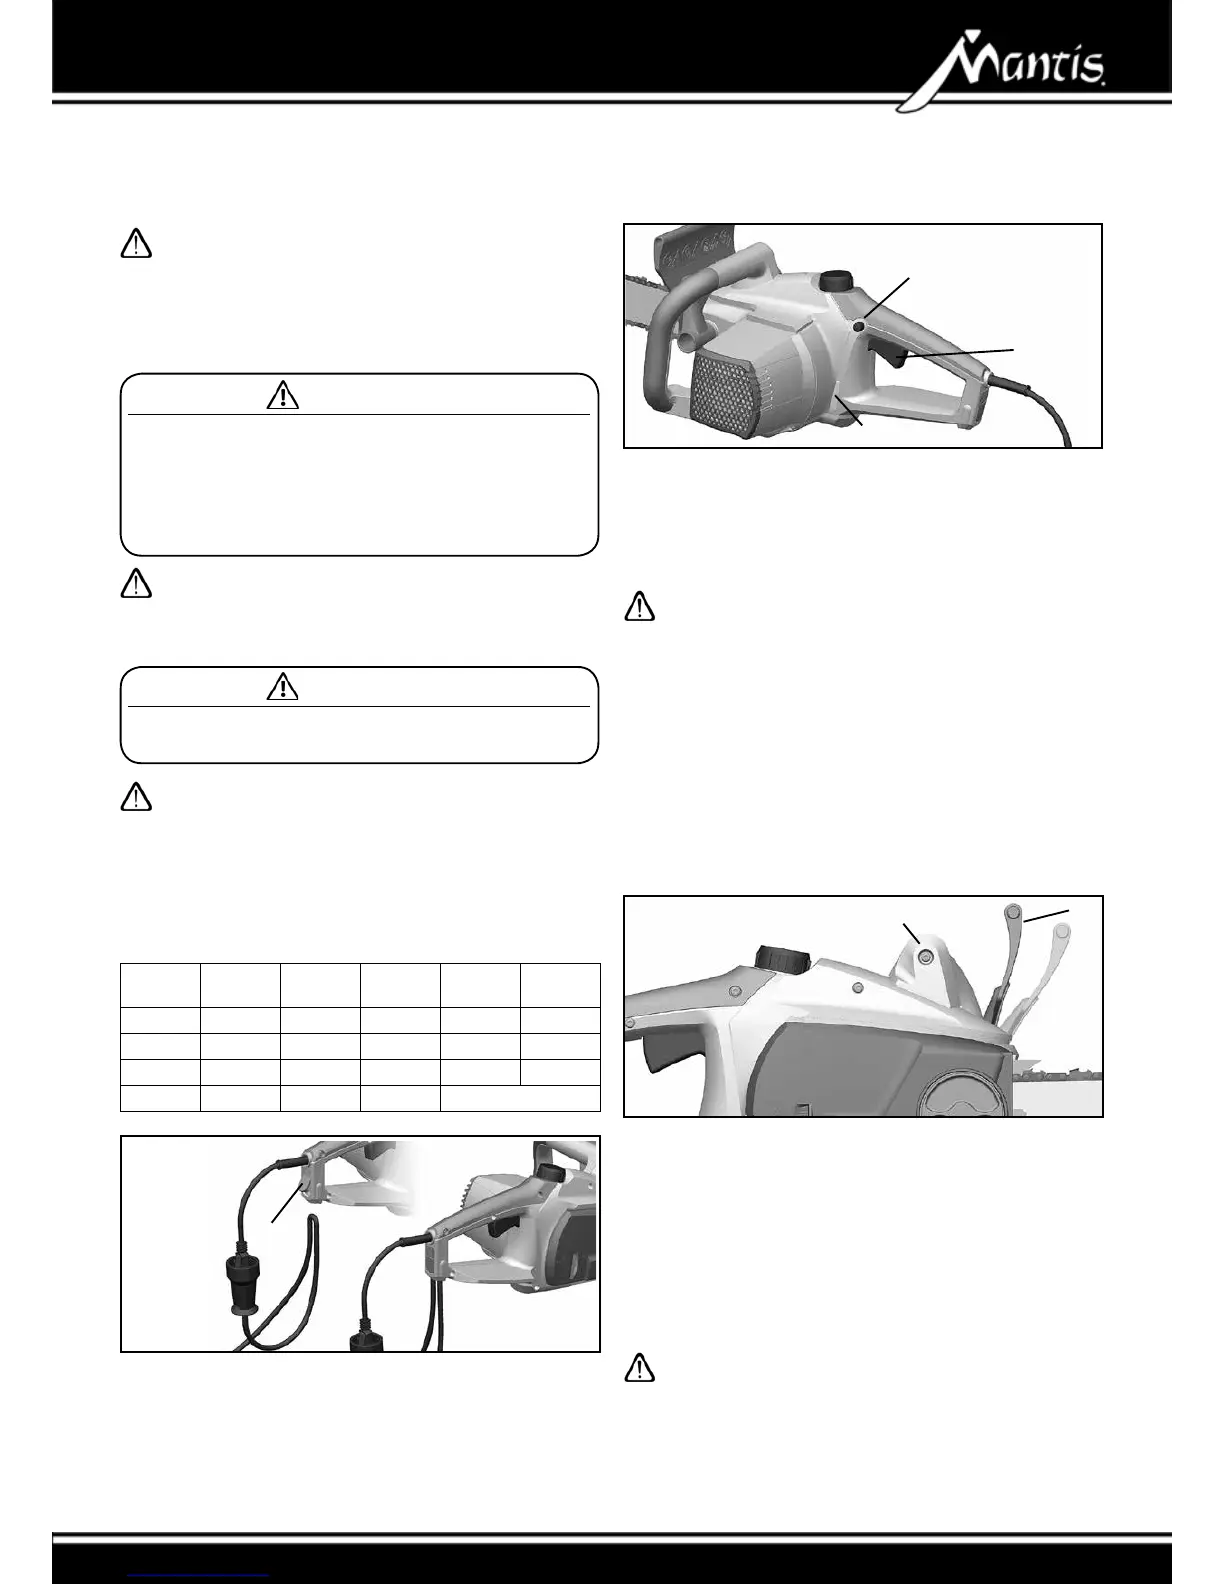
the cable hook button, it will automatically return to starting position B
and the cable will be held in place. Press the cable holder button again
to loosen the cable and pull out the cable.
5.4. Switching On (Fig. 4)
7
16
10
1
• Hold the saw securely with both hands so that the thumbs and ngers
are wrapped around the handle of the chain saw.
• Press with your thumbs the stopping button (16) on the left side of the
rear handle and then the operating switch (10).
• The stopping button (16) is used for unlocking the switch-on mechanism
and does not need to be pressed again after the device is switched on.
• To switch off the device, release switch (10).
Attention: The sawing chain will start running at high speed
immediately. When putting the saw down, make sure that the
chain never touches stones or metal objects.
5.5 Soft Start
The chain saw is equipped with an electronic soft start, in order to avoid
any voltage peaks occurring when it is switched on.
5.6 Thermal Overload Switch
If the chain saw is overloaded, the overload switch will switch the ma-
chine off automatically. After a cool-down period of roughly 15 minutes
the machine will be operational once more. The unit must not be actu-
ated during this period.
6. Safety Devices on Your Chain Brake
6.1. Chain Brake (Fig. 4)
8
3
5
This chainsaw is equipped with a mechanical brake for the chain. In
the case of uncontrolled movements, when the tip of the saw blade
gets in contact with wood or a solid object, the drive of the chain is
immediately stopped by activation of the hand guard (5), the motor will
not be stopped. This brake function is initiated by the back of your hand
on the front handle (3) pushing the (5) hand guard. The proper function
of the saw chain brake shall be checked before each use of the saw.
About every 10 hours of operation, the chain brake should be checked
for its proper function. After the chain brake has been activated, wait for
the motor to come to a halt before you engage the clutch again. Do not
unnecessarily activate the chain brake as this may result in increased
wear and tear.
CAUTION: No buttons should be pressed when the chain
brake is released (hand protection pulled back in the direction
of the handle and locked).
Always ensure before starting the chainsaw that the hand protec-
tion (5) is locked in the operating position. To do this, pull back the
hand protection in the direction of the handle.
The tension in the chain has a major effect on the service life of the cut-
ting ttings, and must therefore be checked regularly. When the chain
warms up to operating temperature it will expand and must be retight-
ened. A new saw chain will have to be tightened more frequently until it
has reached its full length.
CAUTION: During the running-in period, the chain must be
more frequently tightened. The chain must be immediately
retightened if it shakes or leaves the groove !
To tension the chain slightly loosen the T-screw (8). Then turn the knurl-
ing wheel upwards (+ direction of arrow). Tension the chain such that it
can be lifted by about 1/8” in the middle of the bar, as shown.
5.3. Connecting the Chainsaw (Fig. 6)
Do not use this product if any parts on the packing list
are already assembled to your product when you unpack
it. Parts on this list are not assembled to the product by
the manufacturer and require customer installation. Use
of a product that may have been improperly assembled
could result in serious personal injury.
WARNING
The voltage and current supply must comply with the ratings
on the type plate. Before commencing work, always check that
the chainsaw works properly and is safe to operate. Check
also that the chain lubrication and the oil gauge are in good
working order.
In order to prevent electric shock, use an extension
cord that is suitable for outdoor use.
WARNING
The cords must be water-proof. If the connection cable of this
device should be damaged it must be replaced by a workshop
named by the manufacturer only as this work requires the use
of special tools. Mobile devices for outdoor use should be
connected over a ground fault circuit interrupt (GFCI).
MINIMUM GAUGE FOR EXTENSION CORDS (AWG)
(WHEN USING 120 V ONLY)
Amp Rating Total Length of Cord in Feet (meters)
More
than
Not More
than
25‘
(7.6 m)
50‘
(15 m)
100‘
(30.4 m)
150‘
(45.7 m)
0 6 18 16 16 14
6 10 18 16 14 12
10 12 16 16 14 12
12 16 14 12 Not Recommended
6
19
A
B
This chain saw is tted with a strain-relief device to provide extra safety
for the connection. First connect the device plug with the connection line.
Form a narrow loop with the connecting cable, press on the button and
swivel the cable holder (19) out into position A. Now insert the loop of
cable from below into the extension cord cleat. Once you have released