3 4
4. ADJUSTMENT AND SERVICE MODE
1.1. Digital Output (Coaxial) Check
On the preset menu, set "D.OUT" to "ON".(PMD331/PMD340)
Do waveform observation with the oscilloscope, and confirm
the digital output level of JT01 to be 0.5Vp-p, square wave
within ±20% .
1.2. Balanced Output Adjustment (PMD331/PMD340)
1kHz, 0 dB are played back by using TEST disc.
Turn RB01 on the rear panel, and adjust the output of JB53
(Balanced Out L-CH).
Turn RB02 on the rear panel, and adjust the output of JB54
(Balanced Out R-CH).
Adjust each output level to 16 dBu, within ±0.5dB.
1.3. Service Mode
1) With power off, simultaneously press the PLAY/PAUSE,
MODE and TIME buttons, and at the same time, press the
power button. At this time the LCD shows the model name
and firmware version.
2) Next, press CUE button.
3) At this time the LCD shows " Test : Version ". (TEST MODE
select menu)
4) The NEXT and PREVIOUS buttons change the TEST
MODE(refer to the chart below). The PLAY button selects it.
5) Pressing the CUE button returns to the TEST MODE select
menu.
6) Press the STOP button to exit the service mode.
MPU firmware version check
LCD&LED test
Confirmation of Buttons, GPI Control I/O and RC5
Check of EEPROM Read/Write
Manual moving of the pickup
CONTENTS
TEST
MODE
INDEX
*
It is not usually necessary to confirm.
1.3.1. Model name and firmware version check
When the LCD shows "Test : Version", press the PLAY button,
to see the model name and the MPU firmware version.
Pressing the CUE button returns to the TEST MODE select
menu.
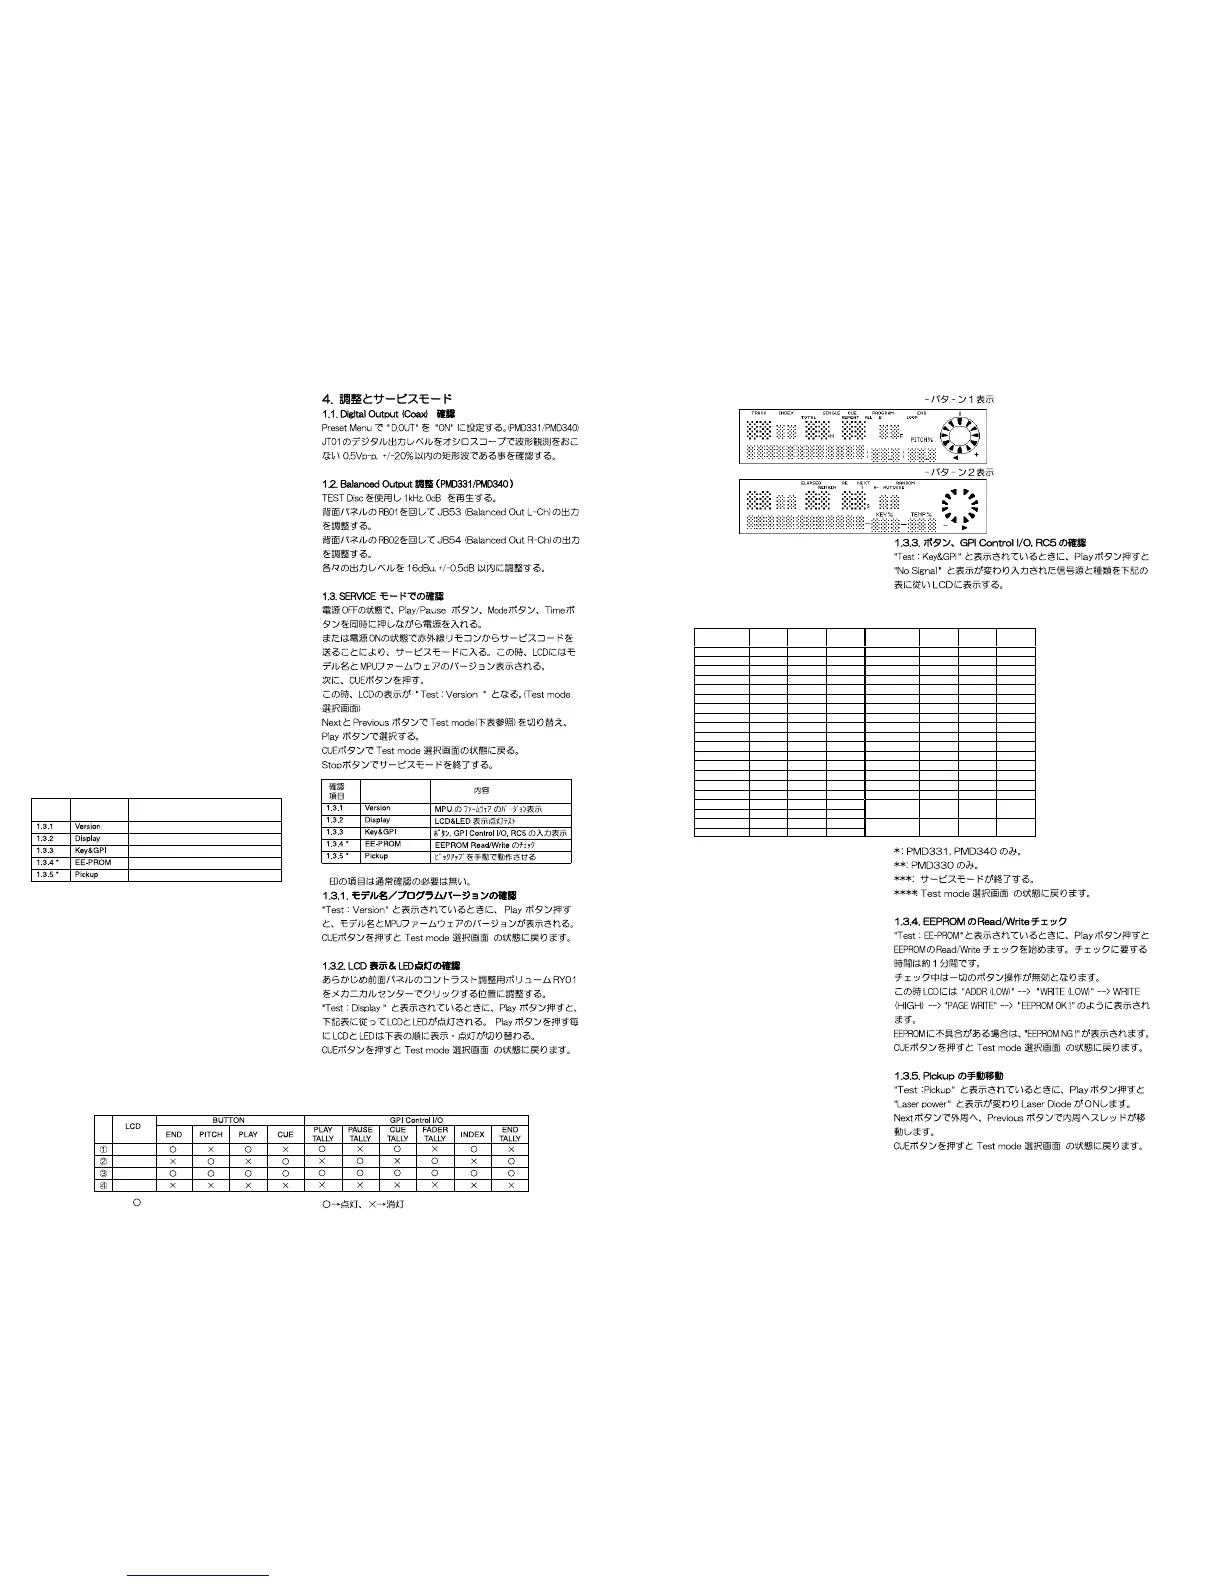
1.3.2. LCD and LED test
1) Set the LCD panel contrast adjustment screw to mechani-
cal center. (you will feel a click.)
2) When the LCD shows "Test : Display", press the PLAY button.
3) The LCD and LED lights as the chart below.
4) Each time the PLAY/PAUSE button is pressed the LCD and
LED change as shown in the chart below.
5) Pressing the CUE button returns to the TEST MODE select
menu.
: Light X : Not Light
PATTERN 1
PATTERN 2
All light up
None light up
FUNCTION
SW
Input
GPI *
Input
RC5
Input
FUNCTION
SW
Input
GPI *
Input
RC5
Input
Open/Close 28 -- 29 Preset 33 -- 34
Time 29 -- 30 Index + 17 8 18
CD-Text 30 -- 31 Index - 18 9 19
Mode 31 -- 32 0 1 -- 2
Stop *** -- -- -- 1 2 -- 3
Cue **** -- -- -- 2 3 -- 4
Play/Pause 11 -- -- 3 4 -- 5
Play -- 1 12 4 5 -- 6
Cue + Play 13 4 -- 5 6 -- 7
Pause -- 2 13 6 7 -- 8
Next 15 10 16 7 8 -- 9
Previous 16 11 17 8 9 -- 10
FF 19 6 20 9 10 -- 11
REW
20 7 21
Pitch Bend +
*
26 -- 27
END 22 -- 23 Pitch Bend - *27 -- 28
A-B Repeat 21 -- 22
Pitch + 24 ** 13 25
Service
-- -- 35
Pitch - 25 ** 14 26
Program 32 -- 33
Fader
(Normal)
--
Fader
Input
--
Pitch On/Off
23 15 24
Fader
(Invert)
--
Fader
Input
--
PATTERN 1
PATTERN 2
1.3.3. Confirmation of Buttons, GPI Control I/O and RC5
1) When the LCD shows "Test : Key&GPI", press the PLAY
button.
2) The LCD shows "No Signal".
3) Press a button, GPI Control I/O and RC5 are input, and the
LCD changes as shown in the chart below.
*
: PMD331, PMD340 only.
**
: PMD330 only.
***
: The service mode is exited.
****
: The TEST MODE select menu is returned.
1.3.4. Check of EEPROM Read/Write
1) When the LCD shows "Test : EE-PROM", press the PLAY
button.
2) Check of EEPROM Read/Write begins. The check takes
about 1 minute. During the check pressing any button has
no effect.
3) At this time the LCD shows as the following order.
"ADDR (LOW)"--->"WRITE (LOW)"--->"WRITE (HIGH)"
--->"PAGE WRITE"--->"EEPROM OK!"
4) If there is an error in the EEPROM, the LCD shows
"EEPROM NG!".
5) Pressing the CUE button returns to the TEST MODE se-
lect menu.
1.3.5. Manual moving of Pick up
1) When the LCD shows "Test : Pickup", press the PLAY button.
2) The LCD shows "Laser power". The laser diode turns on.
3) Press the NEXT button. The sled will move to the outside.
4) Press the PREVIOUS button. The sled will move to the inside.
5) Pressing the CUE button returns to the TEST MODE select
menu.
Test mode
*