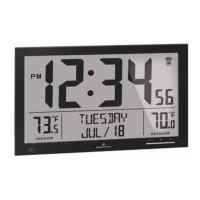
polarity (+ and -). (Note: When the clock is rst
powered by the batteries, all of the segments
of the LCD will display. The clock will then enter
into normal time mode display and beep once.
This is normal.) It is time to change the batteries
when the low battery power indicator appears
on the LCD display above the seconds.
TIME SETTING
TO SET THE CLOCK:
1. Press and hold MODE button on the back of
the clock for approximately 3 seconds until the
hourisashingontheLCDdisplay.
2. Use the
/
buttons to set the desired hour.
3. Press the MODE button again and the minutes
willashonthedisplay.
4. Use the
/
buttons to set the
desired minutes.
5. Press the MODE button again to change the
year, month, date, 12/24 hour format.
6. Press MODE one more time to exit
manual settings.
ALARM SETTING & SNOOZE FUNCTION
TO SET THE DESIRED ALARM TIME:
1. Press MODE button twice to enter alarm
setting. You will see “AL” in the lower right
corner of the display.
2. While in alarm mode, press and hold the
MODE button for approximately 3 seconds
untilthehourisashing.Usethe
/
buttons
to set the desired alarm hour.
3. Press MODEagainandtheminuteswillash.
Use the
/
buttons to set the desired
alarm minutes.