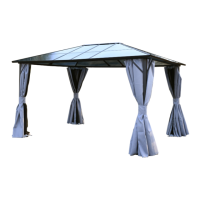
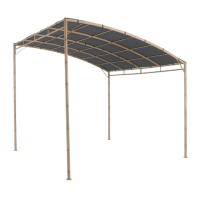
This document outlines the assembly instructions and a comprehensive parts list for a Marquee gazebo, designed to "create your own space."
Function Description:
The Marquee gazebo serves as a temporary outdoor shelter, providing shade and a defined space for various activities. It features a robust frame structure supporting a canopy, designed for relatively straightforward assembly and disassembly. The modular design allows for the construction of a stable and aesthetically pleasing outdoor structure.
Important Technical Specifications (Derived from Parts List):
Frame Components:
- Poles:
- H: 2 pieces
- H1: 4 pieces
- H2: 2 pieces
- These poles likely form the vertical supports of the gazebo.
- Cross Bars:
- D: 4 pieces
- D1: 4 pieces
- These form the horizontal structure of the roof frame.
- Feet (A): 4 pieces. These provide the base support for the vertical poles, ensuring stability on the ground.
- Brackets:
- B: 4 pieces
- B1: 2 pieces
- B2: 2 pieces
- B3: 4 pieces
- These are crucial connectors for joining poles and cross bars, forming the complex roof structure.
- Canopy (M): 1 piece. This is the fabric cover that provides shade and protection.
Fasteners and Connectors:
- U-bolts (C): 12 pieces. Used for securing poles to cross bars.
- Bolts:
- E (50mm): 8 pieces. Used for securing brackets to poles and cross bars.
- F (15mm): 8 pieces. Used for securing feet to poles.
- Nuts (J): 32 pieces. Used with bolts and U-bolts to secure connections.
- Caps (K): 48 pieces. Likely used to cover exposed bolt ends for safety and aesthetics.
- Toggles:
- G (3.0 toggle): 32 pieces. Used for securing the edges of the canopy.
- G1 (3.5 toggle): 8 pieces. Used for securing the corners of the canopy.
- Ground Pegs (L): 8 pieces. Used to anchor the gazebo to the ground for enhanced stability, especially in windy conditions.
- Wrench: 1 piece. Provided for tightening nuts and bolts during assembly.
Usage Features:
Assembly Process:
The assembly is broken down into six main steps, emphasizing a methodical approach:
- Initial Pole and Cross Bar Connection (H & D): Insert U-bolts (C) through pole (H) and cross bars (D). Secure loosely with nuts (J) and caps (K). This step is repeated for the other pole (H) and cross bar (D). The instruction highlights "Attention! Hole downwards" for correct orientation of pole (H).
- Initial Pole and Cross Bar Connection (H2 & D1): Similar to step 1, but using pole (H2) and cross bars (D1). U-bolts (C) are inserted, and connections are loosely secured with nuts (J) and caps (K). "Attention! ball downwards" is noted for pole (H2).
- Roof Frame Assembly: Spread out the components from steps 1 and 2. Locate cross bars (D & D1) and join them until a "click" is heard, indicating a secure connection. This step forms the basic skeletal structure of the roof.
- Bracket Installation:
- Part 4.1: Locate brackets B1 & B3 and secure them to pole (H) and cross bars (D) using bolts (E) and nuts (J). Secure loosely until all bolts are in position. Repeat for the other pole (H).
- Part 4.2: Locate brackets B & B2 and secure them to pole (H2) and cross bars (D1) using bolts (E) and nuts (J). Secure loosely until all bolts are in position. Repeat for the other pole (H2). This step adds critical structural integrity to the roof.
- Canopy Attachment: Locate the canopy (M) and secure its corners to the roof frame using toggles (G1). The remaining edges of the canopy are then secured using toggles (G). This provides the protective covering.
- Final Assembly and Grounding:
- Connect the feet (A) to all H1 poles and secure using bolts (F) and caps (K).
- With the help of a second person, carefully insert each pole (H1) into the assembled poles (H & H2) until a "click" is heard.
- Ensure all nuts are now securely tightened using the provided spanner.
- Once the gazebo is in the desired location, secure it by inserting the ground pegs (L) into the 4 feet (A).
Ease of Use:
- Two-person assembly recommended: Step 6 explicitly states, "With the help of a second person," indicating that some stages of assembly are easier or safer with assistance.
- Click-in connections: The instruction "until you hear a click" for cross bar connections suggests a user-friendly, positive locking mechanism.
- Loose fastening then tightening: The repeated instruction to "Secure loosely until all bolts are in position" before final tightening allows for adjustment and alignment during assembly, preventing misalignment issues.
- Provided tool: A wrench is included, meaning no additional specialized tools are required for assembly.
Maintenance Features:
While the manual does not explicitly detail maintenance, the design implies certain aspects:
- Disassembly for storage: The modular nature of the frame suggests it can be disassembled for compact storage during off-season or when not in use, prolonging its lifespan.
- Replaceable parts: The detailed parts list implies that individual components could potentially be replaced if damaged, rather than requiring the purchase of an entirely new unit.
- Canopy care: Although not specified, canopies typically require cleaning and proper drying before storage to prevent mold and mildew. The toggles allow for easy removal of the canopy for cleaning.
- Frame inspection: Regular inspection of bolts and connections for tightness, especially after strong winds, would be good practice to ensure continued stability and safety. The ground pegs are a key maintenance feature for securing the structure against environmental factors.