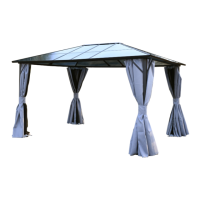
The Marquee Havana Gazebo is a non-permanent outdoor structure designed to provide shade and a comfortable space for leisure activities. It features a robust construction with a polycarbonate roof, offering protection from the elements.
Function Description:
The primary function of the Havana Gazebo is to create a sheltered outdoor area. It serves as a versatile space for various leisure uses, such as entertaining guests, dining outdoors, or simply relaxing in the shade. The polycarbonate roof is specifically designed to offer protection from sunlight and light rain, making it suitable for fair weather conditions. The inclusion of fabric side panels and mosquito nets further enhances its utility by providing privacy and protection from insects, allowing for a more enjoyable outdoor experience. The gazebo is intended for non-permanent installation and is not designed to withstand adverse weather conditions like strong winds or heavy snow.
Important Technical Specifications:
- Dimensions: The gazebo measures 4 x 3 meters.
- Roof Type: Polycarbonate roof. This material is chosen for its durability, light transmission properties, and resistance to impact, while also offering UV protection.
- Frame Components: The structure is built using a combination of leg posts, beams (long and short, right and left), corner ribs, and mid ribs, all connected with various connectors and secured with bolts and screws.
- Roof Panels: The roof consists of multiple panels, including left upper, left lower, middle upper, middle lower, right upper, and right lower sections, which are assembled to form the complete roof structure.
- Coverings:
- Fabric Side Panels (Z): These panels provide privacy and can be drawn open or closed. Each panel contains 12 hooks, with 5 hooks on the short side and 7 on the long side.
- Mosquito Nets (Y): Designed to keep insects out, these nets can be installed along the perimeter of the gazebo. Each mosquito net contains 14 hooks, with 6 hooks on the short side and 8 on the long side.
- Fasteners: The assembly utilizes various fasteners, including M6 x 16 bolts (U, T), ST4 x 25 screws (V), and ST4 x 12 screws (W).
- Stabilization: The gazebo is secured to the ground using 16 stakes (7). For concrete floors or wood decks, alternative anchoring methods (concrete screws, nuts, washers, or wood screws) may be required.
- Connectors and Caps: The structure incorporates specialized components such as beam connectors (Q), mid rib connectors (J), corner rib caps (R), mid rib caps (S), corner beam covers (L), mid beam covers (M), foot plates (N), lower top plate (O), and upper top plate (P) to ensure structural integrity and a finished appearance.
- Tools Required for Assembly: Two ladders, Philips screwdrivers, gloves, and a spirit level are recommended for assembly. An Allen wrench (8) is also included for tightening specific bolts.
Usage Features:
- Assembly: The assembly process is divided into 15 steps, with an estimated total assembly time of two and a half hours for four people. It is crucial to follow the instructions carefully, ensuring all parts are identified and placed on a flat, non-abrasive staging area before assembly.
- Non-Permanent Structure: The gazebo is explicitly stated as a non-permanent structure, suitable for leisure use in fair weather. It is not designed as a shelter against adverse weather conditions.
- Privacy and Insect Protection: The fabric side panels and mosquito nets offer customizable levels of privacy and protection from insects, enhancing comfort during use.
- Placement: The gazebo must be positioned and fixed on a flat, level surface. It should not be placed in areas exposed to excessive wind.
- Safety Guidelines: Users are advised to wear proper safety gear (work shoes, gloves) during assembly. Children and pets should be kept away from the assembly area. Assembly should not be attempted in windy or wet conditions.
- Anchoring: While stakes are provided for soft ground, users have the option to secure the gazebo to concrete floors or wood decks using appropriate fasteners, which may need to be purchased separately.
- Roof Panel Installation: The polycarbonate roof panels are designed to slide into grooves of the mid and corner ribs. It is important to ensure the "words side" of the panels faces the sun for proper orientation and to avoid ripping the films off the panels during installation. Work gloves are essential for this step.
- Beam Covers: Corner beam covers and mid beam covers are installed to enhance the aesthetic appeal and prevent gaps between beams.
- Post-Assembly Adjustment: After placing the gazebo frame in its desired location, it is recommended to ensure all corners are squared at 90 degrees before tightening all bolts by hand tool, except those on the mid rib connectors.
Maintenance Features:
- Part Replacement: The manual advises keeping or recording the parts list, as it can be useful for reordering parts for service if necessary.
- Careful Handling: Users are instructed to carefully take all parts out of the carton and to avoid destroying boxes until assembly is complete.
- Bolt Tightening: It is recommended to install bolts loosely initially and adjust components before fully tightening all screws by hand. Power tools should be used with caution to avoid overtightening.
- Temperature Conditions: Cool temperature conditions are recommended for easier assembly.
- Snow Accumulation: The gazebo is not designed to withstand snow accumulation, and users should avoid it to prevent damage.
- Prohibited Items: Hot items such as grills, blowtorches, and heaters should not be stored in the gazebo. Cooking or lighting fireworks near the gazebo is also prohibited.
- Structural Integrity: The upper structure, particularly the lower top plate and corner ribs, is heavy and requires at least four persons and two ladders for safe movement and installation to prevent twisting or negligence.
- Leak Prevention: Proper alignment of roof panels and ribs during assembly is crucial to minimize any possibility of leaking.
- Wind Resistance: The gazebo is not designed to withstand strong winds, and users should avoid placing it in areas with excessive wind.