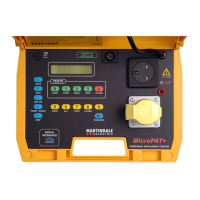
8 17
basis but should only be used for type testing or after major repairs have been
carried out which may have modified the characteristic insulation properties of the
appliance.
NOTE: Due to the high voltages present during this test it should only be carried
out by suitably trained operators.
Press the FLASH key. The display will momentarily show the flash test limit then
go to show a high voltage warning.
If the appliance is a Class II device then plug in the flash probe. Hold the probe tip
firmly against any exposed metal surfaces on the appliance for the duration of the
flash test sequence.
Press and hold the PROCEED key. The orange flash indicator will illuminate and
the flash leakage current will be measured and shown on the display for as long
as the key is held down. Three seconds after the key is released the display will
revert to the ready mode.
If the leakage current exceeds the preset limit the PAT will automatically switch
off the high voltage and the display will indicate a fail condition.
3.4.2 Auto Mode
In this mode of operation a complete test sequence can be automatically carried
out and the results stored in memory.
Press the AUTO key. The display will indicate a VISUAL FAIL condition, press the
ALL key to change to VISUAL PASS if the visual inspection of the appliance
under test shows no indication of mechanical faults. Press the PROCEED key to
accept pass/fail condition.
If the visual inspection has failed then no electrical tests will be carried out and
the prompt to enter the appliance I.D. will be displayed. The appliance I.D. may
be entered via the keyboard or from a bar code via a bar code reader connected
to the serial port. The PROCEED key is pressed to accept the appliance I.D. or
the MAN key may be pressed to return to the ready screen, with no records being
stored. If the appliance I.D. has been accepted, the prompt to enter the user I.D.
is displayed. The user I.D. may be entered via the keyboard and accepted by
pressing the PROCEED key. If the MAN key is pressed, then the user I.D. is not
stored. The prompt to save the test results is displayed. Pressing the PROCEED
key will store the test results and return the PAT to the READY mode. If the MAN
key is pressed, the test results will not be stored.
If the visual inspection has passed, then the prompt to enter the appliance I.D.
Serial interface: Printer/computer output using a 9 pin ‘D’ type
connector
Pin 9: +5V
Pin 5: Earth/ground
Pin 3: Data out (TX)
Pin 2: Busy (RX)
Pin 7: Earth/ground
RS232 +5V DC levels at a communication speed of
1200 BAUD with 8 data bits, no parity and 1 stop bit
Flash: 4mm high voltage safety type
LAMPS
Flash: Neon lamp which illuminates when a flash test is
selected
FUSES
Panel: 16A(FF) 11/4” HBC (Ceramic) - 2 spares supplied
13A Plug: 13A(F) 1” HBC (Ceramic)
Internal: 3.15mA(F) HBC 5 X 20mm (Ceramic)
N.B: Internal fuse is not user replaceable. The front
panel fuse protects the 240V test socket only. The
110V socket is wired direct to the mains input plug
fuse. Exact replacements must always be used.
DISPLAY
LCD: 2 lines X 20 character. Supertwist liquid crystal high
contrast display
EMC Compliance: Meets EN 50081-1, EN 50082-1
LVD Compliance: Meets BS EN 61010-1, Installation Category II,
Pollution Degree 2
2.2 Mechanical Specification
CASE
Size: 330 X 263 X 144mm
Material: ABS
Colour: Yellow
Weight: 4.75kg complete
 Loading...