6
2 Affix the wall pads to the back of the speaker
at the lower contact points (fig. 6).
3 Locate mounting location using a level and the
installation template.
Note:.HORIZONTAL installation requires the
use of TWO wall brackets.
Note:.VERTICAL installation requires the use of
ONE wall bracket.
4 Mark the pilot hole locations.
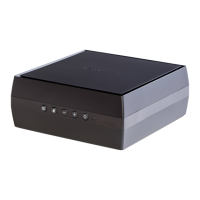
5 Drill the pilot holes using a 1/8-inch drill bit. If
a pilot hole DOES NOT hit a stud, widen that
pilot hole using a 1/4-inch drill bit and install
a wall anchor at that location (fig. 7).
6 Using the 1-inch Phillips screws, mount the wall
bracket(s) as shown (fig. 7).
7 Hang the speaker, guiding the wall mount bolt
into the wall bracket keyhole(s).
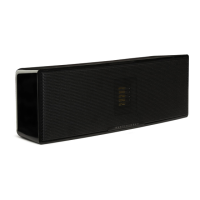
REMOVING THE LOGO BADGE
To remove the logo badge gently pull it away from
the speaker grill (fig. 8).
Fig. 7
Fig. 8
 Loading...