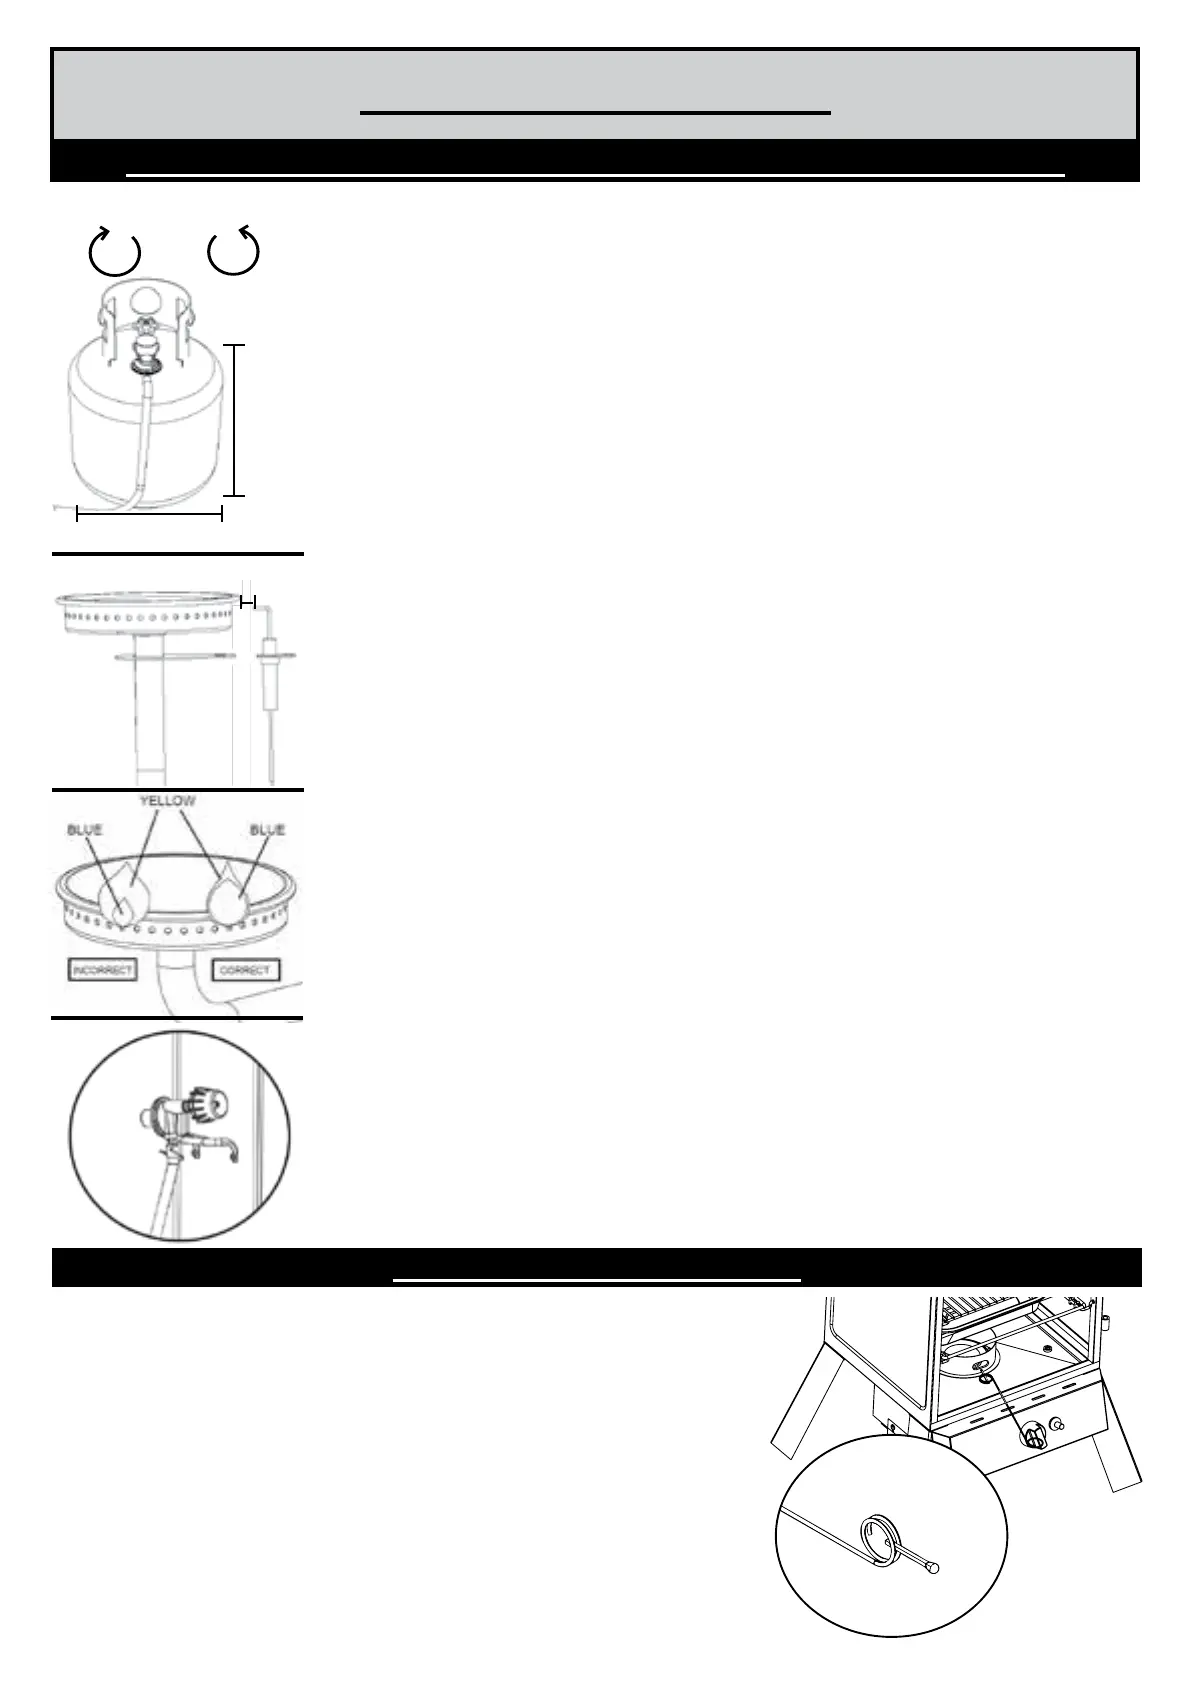
7
CLOCKWISE
COUNTER
CLOCKWISE
17.75”
(45cm)
APPROX.
12.25” (45cm)
APPROX.
Fig. 3
Fig. 1
1/4"
Fig. 2
REGULATOR, BURNER AND GAS VALVE CONNECTION & OPERATION
IGNITION INSTRUCTIONS
Fig.4
MATCH LIGHT INSTRUCTIONS
1. Read all instructions and warnings before lighting.
2. Check burner control knob and gas cylinder valve to be certain it is in OFF position
before connecting to gas cylinder.
3. Perform soapy water test before each use.
4. Open door(s) during lighting and/or remove all accessories and cooking vessels from
in/or on unit.
5. Turn gas cylinder valve on, then turn burner control knob on.
6. Place a long, lit replace match stick close enough to burner to ignite.
7. If ignition does not take place within ve seconds, turn burner control knob to OFF
position and wait ve minutes and repeat match light instructions.
8. After each use, rst turn burner control knob o, then gas cylinder valve o. Always
allow unit to cool completely before touching, moving or storing.
• Inspect hose before each use. If there are signs of abrasion, wear, cuts, or leaks, the hose must be
replaced. DO NOT USE.
• Inspect burner before each use. Check burner and burner venturi tube for insects and insect nests.
A clogged tube can lead to a re beneath unit.
• Check to ensure the orice is centered inside the venturi tube. Failure to properly assemble the
valve orice to the venture tube can result in gas leak or potential re at connection. See assembly
steps for proper assembly method.
• Check to ensure the igniter pin is properly spaced and aligned to the burner. Igniter pin should be
approximately 1/4” from the burner and aligned to the top of a burner port (Fig. 2). Conrm spacing
is correct by pressing the igniter button and ensuring spark occurs between igniter pin and burner.
• Connect hose regulator to LP Gas Cylinder (Fig. 1)
1. Make sure gas cylinder valve is closed. Turn valve clockwise until it stops.
2. Make sure burner control knob on smoker is in the OFF position.
3. Remove protective cap from gas cylinder and coupling nut if applicable.
4. Center and insert regulator nipple into valve outlet on gas cylinder as shown in gure on the
left. Turn regulator coupling nut clockwise until it stops. DO NOT OVER TIGHTEN.
• Perform Soapy Water Test.
• Before starting lighting procedure make sure the smoker door(s) are open.
• When lighting burner remove all parts inside or on unit to prevent explosion from gas build up.
• To use, turn gas cylinder valve ON, push burner control knob in and turn counter-clockwise 1/4
turn to HIGH setting. Push ignitor button to light.
• If ignition does not take place within ve seconds, turn burner control knob to OFF position and
wait ve minutes and repeat lighting procedures. If ignition still does not occur, see match light
instructions.
• Always ensure that smoker door(s) are open before igniting. Gas can accumulate in smoker.
• If ame goes out during cooking, turn burner control knob OFF, turn gas cylinder valve OFF, wait
5 minutes, then open door(s) and wait 5 additional minutes before repeating ignition instructions
above.
• Burner control knob adjusts burner ame. Turn knob counterclockwise to decrease ame. Turn
knob clockwise SLOWLY to increase ame. Push burner control knob in and turn clockwise to shut
ame o.
• Visually check burner ame (Fig. 3). A CORRECT FLAME should be blue with a small amount of
yellow at the tip. An INCORRECT FLAME is excessively yellow and irregular. If an incorrect ame
occurs, turn burner control knob to OFF position, turn OFF gas cylinder valve. If an incorrect ame
still occurs allow unit to cool and then clean burner. Let burner completely dry before re-lighting.
• After use turn burner control knob OFF, then turn gas cylinder valve OFF and disconnect tank.
• Type 1 Regulators will have a hook (Fig. 4). The Regulator Hook is used to keep the regulator o
the ground when removed from the LP cylinder. Attach to unit as shown in image.