Knowyourdetailsander
9 10
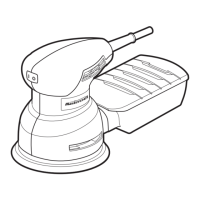
0.5A DETAIL SANDER - 054-7232-80.5A DETAIL SANDER - 054-7232-8
No. Description No. Description
1 Dust sealed On/Off switch 3 Dust collection bag
2 Detail sanding attachment
WARNING!
Do not allow familiarity with the Detail Sander to cause a lack of alertness. A fraction of a
second of carelessness is enough to cause severe injury.
DESCRIPTION
OPERATING INSTRUCTIONS
Installing sandpaper
This detail sander uses hook-and-loop backed sandpaper, which grips the pad firmly when it is applied with
moderate pressure. To change the sandpaper, simply peel off the old sandpaper, remove the dust from the
pad if necessary, and press the new sandpaper into position. Be sure to align the holes in the sanding disc
with the holes in the backing pad to allow the dust extraction system to function properly.
Installing the detail sanding
attachment
(g 1)
The detail sanding attachment is used for fine detail
sanding.
•
Remove the sandpaper from the base.
•
Fit the detail sanding attachment onto the
sanding base.
•
Tighten the screw with the hex wrench
(included).
Turning the sander on and off
(g 2)
Insert the plug from the sander’s power cord into a
standard household outlet. Start the sander by
pushing the “On/Off” switch to the “I” position. Turn
the sander off by pushing the “On/Off” switch to the
“O” position.
Dust collection
This detail sander is equipped with a dust-collection bag to help keep the working surface clean. The dust
collection bag must be installed in the collection port that is located at the rear of the sander. For best
results, the dust collection bag should be emptied frequently, following these steps:
Remove the dust collection bag from the collection opening, empty it, and then place it back in position in
the collection port.
fig 1
fig 2
1
3
2