9
CAUTION:
CAUTION:
CAUTION:
CAUTION:
1.
Installing
Installing
Installing
Installing or
or
or
or removing
removing
removing
removing bit
bit
bit
bit
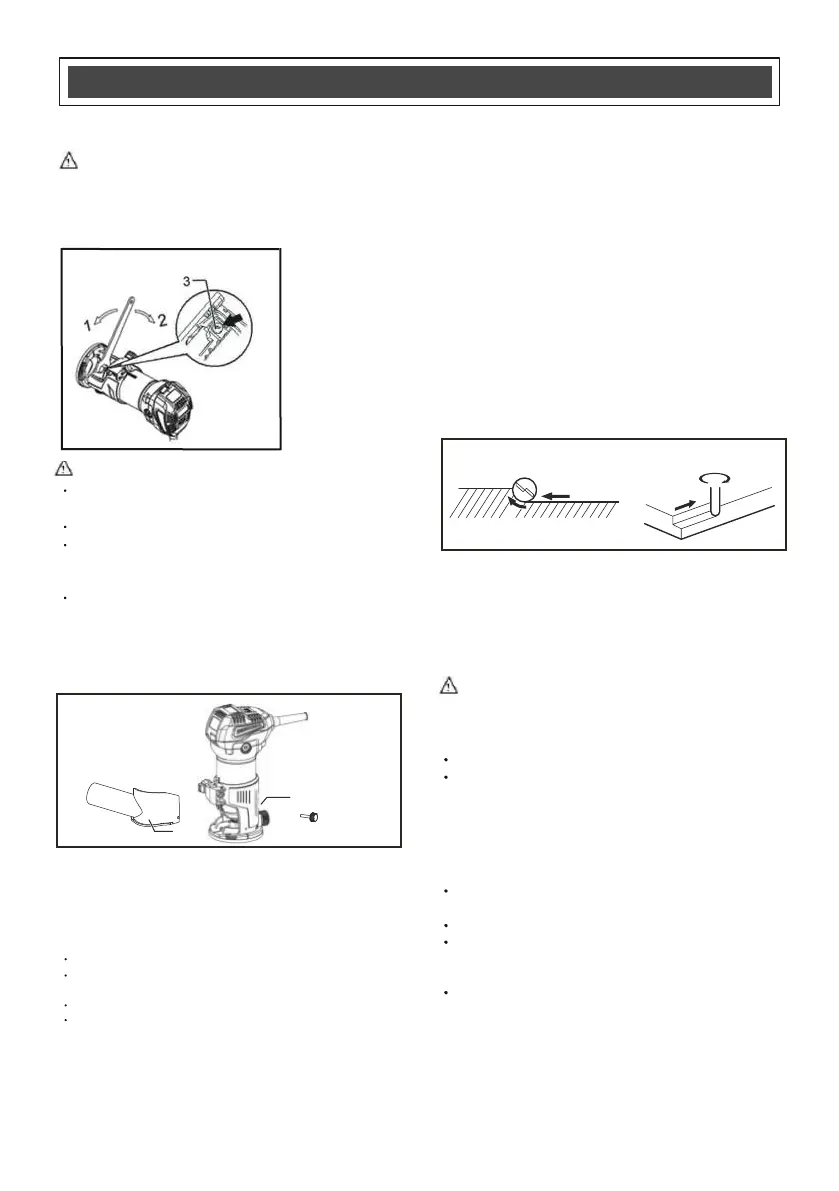
1.
Tighten
2. Loosen
3. Shaft lock
CAUTION:
CAUTION:
CAUTION:
CAUTION:
Do not tighten the collet nut without inserting a bit,
or the collet cone will break.
Use only the wrench provided with the tool.
Insert the bit all the way into the collet cone and
tighten the collet nut securely by pressing the
shaft lock and using the provided wrench.
To remove the bit, follow the installation procedure
in reverse.
ASSEMBLYASSEMBLY
ASSEMBLYASSEMBLY
ASSEMBLY
Dust Hood Installation
1. Dust hood
2. Thumb screw
3. Router base
Locate dust hood
As shown in above diagram, place hood to the bottom
right until the holes line up
Insert and tighten thumb screw
Check to ensure attachment is secure, then attach a 1 ¼”
vacuum hose (not included)
When doing edge cutting, the workpiece surface
should be on the left side of the bit in the feed direction.
1. Workpiece
2. Bit revolving direction
3. Feed direction
CAUTION:
CAUTION:
CAUTION:
CAUTION:
This section explains how to help keep your router
from over heating. Over heating can cause possible
motor damage.
The depth of cut should not exceed 1/8” per pass
If a deeper cut is required, increase the cut depth on
the router, but only 1/8” each time, repeat procedure
until desired depth is reached
NOTE:
NOTE:
NOTE:
NOTE:
Other things to look for:
Moving the tool too quickly may result in a poor cut,
or damage to the bit
Moving too slowly may burn or mar the cutting material
Keep in mind each cut will be different; depending on
type of wood used, thickness of wood; whether it is a
soft or hard wood, etc.
Before getting started, always make a practice cut on
wood scraps
ASSEMBLY
ASSEMBLY
ASSEMBLY
ASSEMBLY AND
AND
AND
AND OPERATING
OPERATING
OPERATING
OPERATING
Dust Hood Installation
Dust Hood Installation
Always be sure that the tool is switched off and
unplugged before making any adjustments.
OPERATION
OPERATION
OPERATION
OPERATION
General Operating Instructions
Run the tool for about 15 seconds, prior to beginning your
project, to ensure that all moving parts are running smoothly,
and there are no loose parts, rattles, or sparking that would
indicate damage. Be sure the bit is firmly and properly installed
before use. Improperly installed bits may eject suddenly at
high speed from the Router, resulting in personal injury.
Set the tool base on the workpiece without the bit making
any contact. Then, turn the tool on and move the tool
slowly forward over the workpiece surface. For best
results, be sure to keep the tool base flush and advance
smoothly until the cutting is complete.
(1) Using the fixed base(1) Using the fixed base(1) Using the fixed base
1
2
3
3
2
1
2
3
 Loading...