9
Bevel Cut
• Loosen the bevel lock handle and move the
cutting head to the desired angle. Tighten the
bevel lock handle.
• Activate the switch, then press the blade guard
lock lever to lower the cutting head down.
Compound Cut
• A compound cut is a combination of mitre cut
and bevel cut. Refer to the above procedures to
perform this cut.
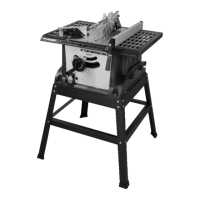
Base Moulding
• Base moulding can be cut vertically against
the fence or at on the table. Use the table below
as a reference.
Settings Vertical position
(Back of moulding is
at against fence)
Horizontal position
(Back of moulding is
at on the table)
Extension fence Close to the blade Far from the blade
Bevel angle 0° 45°
Moulding position Left side Right side Left side Right side
Inside
corner
Mitre
angle
Left at
45°
Right at
45°
0° 0°
Moulding
positioner
Bottom
against
table
Bottom
against
table
Top
against
fence
Bottom
against
fence
Finished
side
Keep left
side of
cut
Keep right
side of
cut
Keep left
side of
cut
Keep left
side of
cut
Outside
corner
Left
Right
Mitre
angle
Right at
45°
Left at
45°
0° 0°
Moulding
position
Bottom
against
table
Bottom
against
table
Bottom
against
fence
Top
against
fence
Finished
side
Keep left
side of
cut
Keep right
side of
cut
Keep
right
side of
cut
Keep
right
side of
cut
Pullover Cut WARNING:
1. Never pull the cutting head assembly and
spinning blade towards you during the cut.
The blade may try to climb up on the top of the
work piece, causing the cutting head assembly
and spinning blade to kick back.
2. Never lower the spinning saw blade down
before pulling the cutting head to the front of
the saw.
• Unlock the carriage (a) with the lock handle (b)
and allow the cutting head assembly to move
freely. (Fig. 5)
• Move the mitre handle and cutting head to the
desired mitre angle and bevel angle according to
the mitre cut and bevel cut procedures.
• Grasp the saw handle and pull the carriage
forward until the centre of the saw blade is over
the front of the work piece.
• Activate the switch, then press the blade guard
lock lever to lower the cutting head down.
• When the saw reaches full speed, push the saw
handle down slowly, cutting through the leading
edge of the work piece.
• Slowly move the saw handle toward the fence,
completing the cut.
• Release the switch and allow the blade to stop
spinning before allowing the cutting head to
raise.
Depth Adjustment Normal Fig. 6
Sawing function 5 mm below the table top
(separate work pieces).
Depth stop (a) housing-adjacent.
Stop screw (b) is used.
Setscrew (c) has no function.
Depth Adjustment Variable Fig. 6
Sawing function above the table top (covered
cuts). Set depth stop a) to the outside.
Set the setscrew (c) to the desired measurement
and secure it with the counternut (d).
Make a test cut.
Stop screw (b) is not used.
Carrying the Tool
• Loosen the mitre lock knob and turn the table
all the way to the right. Lock the table at 45° mitre
angle.
• Push the cutting head backwards and lock the
carriage.
• Lower the cutting head and push in the lock pin.
• Carry this mitre saw with the built-in carry
handle and the side of the base.
Replacing of the Saw Blades, Fig. 7 Warning:
Before replacing saw blades the
switch must be turned o and the mains plug