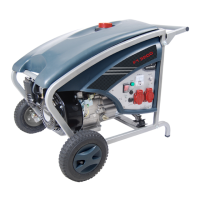
7
1. Filler cap
2. AC outlet
3. AC contact breaker
4. Voltmeter
5. Oil dipstick
6. Switch
7. Drain plug
8. Start-up handle
9. Fuel cock
10. Air lter
11. Choke lever
12. Grounding terminal
13. Muer
14. Ignition plug
15. DC connector
16. Transport wheels
17. Transport handle
3. SPECIFICATIONS
F1 3000:
Engine: CP168FB
Type: 4-cycle OHC, 1 cylinder air-cooled,
Piston capacity (cm³): 196
Ignition system: Transistor ignition without
contact
Start-up system: manual
Fuel tank capacity (L) 15
Fuel consumption (kg/h): 1.13
Engine oil capacity (L): 0.6
Measured sound pressure level (dB(A)): 74.5
Measured sound power level (dB(A)): 94.5
Ensured sound power level (dB(A)): 96
Nominal frequency (Hz): 50
Rated voltage (V): 230
Nominal output (kW): 2.5
Length (mm): 595
Width: 455
Height: 530
Dry weight (kg): 43
DC voltage (V): 12
Direct current (A): 8.3
Max. altitude of site: 1000m/40°C
4. CHECK BEFORE OPERATION
4.1 Engine Oil Level
NOTE: Always check the engine oil level when
the engine is standing on a at surface and is
not running.
4.1.1 Remove the oil ller cap and use a clean
cloth to clean the oil dipstick.
4.1.2 Insert the dipstick into the oil ller neck
without turning.
4.1.3 When the oil level is below the lower limit
on the oil dipstick, use the recommended oil to
rell up to the upper limit.
4.1.4 Replace the oil ller cap.
4.2 FUEL LEVEL
4.2.1 Remove the fuel tank cap.
4.2.2 Fill the fuel tank up to the lter collar.
4.2.3 Recheck the fuel level and rell, if
necessary.
4.2.4 Fasten the fuel tank cap until it is secured.
4.3 AIR FILTE
4.3.1 Detach the clip, and remove the air lter
housing.
4.3.2 Check the lter to make sure that it is clean
and in good condition. When it is damaged, use
a new one as a replacement. (B3)
4.3.3 When the lter element is dirty, clean it by
going through the following steps. (B4)
a) Wash the lter element using a cleaning
agent.
b) Let the element dry.
c) Soak the element in clean engine oil.
d) Squeeze out excessive oil.