32
7.3. Blade change mode (Fig.5,6,7,8,9)
Caution: Before you are going to make the
unplug the power cord.
(Caution: risk of injuries, wear protective
gloves)
•
• Screw in and tighten the saw blade locking screw
while keeping the shaft locking button pressed
again.
• Set the plunge saw to its original position.
7.4 Cut indicators (Fig.10)
• The cutting line should be aligned with the '0°'
marker arrow when performing a plunge cut at 0°.
• The cutting line should be aligned with the '45°'
marker arrow when performing a plunge cut at
45°.
8. Operations
After having performed all the above procedures
and operations, you may begin cutting.
ATTENTION: Always keep hands away from the
cutting area and do not try to approach it when
the machine is running.
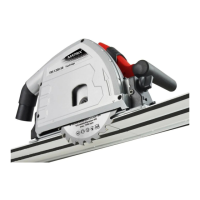
8.2 Operating and holding the plunge-cut saw
(Fig. 12)
• Secure the work piece so that it cannot get
displaced or moved while sawing.
• Only move the saw forwards.
• Grip the saw tightly with both hands ensuring
that one hand is placed on the main handle and
the other on the front handle.
• When using a guide rail, it must be fastened
with screw clamps.
• Make sure the power cable is not placed in the
sawing direction.
8.3 Sawing
• Place the front part of the machine onto the
work piece.
•
(4).
• Push the saw downwards to reach the sawing
depth.
• Push the saw forward evenly.
•
8.4 Guide rail adjustment
• Activate the switch lock (3) and push the handle
(1) forward.
• Push the locking lever (12) forward. Release the
switch lock (3). The motor unit will lock into
place.
• The clamping screw (a) and washer (b) is now
located in the cut-out.
• Push the spindle lock (14) and use the Allen key
(17) to undo the clamping screw (a) with
anti-clockwise.
• Remove the saw blade (11).
• Install the saw blade (11) in the respective
reverse order.
Tighten the adjusting knob (16) to minimize the
clearance between the plunge saw and the rail
(20)
8.5 Connecting the rail (Fig.13)
• The rail (20) is used to make straight cuts.
To connect 2 rails, slide the fastener (22) into the
notch of the guide tracks. Tighten the set screw
(21) with the included allen key (19).
Note: rail (20) feature a chipping guard (black
rubber lip). The chipping guard must be adjusted
before making the first cut. Place the rail (20) on a
work piece. Set to a cutting depth of approx. 10
mm. Switch on the plunge saw and steadily
guide it in the direction of the cut, pushing
slightly.
push
 Loading...