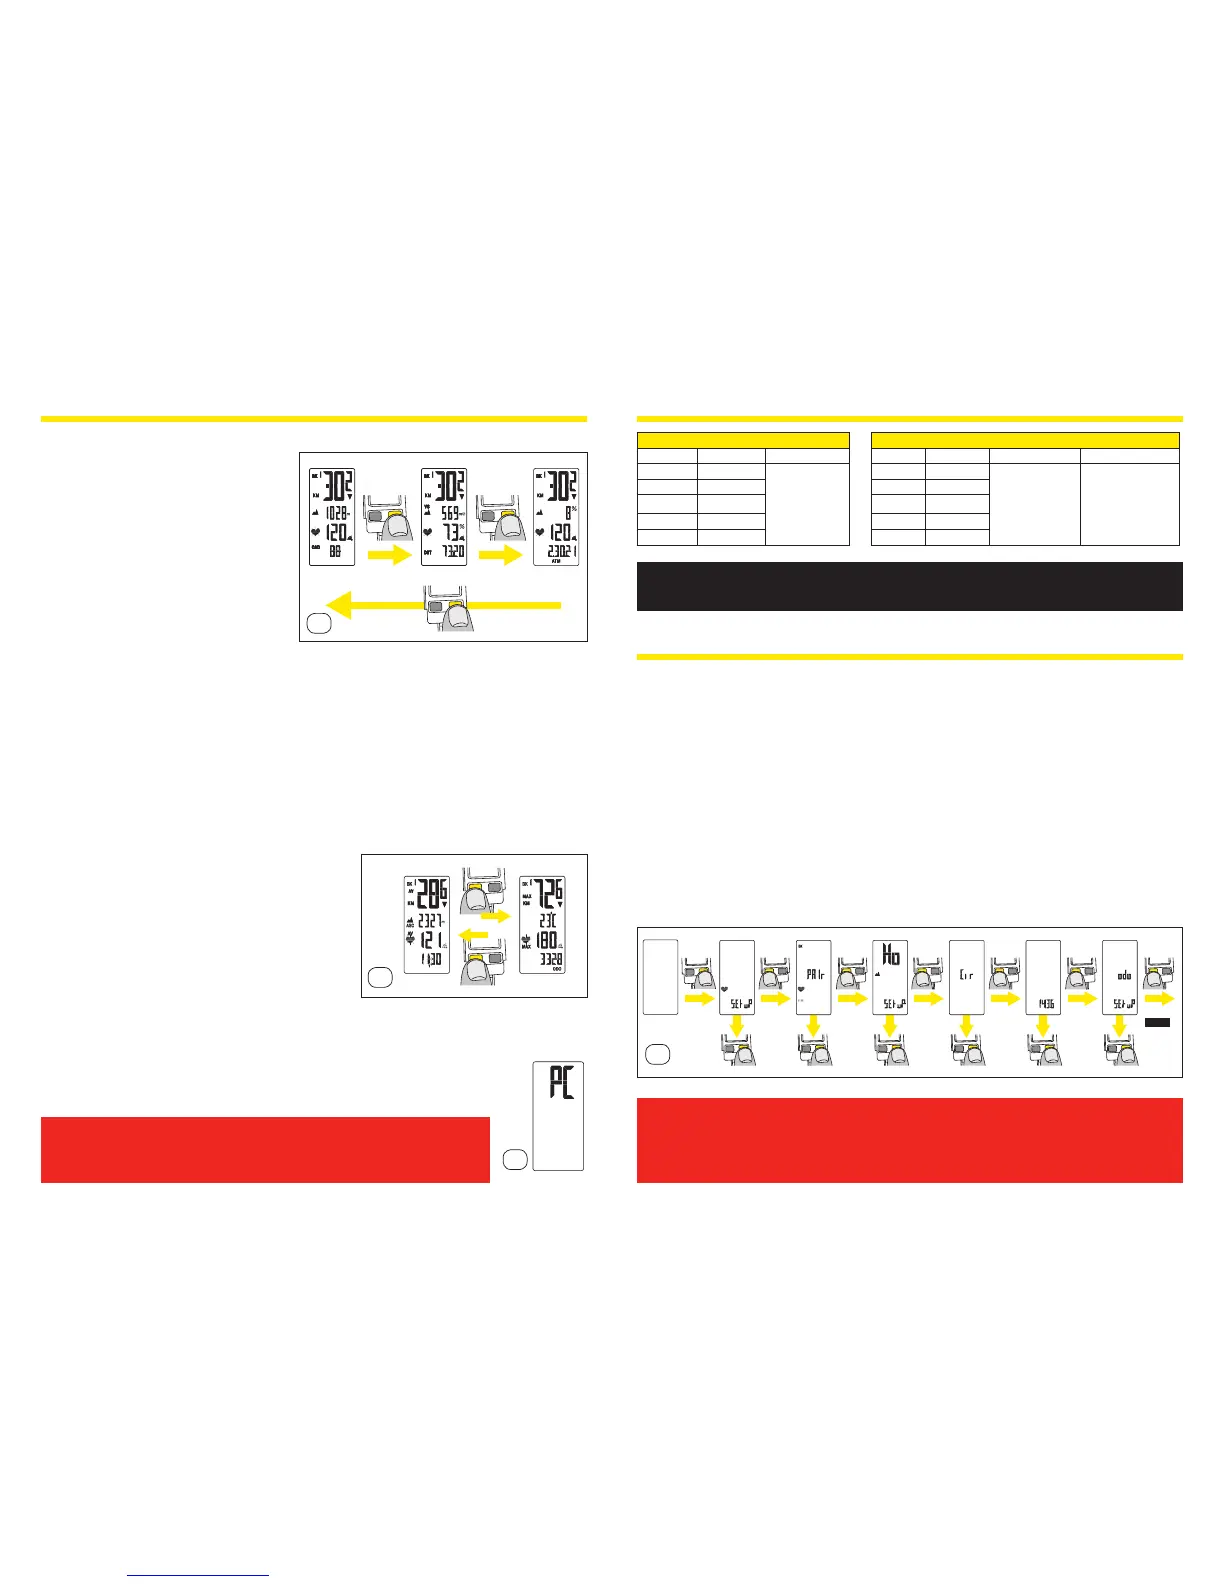
8. FUNCTION DISPLAY DEFAULT SEQUENCE
8.1 Briey press right button (BPR) to scroll down the “while riding” displays
(live information)
Screen 1
– Current speed
– Number of bike used
– Distance unit (KM or Mi)
– Current elevation (Wintech
USB Alti and Wintech USB
Ultimate only)
– Current heart rate (Wintech
USB HR and Wintech USB
Ultimate only)
– Current pedalling cadence
(optional)
Screen 2
– Current speed
– Number of bike used
– Distance unit (KM or Mi)
– Vertical speed (Wintech USB Alti and Wintech USB Ultimate only)
– Heart rate as a percentage of maximum heart rate
(Wintech USB HR and Wintech USB Ultimate only)
– Trip distance
Screen 3 – Current speed
– Number of bike used
– Distance unit (KM or Mi)
– Slope % (Wintech USB Alti and Wintech USB Ultimate only)
– Current heart rate (Wintech USB HR and Wintech USB Ultimate only)
– Stopwatch (ATM)
8.2 Briey press left button (BPL) to scroll down the “after riding” displays
(statistic information)
Screen 4
– Average speed
– Number of bike used
– Distance unit (KM or Mi)
– Cumulated altitude gain (Wintech USB
Alti and Wintech USB Ultimate only)
– Average heart rate (Wintech USB HR
and Wintech USB Ultimate only)
– Clock
Screen 5 – Max speed
– Number of bike used
– Distance unit (KM or Mi)
– Temperature (Wintech USB Alti and Wintech USB Ultimate only)
– Max heart rate (Wintech USB HR and Wintech USB Ultimate only)
– Total cumulated distance (odometer) of the active bike (BK1, BK2 or BKH).
8.3 Active display when the computer is connected with USB to a laptop
or desktop. None of the buttons (BPR and BPL) are active.
You can customize the 5 default screens above by using the
Wintech Manager software included on the CD delivered with your
computer.
9. DEFAULT BUTTON FUNCTION MATRIX
Left Button Right Button
From Short press Long press > 2s From Short press Long press > 2s Long press > 6s
Screen 1 To screen 4
Elevation set up
+ data review
Screen 1 To screen 2
Start/stop CR
(intermediate
chrono)
Parameters set up
zone
Screen 2 To screen 5 Screen 2 To screen 3
Screen 3 To screen 4 Screen 3 To screen 1
Screen 4 To screen 5 Screen 4 To screen 2
Screen 5 To screen 4 Screen 5 To screen 3
SETTINGS
10. ENTERING THE SET UP MENU
From any screen, press and hold the right button (BPR) for 6 seconds to enter the set up menu.
The set up menu is sequentially organized in sub-menus, in the following order:
1. HR alarm and working zone (Wintech USB Alti and Wintech USB Ultimate only)
2. Digital pairing of bike sensor
3. Home elevation, altitude and temperature unit (Wintech USB HR and Wintech
USB Ultimate only)
4. Wheel circumference and distance unit
5. Clock
6. Odometers
To move from one sub-menu to the next one, briey press the left button (BPL).
After the odo sub-menu, pressing again briey the left button, exit the set up menu and return to
the previous active screen.
When on one of the sub-menu, briey press the right button to enter this sub-menu.
In set up mode, when there is no operation for 2min, the computer automatically exits the set up
menu and return to the previous active screen.
Those set up operations have to be performed each time the battery is removed or
changed.
Those set up operation can be performed more easily and more rapidly using the
Wintech Manager software delivered with your computer.
Screen 1
Screen 4
Screen 6
Screen 5
Screen 2 Screen 3
8.1
8.2
8.3
6 sec.
any
screen
1 click
1 click
enter
1 click
enter
1 click
enter
1 click
enter
1 click
enter
1 click
enter
1 click 1 click 1 click 1 click
1 click
EXIT
10
 Loading...