SETUP
If you turn on the UC S10 for the first time, you will be guided thru a very short setup menu.
Therefor it is necessary to have a Display with best 1080p resolution and connect the HDMI cable, which
is shipped with the UC S10, between the two units.
Please make sure you purchase a pair of AAA batteries, so you can insert them into the IR Remote
Control of the UC S10.
Next step is to choose if the UC S10 will be connected via LAN cable or WIFI to the Network/Internet. In
both cases, please make sure, you have access to all needed information and passwords, etc.
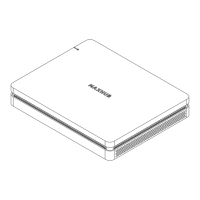
#1 While installing the UC S10 via LAN Cable, the RJ45-LAN connector on the rear side of
the unit, needs to be connected to the Router to get internet access.
If the UC S10 shall be connected
thru WIFI, then this connection
is not needed.
#2 Plug the connector of the
PSU into the respective
connector on the UC S10,
plug the HDMI cable into
the Display and turn the
power of both units on.
#3 Put two AAA batteries into the IR Remote Control, so you can use it to go thru the
setup menu. In the Manual of the UC S10 you will find a short description, which
buttons to use for going thru the short setup.
#4 Please enter all your data as needed and after this setup process, the UC S10
will be ready to use.
POWER
ON/OFF