EasyManua.ls Logo

MaxLite c-Max CN-REMOTE - User Manual

MaxLite c-Max CN-REMOTE
3 pages
Print Icon
To Next Page IconTo Next Page
Loading...
Page 1 of 3
Basic Control Remote
5-year standard warranty (further details available at www.maxlite.com/warranties) Product may be eligible for a warranty extension to
10 years, for an additional fee. Contact MaxLite for details.
Phone: 1-800-555-5629 Fax: 973-244-7333 Web: www.maxlite.com E-mail: info@maxlite.com Rev: 04/06/21
© 2021 Specications subject to change without notice.
PROJECT NAME:___________________________________________________________________ CAT. #: _________________________________________________________
NOTES:____________________________________________________________________________ FIXTURE SCHEDULE:__________________________________________
___
Features
Easy eld commissioning with c-Max basic control nodes and controls ready xtures
Versatile with many packed features
Ability to set High Trim
Bi-Level dimming with dim-to-off capability
Daylight harvesting as ON/OFF or CAM (continuous adjustment mode)
Manual override dimming mode to adjust desired dimming level
Point and click and visual cues for easy commissioning
4 memory modes to easily store sensor settings
Check www.maxlite.com/cmax/ for c-Max xture compatibility
5 Year Warranty
Ordering Information
MODEL
NUMBER
ORDER CODE
CN-REMOTE 105567
Remote Controller Specications
POWER SUPPLY 2x CR2032 (Included)
COMMUNICATION IR
COMMUNICATION
RANGE
CN-RTPSW up to 20ft*/6m
CN-RTMST / CN-RDMSW
/ CN-RDMSB
up to 35ft/10m
OPERATING TEMPERATURE 32°F TO 104°F / 0°C to 40°C
DIMENSIONS
5.70" X 2.36" X 0.47" /
145mm X 60mm X 12mm
PRELIMINARY
*IR commissioning range may be impacted due to the lighting environment
Question and Answer IconNeed help?

Do you have a question about the MaxLite c-Max CN-REMOTE and is the answer not in the manual?

Summary

Basic Control Remote

Ordering Information

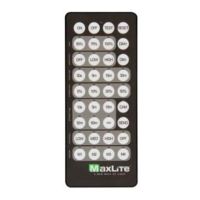
Lists the model number and order code for the remote control.

Remote Controller Specifications

Details power supply, communication range, operating temperature, and dimensions.

Product Dimensions

Provides front and side measurements of the remote.

Battery Replacement Instructions

Step-by-step guide for opening the battery tray and installing batteries.

Common User Errors

Highlights common mistakes made during battery replacement.

Remote Settings

Defines and configures settings like High Mode, Sensitivity, and Hold Time.

Memory Mode Commissioning

Guides on saving and recalling specific remote configurations.

Test Mode

Explains how to enter and utilize the remote's test mode.

Manual Dimming Mode

Instructions for manually adjusting the light dimming level.

Continuous Adjustment Mode or CAM

Details on using daylight harvesting for automatic dimming.

Reset Mode

Procedure to reset the remote to its default settings.

Overview

The MaxLite Basic Control Remote is a versatile device designed for easy field commissioning of c-Max basic control nodes and controls-ready fixtures. It offers a comprehensive set of features for managing lighting systems, including dimming, daylight harvesting, and motion detection.

Function Description

The remote serves as an infrared (IR) controller for MaxLite's c-Max lighting control systems. It allows users to:

  • Set High Trim: Define the maximum light output for a fixture.
  • Bi-Level Dimming: Implement dim-to-off capability, reducing light output to a specified level before turning off.
  • Daylight Harvesting: Operate in either ON/OFF or Continuous Adjustment Mode (CAM) to automatically adjust light levels based on ambient light.
  • Manual Override Dimming: Manually adjust the desired dimming level.
  • Motion Detection Settings: Configure sensitivity, hold time, standby dim level, and standby time for motion-activated lighting.
  • Photocell Control: Enable ON/OFF control based on photosensor settings, suitable for outdoor applications.
  • Memory Modes: Store up to four sets of sensor settings (M1, M2, M3, M4) for quick recall and commissioning.
  • Test Mode: Temporarily activate a test mode for five minutes to verify settings.
  • Reset Mode: Revert the sensor to its original default settings.

The remote's "point and click" interface with visual cues simplifies the commissioning process. It is compatible with c-Max fixtures, and users can check the MaxLite website for specific compatibility information.

Important Technical Specifications

  • Power Supply: 2x CR2032 batteries (included).
  • Communication: Infrared (IR).
  • Communication Range:
    • Up to 20ft (6m) for CN-RTPSW sensors.
    • Up to 35ft (10m) for CN-RTMST, CN-RDMSW, and CN-RDMSB sensors.
    • Note: IR commissioning range may be impacted by the lighting environment.
  • Operating Temperature: 32°F to 104°F (0°C to 40°C).
  • Dimensions: 5.70" x 2.36" x 0.47" (145mm x 60mm x 12mm).
  • Warranty: 5-year standard warranty, with an option for a 10-year extension for an additional fee.

Usage Features

The remote offers several user-friendly features for configuring and controlling lighting:

Remote Settings (Default Values):

  • High Mode: Set maximum threshold value to 50%, 75%, or 100% (Default: 100%).
  • Sensitivity: Motion detection sensitivity can be set to OFF (no occupancy), LOW (50%), or HIGH (100%) (Default: HIGH).
  • Hold Time: Time luminaire stays at High Trim after no motion detected: 30 seconds, 5 minutes, 15 minutes, or 30 minutes (Default: 5 minutes).
  • Standby Dim: Light output level after hold time and no motion: 0%, 10%, 30%, or 50% (Default: 50%).
  • Standby Time: Duration luminaire stays at Standby Dim level before turning OFF: 10 seconds, 5 minutes, 15 minutes, 30 minutes, 60 minutes, or infinite (Default: 30 minutes).
  • Photocell: Turns luminaire ON/OFF based on photosensor settings: LOW (1FC), MEDIUM (20FC), or HIGH (50FC) (Default: PC OFF).

Commissioning (Memory Mode):

  1. Select one of the four memory banks (M1, M2, M3, or M4).
  2. Indicator lights on the remote will show current saved settings.
  3. Adjust settings using the buttons in the gray area (HIGH, SENSITIVITY, HOLD TIME, STANDBY DIM, STANDBY TIME, PHOTOCELL).
  4. Point the remote at the desired luminaire and press "SEND".
  5. A successful configuration is indicated by the luminaire flashing. Note: Changes made to sensor settings are automatically saved to the selected memory bank, overriding previous settings. For multiple luminaires, select the configured memory mode and repeat steps 4 and 5.

Light Control:

  • Turn Lights ON: Press "ON" to turn the luminaire on.
  • Turn Lights OFF: Press "OFF" to turn the luminaire off.
  • Manual Dimming Mode: Press "ON" (luminaire blinks), then use "DIM+" or "DIM-" to adjust the dimming level.
  • Continuous Adjustment Mode (CAM) / Daylight Harvesting:
    1. Point the IR remote to the luminaire.
    2. Enter Manual Dimming Mode (press "ON", luminaire blinks, then use "DIM+" or "DIM-" to adjust the desired light level).
    3. Press "CAM". Indicator lights will show current saved settings. Only HIGH, SENSITIVITY, and HOLD TIME can be selected for CAM settings (Sensitivity should be LOW or HIGH). CAM is recommended with CN-RTPSW sensor only.
    4. Review and adjust settings as necessary. Press "SEND".
    5. Luminaire flashing confirms successful configuration. For multiple luminaires, repeat steps 1-5 for each luminaire individually.

Test Mode:

  • Press "TEST" to enter. Luminaire flashes twice. Lasts five minutes, then returns to previous setting.
    • Default Hold Time: 2 Seconds
    • Default Standby Dim: 50%
    • Default Standby Time: 2 Seconds

Reset Mode:

  • Press "RESET" to enter. Luminaire blinks to indicate reset is complete. Sensor defaults to original settings.

Maintenance Features

Battery Replacement:

  1. Flip the remote over.
  2. Push the small tab on the left towards the center of the remote, and simultaneously pull the bigger tab in the center away from the remote. The battery tray will come loose.
  3. Insert two (2) CR2032 batteries into the tray with the positive side facing up.
  4. Once batteries are in place, insert the tray back into the remote.

Common User Errors (Battery Replacement):

  • Ensure the small tab on the battery tray is positioned correctly for proper fit.
  • Verify the positive side of the batteries is facing up; otherwise, the remote will not power on.
  • Do not pull only the center tab when opening the battery tray; both tabs must be engaged as instructed.

MaxLite c-Max CN-REMOTE Specifications

General IconGeneral
BrandMaxLite
Modelc-Max CN-REMOTE
CategoryRemote Control
LanguageEnglish