866.4.Maxtec www.maxtec.com 11
1. Connect the oxygen supply line (Pressure differential alarm may sound).
Verify the sensor is plugged into the O
2
sensor port and connected to the
sensor cable. DO NOT connect air supply line at this time.
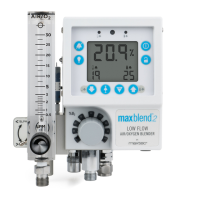
2. Using the ON/OFF key , make sure the MAXBlend2 is in the power on mode.
3. Rotate the FiO
2
control knob to the 100% stop. Allow a few minutes for the
reading to stabilize.
4. Press the Un-lock key to unlock the keypad. Note the LOW, Smart Alarm,
CAL and HIGH icons will begin to flash indicating the SET OPERATING MODE.
5. Press the CALIBRATION key on the keypad. The word "CAL" will appear
on the display for approximately 5 second and then finish with 100.0%.
6. The unit is now calibrated and in the normal operating mode.
2.8.2 Calibration to Room Air
The MAXBlend2 can quickly be calibrated to room air (20.9%)
To use this function:
1. Connect the air supply line (Pressure differential alarm may sound). Verify
the sensor is plugged into the O
2
sensor port and connected to the sensor
cable. DO NOT connect oxygen supply line at this time.
2. Using the ON/OFF key , make sure the MAXBlend2 is in the power on mode.
3. Rotate the FiO
2
control knob to the 21% stop. Allow a few minutes for the
reading to stabilize.
4. Press the Un-lock key to unlock the keypad. Note the LOW, SMART ALARM,
CAL and HIGH icons will begin to flash indicating the SET OPERATING MODE.
5. Press the CALIBRATION key on the keypad. The word "CAL" will appear on
the display for approximately 5 seconds and then finish with 20.9%.
6. The unit is now calibrated and in the normal operating mode.
3.0 PERFORMANCE CHECK
Prior to placing the MAXBlend2 into clinical use, perform the following tests.
WARNING: If the MAXBlend2 does not function as described on the next
page, contact your Maxtec Distributor or contact a Maxtec Certified Service
Technician at:
Maxtec
2305 South 1070 West
Salt Lake City, UT 84119
(385) 549-8000 or (800) 748-5355
DO NOT use the MAXBlend2 until correct performance has been verified.
CAL
CAL