EasyManua.ls Logo

Meec tools 014137 - User Manual

Meec tools 014137
72 pages
Go to English
Print Icon
To Next Page IconTo Next Page
Loading...
YTTÖOHJEESTA
Tärkeää! Lue käyttöohje huolella ennen
käyttöä! Säilytä se myöhempää käyttöä var-
ten. (Käännös alkuperäisestä käyttöohjeesta)
INSTRUKCJA OBSŁUGI
Ważne! Przed użyciem uważnie przeczytaj
instrukcję obsługi! Zachowaj ją naprzyszłość.
(Tłumaczenie oryginalnej instrukcji)
GEBRUIKSAANWIJZING
Belangrijk! Lees de gebruiksaanwijzing aan-
dachtig door voordat u het apparaat gebruikt.
Bewaar de gebruiksaanwijzing voor toekomstig
gebruik. (Vertaling van de originele instructies)
BRUKSANVISNING
Viktig! Les bruksanvisningen nøye før
bruk. Ta vare på den for fremtidig bruk.
(Oversettelse av original bruksanvisning)
MODE D’VEMPLOI
Important! Lisez attentivement le mode
d’emploi avant la mise en service. Conservez-le.
(Traduction des instructions originales)
OPERATING INSTRUCTIONS
Important! Read the user instructions
carefully before use. Save them for future
reference.
(
Translation of the original in-
structions
)
BEDIENUNGSANLEITUNG
Wichtig! Die Bedienungsanleitung vor der
Verwendung bitte sorgfältig durchlesen! Für
die zukünftige Verwendung aufbewahren.
(Bedienungsanleitung im Original)
BRUKSANVISNING
Viktigt! Läs bruksanvisningen före an-
vändning. Spara den för framtida bruk.
(Original bruksanvisning)
Item no. 014137
OSCILLATING
POLISHING MACHINE
OSCILLERANDE POLERMASKIN
OSCILLERENDE POLERINGSMASKIN
POLERKA ZFUNKCJĄ RUCHU OSCYLACYJNEGO
OSZILLIERENDE POLIERMASCHINE
EPÄKESKOKIILLOTUSKONE
POLISSEUSE OSCILLANTE
OSCILLERENDE POLIJSTMACHINE
18 V
Ø125 mm
Question and Answer IconNeed help?

Do you have a question about the Meec tools 014137 and is the answer not in the manual?

Overview

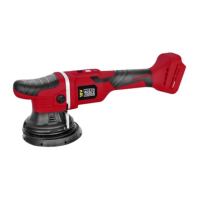
The Meec Tools Oscillating Polishing Machine, item no. 014137, is an 18V battery-powered polishing machine designed for cleaning and polishing tasks. It features an oscillating movement pattern and a highly variable speed, making it suitable for a range of applications. The machine's powerful motor is brushless and includes overload protection, ensuring durability and safe operation. Its comfortable grip surfaces are designed for ergonomic and safe use.

Technical Specifications:

  • Voltage: 18 V DC
  • Speed: 2100–5000 rpm
  • Disc diameter: 125 mm
  • Oscillating: Yes
  • Stroke rate: 15 mm
  • Sound pressure level (LpA): 75 dB(A), K=3 dB
  • Sound power level (LwA): 86 dB(A), K=3 dB
  • Vibration level (Ah): 4.56 m/s², K=1.5 m/s²

Battery Charger Specifications:

  • Input voltage: 230 V ~ 50 Hz
  • Power output: 40 W
  • Output voltage: 14.4–18 VDC
  • Output current: 2.4 A
  • Safety class: II
  • Protection rating: IPXO
  • Battery type: Lithium
  • Cells (number and voltage): 5 x 3.6 VDC

Usage Features:

The polishing machine is part of the Meec Multi-series, which means it shares batteries and chargers with other Meec power tools and garden equipment.

Battery Charging:

Before first use, the battery must be fully charged. After the initial charge, the tool should be used until the battery is completely flat. This charge/discharge cycle should be repeated 4 to 5 times to optimize battery performance. To charge the battery:

  1. Place the battery charger on a flat, stable surface and plug it into a 230 V power outlet.
  2. Connect the battery to the charger until it clicks into place. A red LED on the charger will illuminate if the connection is correct.
  3. Once fully charged (approximately one hour), the red LED will turn off, and only the green LED will remain lit.
  4. Unplug the charger from the power outlet and remove the battery. If the charger LEDs do not light up, ensure the charger's mains adapter is properly plugged into the power point, the charger is switched on, and the battery is correctly inserted.

Connecting/Removing the Battery:

To connect the battery, slide it into the tool's battery socket until it clicks into place. To remove the battery, press the battery lock (1) and pull the battery out (2). Always ensure the power switch is not pressed when inserting or replacing the battery. Connect the battery with moderate force; avoid excessive force to prevent damage to the battery terminals or the tool's battery socket. To check the battery charge level, press the "Press" button on the battery. 1-4 red LEDs will light up, with 1 indicating the lowest charge level.

Starting and Stopping:

To start the machine, set the power switch (1) to position I. The display will show "00". To switch off, set the power switch (1) to position O.

Adjusting the Speed:

The machine offers variable speed settings:

  • Increasing Speed: Press the speed increase button (5) while the product is running. The set speed is shown on the display and changes in the sequence 20, 25, 30, 35, 40, 45, 48 with each press. This corresponds to speeds of 2000, 2500, 3000, 3500, 4000, 4500, and 4800 rpm, respectively.
  • Reducing Speed: Press the speed reduction button (3) while the product is running. The set speed is shown on the display and changes in the sequence 20, 25, 30, 35, 40, 45, 48 with each press. This corresponds to speeds of 2000, 2500, 3000, 3500, 4000, 4500, and 4800 rpm, respectively.

Polishing and Waxing:

  • Ensure the surface to be polished is clean and dry.
  • Avoid polishing in direct sunlight, at low temperatures, or high humidity, as this can lead to streaky results with some products.
  • Do not polish outdoors if it is windy, as sand and other airborne particles can adhere to the paintwork and cause an abrasive effect.
  • Mask edges of plastic and rubber parts if you do not want them to come into contact with the polish.
  • Always switch off the machine before lifting it from the polished surface.
  • Do not apply pressure; let the machine's own weight do the work.
  • Be aware that sharp edges are worked faster, and the paintwork on these surfaces may be thinner.
  • Clean or replace bonnets regularly during polishing. Expect to use 2-4 bonnets per car.
  • Apply five pea-sized drops of polish to the bonnet. Avoid using too much polish, as it can clog the bonnet and reduce effectiveness.
  • Place the bonnet on the surface and start the machine at a low speed.
  • Spread the polish evenly over a small area (approx. 30 x 30 cm).
  • Increase the speed and move the polisher slowly (approx. 4 cm/sec) back and forth over the chosen area a few times.
  • Apply a few more drops of polish to the bonnet if it seems to be running out. Note that new or freshly washed bonnets absorb more polish initially. Always switch off the machine before lifting it from the surface.
  • Use a microfibre cloth to wipe off the polish for a shiny finish. Check the results and continue on a new small area (approx. 30 x 30 cm).
  • After polishing the entire car, protect the paintwork with wax. Apply a thin layer by hand or with a clean, soft polishing wheel. Wait a few minutes, then wipe with a clean microfibre cloth. A tip is to remove residual polish with isopropanol or another deep-cleaning agent suitable for car paintwork before applying wax.

Maintenance Features:

  • General Maintenance: Keep the power tool properly maintained. Check that moving parts are correctly adjusted and move freely, and that no parts are incorrectly fitted or damaged. If the power tool is damaged, it must be repaired before being used again.
  • Cutting Tools: Keep cutting tools sharp and clean. Properly maintained cutting tools with sharp cutting edges are less likely to jam and are easier to control.
  • Handles and Grips: Keep handles and grips clean, dry, and free from oil and grease.
  • Dust Management: Dust produced during work can be harmful, carcinogenic, flammable, or explosive. Use a dust filter mask and suitable equipment for dust extraction/collection. Dust from some alloys can catch fire or explode. Mixtures of materials increase the risk, so keep the work area clean. Always empty the dust container before pausing work to prevent self-ignition from sparks, hot workpieces, or chemicals like polyurethane or solvent-based paint.
  • Cleaning: Clean bonnets and microfibre cloths and store the equipment in a dry, dust-free place.

Error Messages and Troubleshooting:

The manual provides a table of error messages (E1 to E9) with symptoms/possible causes and proposed actions, including switching off, restarting, and contacting the retailer if the issue persists. For example:

  • E1 (Overcurrent protection): High power consumption or defective product. Action: Switch off, restart, or contact retailer.
  • E3 (Product does not start): External cause or defective product. Action: Switch off, restart, or contact retailer.
  • E4 (Overload protection): High load or defective product. Action: Switch off, restart, or contact retailer.
  • E5 (Overheating protection): Product overheats due to continuous high load. Action: Switch off and allow to cool for at least 30 minutes.
  • E6 (Undervoltage protection): Voltage too low (<14 ± 0.5 V). Action: Charge or replace battery.
  • E7 (Hardware fault): Defective hardware. Action: Switch off, restart, or contact retailer.
  • E8 (Motor failure): Defective motor. Action: Switch off, restart, or contact retailer.
  • E9 (Surge protection): Voltage too high (>30 V). Action: Check battery voltage (<21 V) and use specified battery type.

Meec tools 014137 Specifications

General IconGeneral
BrandMeec tools
Model014137
CategorySander
LanguageEnglish

Related product manuals