EN
34
20, 25, 30, 35, 40, 45, 48 each time the
button is pressed. This corresponds to the
speeds 2000, 2500, 3000, 3500, 4000,
4500 and 4800 rpm.
Speed settings
A = Mode, B = Indication on display,
C = Actual speed (0 = No rotation,
7 = max speed)
A B C
0 00 Zero speed
1 20 2000 ± 10%
2 25 2500 ± 10%
3 30 3000 ± 10%
4 35 3500 ± 10%
5 40 4000 ± 10%
6 45 4500 ± 10%
7 48 4800 ± 10%
POLISHING AND WAXING
NOTE:
• Make sure the surface to be polished is
clean and dry.
• Do not polish in direct sunlight.
• Do not polish in low temperatures or
high humidity, this can produce a
mottled result.
• Do not polish outdoors if it is windy;
sand and other particles in the air can
adhere to the paintwork and have an
abrasive eect when polishing.
• Mask edges if necessary to plastic and
rubber parts that you do not want to
come in contact with the polish.
• Always switch o the machine before
lifting it up from the surface being
polished.
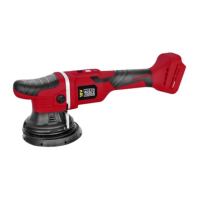
Connect/remove the battery
Connect the battery to the battery socket on
the tool so that it clicks in place.
FIG. 4
To remove the battery, press the lock (1) and
release as shown in the gure (2).
FIG. 5
NOTE:
• Make sure that the power switch on the
tool is not pressed in when inserting or
replacing the battery.
• Connect the battery with moderate
pressure – do not force. An incorrectly
connected battery can damage the
battery terminals or the battery socket
on the tool.
• To check the battery charge level, press
the "Press" button to see 1-4 red LEDs,
where 1 indicates low battery level.
STARTING AND STOPPING
Set the power switch (1) in position I to start.
The display shows 00. Set the power switch (1)
in position O to switch o.
ADJUSTING THE SPEED
Increasing the speed
Push the button to increase the speed (5)
when the product is running. The set speed
is shown on the display and changes in the
order of 20, 25, 30, 35, 40, 45, 48 each time
the button is pressed. This corresponds to the
speeds 2000, 2500, 3000, 3500, 4000, 4500
and 4800 rpm.
Reducing the speed
Push the button to reduce the speed (3) when
the product is running. The set speed is shown
on the display and changes in the order of