EasyManua.ls Logo

MEI Conlux CV1000 - User Manual

MEI Conlux CV1000
2 pages
Print Icon
To Next Page IconTo Next Page
Loading...
CV1000
BILL VALIDATOR
Status LED
A Status LED assists in diagnosing the condition of
the Series CV1000. The following is a description
of the LED codes, their meanings, and suggested
remedial actions.
Signal Meaning Solution
LED ON Indicates the unit is enabled and
ready to accept a bill.
No action necessary.
LED OFF Indicates that no power has
been applied to the unit.
Check to ensure that power is applied.
1 Flash Indicates that something is
obstructing the bill path.
Remove the magazine and LED housing;
inspect for foreign material
2 Flashes Indicates the unit is not enabled. Verify conguration.
Check the coin tube levels in the coin
changer. There must be coins in each tube.
Note: Many machines disable the bill
Validator if the machine door is open and
the door switch is not activated or if the
machine is out of product.
3 Flashes Indicates that the bill path
needs cleaning for optimum
performance.
Remove the magazine and LED housing
and follow cleaning instructions to clean
the bill path.
4 Flashes Indicates that something is
obstructing the cross channel
sensor.
Remove the LED housing and look at the
bill path on the housing and inside the unit
for foreign material; clean as necessary.
5 Flashes Indicates that the magazine is
removed (the unit will not accept
bills without the magazine
attached).
Reinstall the magazine.
Slow
Flashes
Unit is defective. Replace the unit.
Fast
Flashes
The magazine is full of money. Remove money from the magazine.
Status LED
Conguration
Button
© MEI 2012 P/N 252657005
MEI
Suite 200, 3222 Phoenixville Pike
Malvern, Pa. 19355
Technical Support:
1-800-345-8172
www.meigroup.com
The CONLUX series CV1000 Bill Validator will
accept the Conlux Free vend, Conlux Value
vend, Conlux low cost Free vend coupons, the
Pepsi coupon, and the Aramark $1.00 coupons.
Question and Answer IconNeed help?

Do you have a question about the MEI Conlux CV1000 and is the answer not in the manual?

Summary

Status LED Diagnosis

LED ON Status

Indicates the unit is enabled and ready to accept a bill. No action necessary.

LED OFF Status

Indicates that no power has been applied to the unit. Check to ensure that power is applied.

1 Flash Signal

Indicates something is obstructing the bill path. Remove magazine and LED housing; inspect for foreign material.

2 Flashes Signal

Indicates the unit is not enabled. Verify configuration. Check coin tube levels.

3 Flashes Signal

Indicates the bill path needs cleaning for optimum performance. Remove magazine and LED housing and follow cleaning instructions.

4 Flashes Signal

Indicates something is obstructing the cross channel sensor. Remove LED housing; inspect/clean for foreign material.

5 Flashes Signal

Indicates the magazine is removed. Unit will not accept bills without magazine attached. Reinstall magazine.

Slow Flashes Signal

Unit is defective. Replace the unit.

Fast Flashes Signal

The magazine is full of money. Remove money from the magazine.

Installation and Setup

Mounting the CV1000

Designed for easy mounting onto existing studs. May require brackets or faceplates. Refer to machine manual.

Connecting and Powering Up

Disconnect power, secure unit, connect harnesses, apply power. Check Status LED for steady ON.

Bill Acceptance Test

Insert a bill to check acceptance. Make a vend to ensure credit and proper change.

Configuration Procedures

Coupon Configuration Procedure

Copy coupon from guide, use standard non-color copier. Copies must be $1 bill size.

Filling Out the Coupon

Use #2 pencil. Fill only one block per line. Complete sections 1, 2, and 5 for options.

Entering Programming Mode

Press blue button on back. Red LED flashes rapidly. Depress again to exit.

Verifying Configuration

Insert coupon face up. Accepted: coupon returned, green arrows flash 10 times. Rejected: returned after 10s, flashes indicate error.

Bill Configuration Method

Press blue button. Red LED flashes. Insert bill of desired denomination. Bill returned.

Interpreting Configuration Feedback

Enabled: red LED/green arrows flash 10 times. Disabled: flash 3 times. 7 flashes = not accepted.

Important Note on Status LED

DO NOT leave machine until Status LED returns to steady ON.

Overview

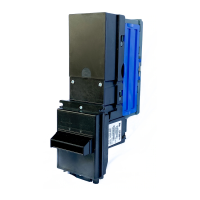
The CONLUX CV1000 is a bill validator designed for use in various machines, primarily for vending and similar applications. It is capable of accepting multiple denominations of currency, as well as specific coupons.

Function Description

The primary function of the CV1000 is to validate and accept banknotes, converting them into credit for a machine. It is preconfigured during manufacture to accept U.S. $1.00 bills but can be manually configured to accept other denominations and specific coupons. The device uses an LED Status light to provide diagnostic information about its operational state and any potential issues.

Important Technical Specifications

  • Accepted Currency: U.S. $1, $5, $10, and $20 bills.
  • Accepted Coupons: Conlux Free vend, Conlux Value vend, Conlux low cost Free vend coupons, Pepsi coupons, and Aramark $1.00 coupons.
  • Mounting: Designed for ease of mounting onto existing studs provided by Original Equipment Manufacturers (OEMs). Some machines may require additional brackets or faceplates.
  • Configuration: Can be configured using an option coupon or by inserting a bill of the desired denomination. Configuration settings are retained in memory even without power.
  • Diagnostic Indicator: Status LED for operational feedback.
  • Technical Support: 1-800-345-8172 (MEI).
  • Manufacturer: MEI (Suite 200, 3222 Phoenixville Pike, Malvern, Pa. 19355).
  • Part Number: P/N 252657005.
  • Copyright: © MEI 2012.

Usage Features

  • Bill Acceptance: The unit is enabled and ready to accept a bill when the LED is ON.
  • Directional Acceptance: Can be configured for 1 or 2-direction face-up acceptance, or 4-way acceptance (allowing bills to be inserted in any direction).
  • Configuration Flexibility:
    • Coupon Configuration: A programming coupon (a copy of a U.S. $1 dollar bill with specific blocks filled in with a #2 pencil) can be used. The coupon must be inserted face up.
      • Section 1: Enables desired bill denominations and sets directional acceptance.
      • Section 2: Enables specific bill denominations (fill one block per denomination). "Off" rejects, "ACCEPT" accepts.
      • Section 3 & 4: Not Applicable.
      • Section 5: Controls Bezel Lights (Flashing or constantly ON).
      • Process: Depress the blue configuration button once to enter programming mode (red LED flashes rapidly). Insert the coupon.
      • Feedback: If accepted, the coupon is returned immediately, and the LED and green arrows flash 10 times. If rejected, the coupon is returned after ten seconds, and the LED/green arrows flash a number of times corresponding to the improperly filled section.
    • Bill Configuration (Alternative):
      • Press the blue configuration button. The red LED status light will flash rapidly.
      • Insert a bill of the desired denomination. The bill will be returned.
      • If the denomination was enabled, the LED and green arrows flash 10 times. If it was already enabled, it will be disabled, and the LED/green arrows flash 3 times. Repeating the process returns to the former setting.
      • 7 flashes indicate programming was not accepted.
  • Diagnostic LED Status (Status LED Chart):
    • LED ON: Unit enabled, ready to accept bill.
    • LED OFF: No power applied.
    • 1 Flash: Obstruction in bill path.
    • 2 Flashes: Unit not enabled.
    • 3 Flashes: Bill path needs cleaning.
    • 4 Flashes: Obstruction in cross channel sensor.
    • 5 Flashes: Magazine removed.
    • Slow Flashes: Unit defective.
    • Fast Flashes: Magazine full of money.
  • Important Notes:
    • Many machines disable the bill validator if the machine door is open, the door switch is not activated, or if the machine is out of product.
    • Always ensure the Status LED returns to steady ON before leaving the machine after configuration.

Maintenance Features

  • Troubleshooting via Status LED: The LED codes provide clear indications for common issues, guiding maintenance actions.
  • Obstruction Removal: For 1 Flash (bill path obstruction) or 4 Flashes (cross channel sensor obstruction), the solution involves removing the magazine and LED housing to inspect for and remove foreign material.
  • Cleaning: For 3 Flashes (bill path needs cleaning), the magazine and LED housing should be removed, and the bill path cleaned according to instructions.
  • Magazine Management: For 5 Flashes (magazine removed), the solution is to reinstall the magazine. For Fast Flashes (magazine full), money needs to be removed from the magazine.
  • Unit Replacement: For Slow Flashes (unit defective), the unit should be replaced.
  • Power Check: For LED OFF (no power), check to ensure power is applied.
  • Configuration Verification: For 2 Flashes (unit not enabled), verify configuration and check coin tube levels in the coin changer, ensuring coins are in each tube.

MEI Conlux CV1000 Specifications

General IconGeneral
BrandMEI
ModelConlux CV1000
CategoryBank Note Validator
LanguageEnglish

Related product manuals