EasyManua.ls Logo

Mesa/Boogie STUDIO .22 PLUS User Manual

Mesa/Boogie STUDIO .22 PLUS
6 pages
To Next Page IconTo Next Page
Page #1 background imageLoading...
Page #1 background image
- 1 -
MESA/BOOGIE
STUDIO .22 PLUS
OWNER OPERATING INSTRUCTIONS
MESA/BOOGIE
The Spirit of Art in Technology
CONGRATULATIONS! You've just become the proud owner of the liveliest sounding, easiest
operating, small caliber amplifier there is... and you're sure to enjoy it! When friends and strangers
come up to compliment you on your tone, you can smile knowingly ... and hopefully you'll tell them a
little about us! Because word-of-mouth is still the best way to spread the news about MESA/Boogie.
GREAT SOUND Many months of patient, painstaking R & D were spent developing the Studio .22
Plus so it would deliver professional quality sound that lives up to the MESA/Boogie reputation. (So
even though our other models have more power and perhaps more features, your Studio .22 was
designed and built as a totally professional, no-compromise instrument.) We figure that once you're
hooked on great amp performance, you'll find yourself playing better and enjoying it more.
GREAT SIMPLICITY One of the Studio Boogie's greatest virtues is its incredible simplicity of
operation. It's nearly impossible to come up with a bad sound or a wrong setting. And here, to help
you get started, is a brief explanation of your new amp's features and controls.
FRONT PANEL FEATURES
INPUT JACK This ¼ inch jack is the instrument input to your Studio amplifier. Patented “Dual Mode”
circuitry makes this single jack work for both Rhythm and Lead… providing very high headroom for
sparkling clean rhythm and super high gain for monstrous lead playing. Be sure to use a good
quality, shielded guitar cord.
FOOTSWITCH JACK
This ¼ inch jack connects to the Lead/Rhythm footswitch via the un-shielded
cable provided. When the red LED on the footswitch box is illuminated, the Studio .22 is in the
RHYTHM mode...red equals
rhythm. Stepping on the button switches the amp into the LEAD mode
and the light goes out.
Should you lose or forget your footswitch, you can activate the Lead mode by plugging a cable into
the footswitch socket and shorting the tip of the other plug against the chassis or one of the metal
handle caps.
VOLUME This control, which could also be called "preamp gain", establishes the amplifier's overall
sensitivity to your guitar's output. It is active in both Rhythm and Lead modes, and must be mixed in
conjunction with the Master (or, when in the Lead mode, both Masters). In the Rhythm mode, the
maximum clean setting is usually around 6 (varies with stronger or weaker pickups) and most players
find their favorite cleanest brightest spot between 3 and 5. But if you want some break-up in the
Rhythm model turn the Volume up high.
In the Lead mode the Volume knob is intentionally less sensitive so that there is no need to 'Ire-set" it
for the two modes. With most guitars, distortion begins around 2 with a real nice sounding blues-type
tone reminiscent of old Fenders turned up loud. Settings above 3 or 4 produce the more modern,
"monstrous" distortion sounds. Gain and distortion increase slowly as the Volume setting is
increased, often producing the tightest, best sounding heavy crunch tone between 7 and 9.
Question and Answer IconNeed help?

Do you have a question about the Mesa/Boogie STUDIO .22 PLUS and is the answer not in the manual?

Mesa/Boogie STUDIO .22 PLUS Specifications

General IconGeneral
Power Output22 Watts
Channels2
ReverbSpring Reverb
Effects LoopYes
ControlsGain, Treble, Middle, Bass, Reverb, Presence
Speaker1 x 12"
Tubes12AX7
EQ3-Band EQ
WeightApproximately 40 lbs

Summary

Front Panel Features

INPUT JACK

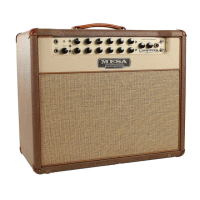
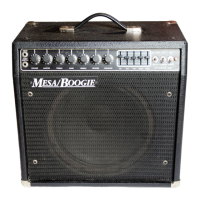
This 1/2 inch jack is the instrument input. It uses "Dual Mode" circuitry for both Rhythm and Lead.

FOOTSWITCH JACK

Connects to the Lead/Rhythm footswitch. The red LED indicates Rhythm mode.

VOLUME

Establishes amplifier's overall sensitivity to guitar output. Active in Rhythm and Lead modes.

MASTER

Regulates power amplifier level and overall loudness. Operates with Lead Master in Lead mode.

LEAD MASTER

Operative only in Lead mode, determining Lead volume with the regular Master.

TREBLE

Most powerful tone control. Affects Bass and Middle response significantly.

BASS, MIDDLE

Tone controls that are interactive with Treble. Designed for fatness and avoiding tubbiness.

REVERB

Features a 3-spring Hammond-Accutronics unit with all-tube send/return electronics.

PRESENCE

Controls extreme high frequencies, determining basic brightness and clarity of overall tone.

GRAPHIC EQUALIZER (Optional)

Expands tonal flexibility with selectable EQ modes (AUTO, OUT, IN).

Rear Panel Features

FUSE

Replace with same amperage, slow-blow type if blown. Check power tube if it blows again.

GROUND

Helps reduce buzzes from AC power wiring. Center OFF position is standard.

DIRECT

Variable strength signal output from the output transformer for direct recording or slaving.

EFFECTS SEND & RETURN

Jacks provide a low-noise patch loop for connecting external effects units.

SPEAKER JACKS

Provides 8-ohm and two 4-ohm speaker outputs for connecting cabinets.

EQ FOOTSWITCH JACK

Jack for connecting an optional EQ Footswitch for remote EQ control.

POWER TUBE MAINTENANCE

EL-84 power tubes require periodic replacement, typically once a year for average players.

PREAMP TUBE MAINTENANCE

Troubleshooting noise issues by replacing suspect 12AX7 preamp tubes.

Related product manuals