23
meteo – SP89 Manual
sensor power first, then follow the steps above to control the weather station.
Note: When the channel icon (the position of the display A15) displays the low voltage icon “ ” , the battery of the
corresponding channel wireless sensor is replaced according to the channel number of the channel icon. Then
follow the steps above to re-add the wireless sensor to the weather station.
In the normal time display interface, press and hold the “ ” button for 3 seconds, the wireless channel in the
OUTDOOR REMOTO column will enter the loop mode, and the channel will be changed every 5 seconds
(OUTDOOR|CH1|CH2|CH3), and the automatic conversion display will be different. Channel temperature | humidity
value
Note: In the cycle mode, only the values of temperature and humidity are being converted, and the values of wind
speed, wind direction, rainfall, etc. are not converted, and the values are still derived from the
Multi-combination wireless sensor.
Weather alerts viewing and setting
Press and release the “ ” button to view the weather alerts mode. Continue to press and release the “ ” button to
confirm and move to the next item.
Note: After 20 seconds without pressing any button or touch the “ ” location button at any time to exit the view
mode.
Note: View Outdoor | REMOTE Temperature | Humidity alert, press and release the “ ” button to switch to other
channels. (A total of 4 channels: outdoor | CH1 | CH2 | CH3)
In each weather alert view item, press and hold the “ ” button to turn the alert on or off.
Note: The weather alert is initially turned off by default, and the display is OFF. When the weather alert is turned on, it
is displayed as ON.
Press and hold the “ ” button for 3 seconds to enter the weather alert setting mode.
Press and release the “ ” or “ ” button to adjust the value. Hold the “ ” or “ ” button to adjust quickly.
Press and release the “ ” button to confirm and move to the next item.
Note: After 20 seconds without pressing any button or touch the “ ” location button at any time to exit the
settings.
Note: Set Outdoor | REMOTE Temperature | Humidity alert, press and release the “ ” button to switch to other
channels. (A total of 4 channels: outdoor | CH1 | CH2 | CH3)
View and Settings order:
1. Outdoor | remote high temperature
2. Outdoor I remote low temperature
3. Outdoor | remote high humidity
4. Outdoor | remote low humidity
5. Indoor | remote high temperature
6. Indoor I remote low temperature
7. Indoor | remote high humidity
8. Indoor | remote low humidity
9. High wind speed
10. High 24-hours rainfall
11. High rainfall rate
Weather alert trigger
When armed alert value is reached, station will beep 5 times each minute, until Out of alert range.
meteo – SP89 Manual
mode.
Rain Readings | History
In the main display interface, press and hold the “ ” button for 3 seconds to convert the display to cumulative value of
rainfall or rate of rainfall
Note: Rainfall: from current to past (1 hour | 24 hours | day | 7 days | month | year | total) total accumulated rainfall
Rainfall rate: average rainfall over the past 12 hours per hour
Press and release the “ ” button to view the rain history
Note: NOW: cumulative value over the past 30 minutes
HOUR: cumulative value over the past 60 minutes
24 HOURS: The cumulative value of the past 24 hours.
DAY: 24 hr period from 0:00 – 23:59(12:00am - 11:59pm). Cumulative value with today
7 DAYS: In the past 7 days, the cumulative value of the last record begins
MONTH: The cumulative value defined by the calendar month (ie January 1st - January 31st).
YEAR: The cumulative value is determined by the calendar year, from January 1 to December 31.
TOTAL: The cumulative value of the total run time (no time stamp) since the weather station was started
In the mode of viewing rain history, press and hold the “ ” button for 3 seconds to clear all history of rain.
Note: The rain reading will reset to 0 mm (in).
Note: After 20 seconds without pressing any button or touch the “ ” location button at any time to exit the view
mode, The weather station will resume normal time display and display the last rainfall record you viewed.
When the rain shows the rain rate before entering the observation mode, it still shows the rain rate when
returning from the observation mode to the normal time display.
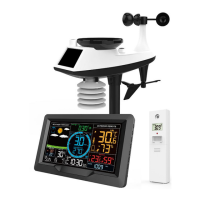
Wireless sensor connection
The weather station can connect up to 1 Multi-combination wireless sensor and 3 different channels of temperature |
humidity wireless sensor,
The weather station automatically searches for all wireless sensors within 3 minutes of power-on and registers the
sensor IDs. Each sensor generates a random ID after power-on to distinguish the sensors.
In the main display interface, press and release the “ ” button to view the value of the wireless sensor on the different
channels.
Note:
In view mode, the ID of the wireless sensor can be displayed.
The temperature/humidity data of the additional channel wireless sensor needs to be displayed on the normal time
display interface. After selecting the channel in the viewing mode, touch the “ ” location button to exit the viewing
mode.
Note: The temperature and humidity values shown in the OUTDOOR REMOTE column after exit are the selected
channels. At the same time, in the channel icon (displaying the position of A15), the number of channels is
displayed: OUTDOOR (representing Multi-combination wireless sensor) | 1 or 2 or 3 (representing 3 channels
of temperature | humidity wireless sensor))
Note: When the weather station loses sensor signals or the sensor is not connected to the channel, the value of the
channel is displayed as “--”
If you need to add a new sensor or replace the sensor. In channel view mode, press and hold the “ ” button for more
than 3 seconds, the weather station will search for the 3 minute signal again, and the new channel sensor will be added
to the weather station within 3 minutes.
Note: When adding a new sensor or replacing a sensor (old sensor replacement battery), you need to turn on the
 Loading...