Do you have a question about the METHVEN AIO and is the answer not in the manual?
Details minimum, maximum, and optimum operating pressures for the shower mixer.
Specifies the maximum hot water and minimum cold water temperatures.
Indicates the type and size of connections for water supplies.
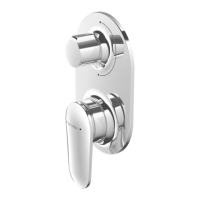
Instructions for screwing the diverter knob onto the spindle and securing it.
Guidance on attaching the handle to the cartridge lever and tightening.
Important notes on installation, including plumber requirements, flushing, and testing.
Instructions for securing the mixer body to supporting timber.
Guidance on flushing pipework and connecting hot/cold supplies.
Specifies dimensions for cutting or finishing the wall lining hole.
Steps for attaching the faceplate, including silicone seal and o-ring.
The Methven AIO Shower Mixer with Diverter is a plumbing fixture designed for controlling water flow and temperature in a shower system, incorporating a diverter function to switch between different water outlets. This installation guide provides comprehensive instructions for setting up and maintaining the device, along with crucial technical specifications and general advice for optimal performance and longevity.
The primary function of the AIO Shower Mixer is to mix hot and cold water to achieve a desired temperature and to control the flow of this mixed water to the shower outlets. The integrated diverter allows the user to switch the water flow between two different outlets, such as a main showerhead and a handheld shower or body jets. The mixer features a cartridge lever for temperature and flow control, and a diverter knob for outlet selection. The installation process involves securing the mixer body within the wall cavity, connecting hot and cold water supplies, and then attaching the faceplate, diverter knob, and handle.
The Methven AIO Shower Mixer with Diverter is designed for reliable performance and ease of use, emphasizing proper installation and maintenance for a long-lasting shower experience.
| Brand | METHVEN |
|---|---|
| Model | AIO |
| Category | Kitchen & Bath Fixtures |
| Language | English |